AZ Fisher
-
Posts
385 -
Joined
-
Last visited
-
Days Won
12
Content Type
Profiles
Articles
TU Classifieds
Glossary
Website Links
Forums
Gallery
Store
Everything posted by AZ Fisher
-
Colors above and I would add transparent leaf green and a plum purple...
-
I use eyescrews anywhere from .062 thru .092 thickness, from 3/4 inch long to 1.5 inch long depending on the size lure. You can find them at Barlows, Lurepartsonline, and Jann's Necraft, all tackle hardware suppliers, or Ebay. I'm making 6-10 inch swimbaits.
-
-
There's many ways of making molds and pouring resin baits, this is just what I do. Most of my baits, especially glides, have wider shoulder/back than belly or stomach area. Those wide shoulders create a high/higher center of gravity. When I have an even density pour, meaning MB's{micro balloons} are mixed evenly thru the resin, the bait will want roll from side to side as it swims/glides. I don't want or like that roll in a bait. Hooks, split rings and hook hangers alone, are usually not enough to counter the higher center of gravity. I pour with the molds vertical, belly/hook hangers down, dorsal fin on top. I pour thru a small spru hole on the top of the mold. I place my weights and hook hangers in the bottom of the mold prior to pouring. I pour with the mold on a digital scale so I can pour exact amounts of solid resin to the gram. I mix my resin amount for the whole bait but only pour about 25% solid resin in the bottom of each sections mold, enveloping the weights. I then quickly mix the correct weighed amount of MB's into the remaining resin and fill the molds with the MB'd/less dense resin. This creates a heavier bottom/higher density and a lighter/less dense top of the bait. I find the upward migrating MB's help this process. Unfortunately it also creates lots of bubbles and small surface imperfections in the top/back of the bait that have to be filled. The heavier bottom/lighter top helps the bait orient itself quicker upon splash down/landing and will help the bait swim and glide more upright/ vertical with less or no roll. It also helps the bait swim and cut from side to side better. Engineered Angler on Youtube has some vids on pouring resin baits with MB's, worth the watch. Hope this helps...
-
Add micro balloons or micro spheres to your resin while mixing. Approx 8% micro balloons by weight for low float, 10% for a very buoyant floating bait, if memory serves
-
Ebay, Amazon and Aliexpress all carry a variety. Ali used to have the largest selection. Look into fingernail foils also, come in smaller rolls and widths, will cover the sides of smaller cranks, jerks and poppers
-
If you're looking for really bright florescent coverage, a white undercoat or primer will help greatly, especially with chartreuse. Light coats and heat set in between as mentioned above. I reduce the paints quite a bit for spraying over foil, so I don't kill the shine. Little at a time and heat set. It's easy with reduced paints or transparents to spray it too heavy because you can't see the pigment as well.
-
Here's one way. I think JR Hopkins had a similar method but used scotch tape to hold the tail's shape, then epoxy into place.
-
799280BF-B3F3-4E53-AC09-12EF9E09C8EB.jpeg
AZ Fisher commented on Flaswimbaiter's gallery image in Hard Baits
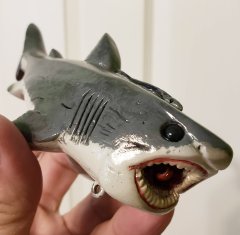 Bad azz man!! You have awesome creativity and great carving skills, love the parasite sucker on top, nice detail...I'm waiting for an Octopus haha!
 -
Private group, gotta join, best I can do...
-
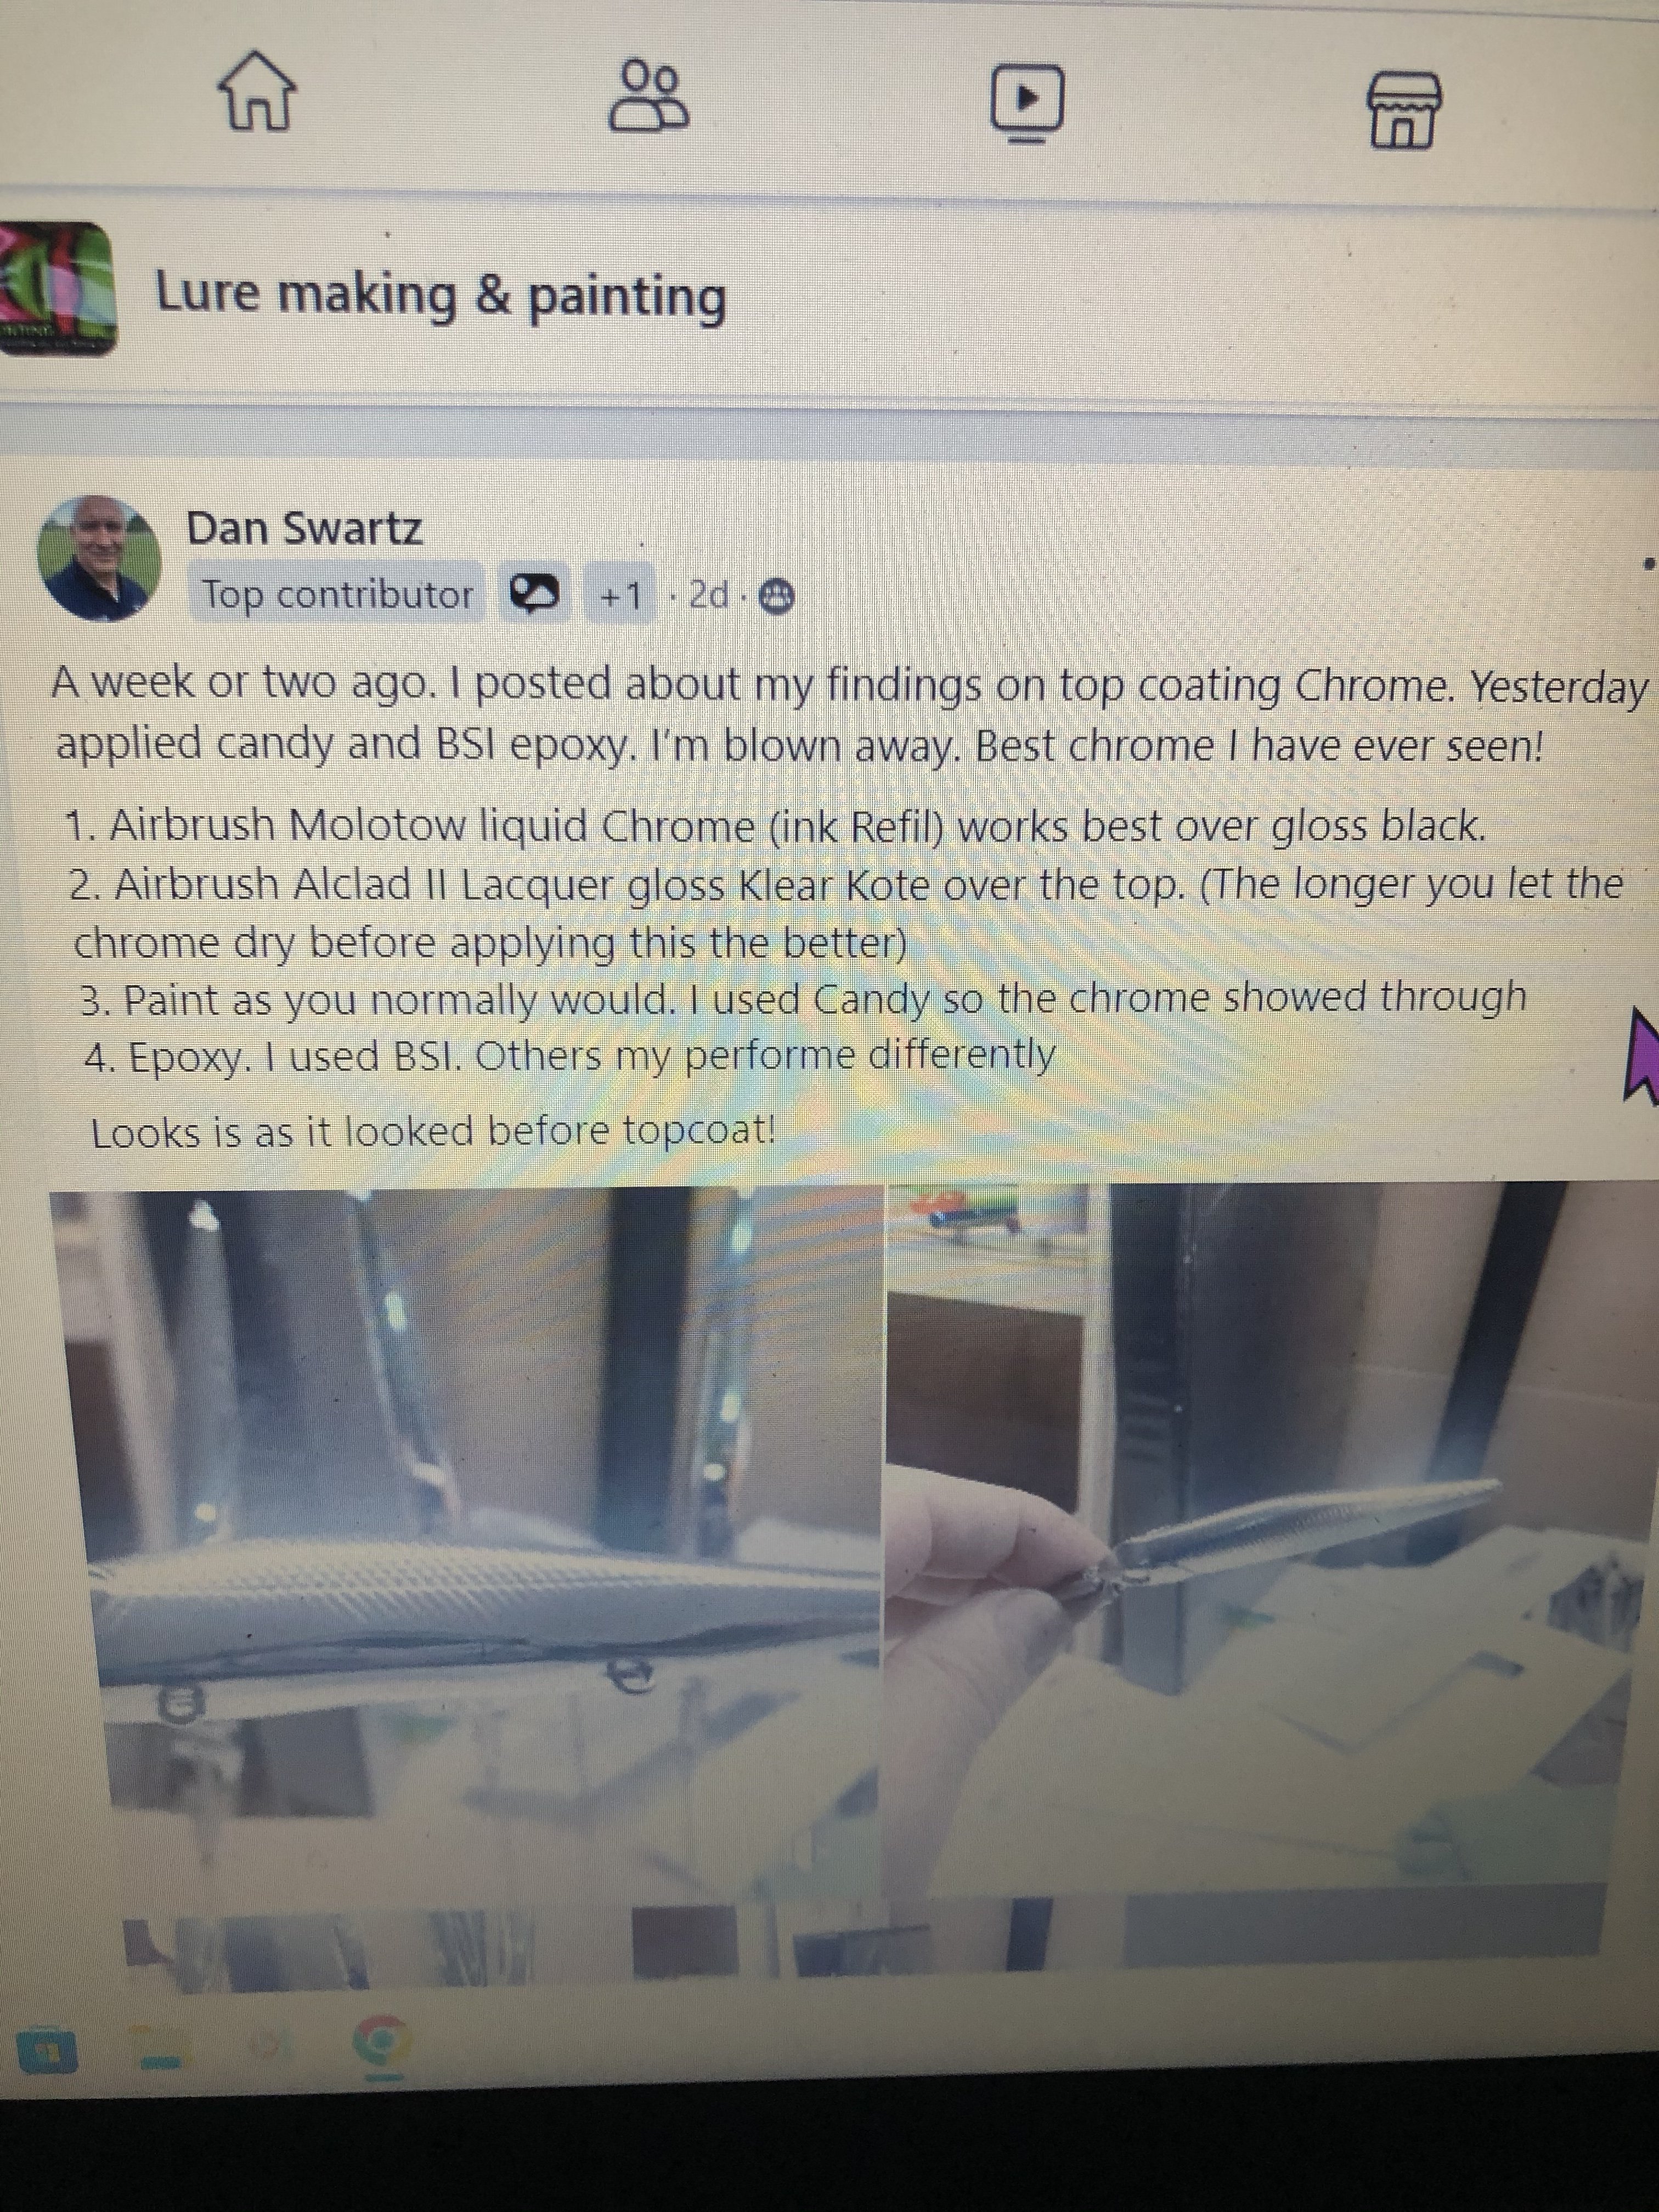
I just saw on FB, on the Lure Making and Painting page, a guy named Dan Schwartz posted how he painted and cleared his chrome, and products he used. Best looking chrome I have seen to date, really pops and the clear doesn't dull the shine.
-
Krylon Spray Paint Reacting with Platinum Cure Silicone?
AZ Fisher replied to porkmeatballs's topic in Hard Baits
Yep, it is tin cure, I thought the opposite... -
Krylon Spray Paint Reacting with Platinum Cure Silicone?
AZ Fisher replied to porkmeatballs's topic in Hard Baits
Dave, I have used the Rustoleum 2X matte clear for sealing at least ten baits that I molded and had no curing issues with the silicone. I do about 3 light to med coats and it doesn't seem to fill in much detail. Again, I normally say stay away from Rustoleum products, but this one has worked for me. I let the matte clear dry and off gas a few days in the sun I have been using Smooth-On 29NV and Sprayway #946 Silicone release agent. I've always waited only and hour or two past the cure time to unmold the master. Hope you get'r figured out... -
I usually say stay away from Rustoleum 2X clear like the plague, but they have a matt finish clear that I have used that looked OK. Knowing that if it touches plastic, plastisol, vinyl and or some silicones is can react, melt and start to make a sticky mess. I haven't sprayed the spray can version of KBS, but dipped and sprayed the quart stuff and it's very glossy.
-
Are you talking about sealing a master copy or just wall hangers for display?
-
I've found texture and pattern sheet stencils on Ebay, Amazon, AliExpress, Spraygunner and Coast Airbrush. If you want to make your own for a specific bait, check out Dakota Lakes Tackle on Youtube. He shows how to make vacuum stencils pretty easy. I find the blank stencil material at Hobby Lobby. Cut an appropriate size piece of blank stencil, place over the bait on the vacuum bed, heat with a heat gun until softened and kind of melty, then turn on the vac and suck the softened stencil material down around the bait. Once cooled for 30 secs, remove the stencil from the bait and cut in your pattern or design. I will make extra stencil molds of a bait to cut up to make masks for certain parts of the bait. I cut out the face and gill plate, and also the pec fin. These cut out pieces are your masks. I place a small piece of doubled over painters tape on the inside of the mask to hold in place on the bait. Then place my scale netting over and spray. Heat set the paint and remove the stencils or masks. The mask keeps the scale pattern from appearing on the face, gills and pec fin. Then you can use the piece of stencil you cut the pec fin out of and use it to mask the rest of the bait when painting the pec fin and keep things looking clean. The mesh material can be found at Walmart, Hobby Lobby and your local fabric store. Fabric store will have the largest selection, search for "Tulle". I use the knitting or embroidery hoops to hold the mesh tight and place over the bait to spray thru. Make sure any stencil is as tight to the bait as possible to keep overspray and bleeding to a min. Lower spray pressures help also. Hope this helps...
-
Not sure if you noticed but the post is 6 years old and the OP hasn't been on the site for 5 and a half years. Using 8% MB's for low floating or crankdown baits and 10% for walking or waking baits will get you in the ballpark and you can adjust from there to your liking for your specific bait. For glides I add more MB's and counter the extra buoyancy with weights in the bottom of the bait for a more stable swim.
-
Spraygunner can have decent prices as well as good service. They had a discontinued Wicked color I was looking for.
-
I've sprayed the Wicked 0210 uv glow base with limited success. Maybe I wasn't using it correctly tho. I tried using it as a multi layer base coat with a lite paint scheme over the top and got no glowing at all. Then used it as a finish coat over the paint scheme before clearing, this had a moderate glow effect. I found it took many coats, 6-8 dried layers, to get it to somewhat glow. This many coats caused the paint/clear to become milky or cloudy like an old MCU finish when it turns. I was using it on a glide bait to be able see it at night. The bait would glow for a few minutes and then need to be "Recharged" under a light and even then I could only see it when it less than 20-25 feet from my boat. While I didn't expect it to shine like a star, I was thinking the glow would be more substantial. I was also looking at the situation as me being able to see how the bait was swimming as opposed to the fish seeing it because of the glow. Not sure if any of this will relate to your Transparent dark base. Like I said, I could have been applying it completely wrong and hopefully there is a dif process or application to be more effective.
-
Everyone I have spoken with say the magnet thing turns into a giant PITA and seems to be more trouble than it's worth and no one stuck with them. . For a top hook I would agree with Barry about the groove or slot with some tubing to tighten the fit. You can follow what Roman Made did with the Negotiator Custom. The one in the pics has a homemade harness, OG's come with an assist line harness with tubing around the assist line and the line tie part of the hook to ensure a tight fight in the slot for the whole harness.

-
This is my version. This is the first bait I painted after getting an airbrush a bunch of years back. Never thrown it, was just for fun.
-
I can't get a link to post but check Ebay for heat/hot stamping foils. You'll find gold in sheets or rolls. Aliexpress has the same plus fingernail foils, but a 4-8 week ship time, but it's cheap. Fingernail foil will work for smaller baits
-
I use the 30 min D2T, 5 min can turn brittle, IMO and isn't waterproof. Prior to installation, I drill a couple small holes thru the lip where it's inserted in the lure. The epoxy will envelope the lip and flow thru the holes and make a more secure connection. Hope this helps...
-
While I haven't made baits that small, I tend to use 3/16 SS welding rod for the pin. I run the screw eyes into the back end of each section and the pin thru the corresponding front section. If I'm using a 3/16 pin, I use the same size drill bit and open the hole just a hair, 1/4 bit was just too large of a hole for me. I have some 1/16 welding rod that would probably work for your sized bait, I would use a 1/16- 1/8 drill bit for that size. Be careful drilling the pin's hole to make sure it is centered well. I would be concerned about how close your lip slot is to the nose of the bait and you still need to predrill and to add a line tie there. That has the potential to be a very weak spot and break when a lip is that close to the front. I would predrill the line tie hole at an upward angle and add a long .072 screw eye that could get to reach far into the the nose section. Both PVC and Redwood are very buoyant and will probably need some bottom ballast weighting. Keep that in mind when you are placing your bottom joint screw eyes and/or the receiving slot/pocket and hook hangers. You can run out of room in the bottom of a small bait real quick. Hope this helps...
-
This is what has worked for me. I wrap the joint hardware with 1/8-1/4 inch wide rubber bands, wrap it tight enough it'll pin the joint and the body segments won't move. Try and spread the bands out to cover while wrapping Some small paint/clear touch up may be needed if the rubber band covers any part of the bait body near the hardware. After it's dried/cured, just cut the bands with an exacto and dig out them out with forceps or tweezers. I'm spraying auto clear now, but have dipped 2 pc baits, half a bait at a time and put on a turner with decent results, 4 oz baits and under with the dipping. When dipping I kept the product off the hardware/bands as much as possible, even using a small brush to fill in tight spots. Hope this helps...