


JD_mudbug
-
Posts
419 -
Joined
-
Last visited
-
Days Won
55
Content Type
Profiles
Articles
TU Classifieds
Glossary
Website Links
Forums
Gallery
Store
Posts posted by JD_mudbug
-
-
ddl, I do not use epoxy as a sealer but I have seen posts where people use up to 50% denatured alcohol.
1 part resin, 1 part hardener, 1 part DN. Mix the hardener and resin first. Then mix in the DN.
-
In the past, I have used spar urethane cut with 20-25% mineral spirits to help it penetrate a bit better and get into through-wire shaft holes. I saw that formula in an old saltwater/striper magazine. I dunk the bait for a couple of minutes with an occasional stir of the bait, lightly brush off the excess with a cheap brush to prevent pooling on the end, and hang to dry overnight. I use a tennis ball tube container to dunk big baits. I stopped using spar because of the dry time and residual smell.
Back in the day, a lot of people used spar urethane as part of the ‘Old Timers formula’ for a penetrating sealer. 1 part spar urethane, 1 part boiled linseed oil, and 2 parts mineral spirits. I never tried it because rags soaked in boiled linseed oil can spontaneously combust as they dry. I didn’t want to be the guy on the news who burned his house down because he threw some wet rags in the trash.
I still use wood hardener from time to time. The off-gas time on wood hardener is long. I soaked a body for 2 days once. It was still off-gassing 2 weeks later. The body was 2.5 oz before the soak, 3 oz after the soak. I don't think there is anything out there that will penetrate into wood deeper. I mostly make baits in the winter. To be sure the wood hardener has fully off-gassed, it almost feels like I should dunk a bunch of bodies in one winter, hang them to dry in some out of the way corner of the shop, and finish the baits the following winter just to be safe.
I mostly use thin superglue now for the quick dry time.
-
 1
1
-
-
I agree with the 3 posts above. I think the taper looks better.
I also like the taper because it gives the tail hook a lot more clearance for hookups.
-
1
-
 1
1
-
-
I have used JB weld on a couple of pvc baits. The baits are 2 halves with a straight wire through with a drop wire for the belly hook. One is a 4" long wake bait that is 1.375" wide by 1.375" tall at its bulkiest spot. It is in great shape after 3 years use and has taken several northern pike. I used the original or the marine version JB weld. It says 5020 psi on the package. It floats low in the water and did not require any ballast weight because of the JB weld.
If you want one thicker pvc piece check the molding section of the stores. Some of the molding pieces are thicker than boards. You may have to order them and ship to store. Royal makes a 1.5" x 1.5" square trim which I think comes in 8' and 12'. It may be called a 2 x 2.
-
1
-
1
-
-
Looks goods. Wire-through is definitely worth a good upcharge.
If you hold one end of the wood drink stirrer down with an index finger, a few wipes down one of the faces with a piece of sandpaper will make them fit into a 1/16th slot. It takes only a few seconds. I have used them on a few baits to fill belly slots. I also use them on lip slots in test baits to try thinner lip material.
-
1
-
-
Maybe something thinner than popsicle sticks would work, like wooden beverage stirrers?
https://www.amazon.com/Royal-Count-Coffee-Beverage-Stirrers/dp/B001FVPAOE?th=1
-
For a soft plastic bait, they probably want 200 of the exact same bait to carry them through a tournament season. For a particular hard bait, some people want enough to carry them through a lifetime.
It’s about confidence. As jigmeister posted, an angler doesn’t want to worry about the bait being different or not available. The bait maker could quit the business to take up sasquatch hunting. The company that supplies the components may change their products like changing the shade of the color or changing the size of the flake by an angstrom. The bait maker could discontinue the color or the lure. The company making the lure could get acquired by another company and the production method of the lure changes (ex. look at pre-Rapala Wiggle warts on eBay). An angler doesn’t want to worry about these things, whether real or imagined. An angler just wants to concentrate on fishing. They don’t want to have to even think about finding a replacement until offseason. In the case of a hard bait which could last forever in storage, an angler may never want to worry about replacements.
When I heard my favorite crankbait was discontinued, I immediately contacted the company. The company said they could do another production run of 300 baits. So, I and a couple of buddies chipped in and bought a 300 bait run. The company charged wholesale price. I thought it was worth it. Later through a friend of a friend of a friend, I tracked down another 100 or so sitting in a box in their warehouse. So, I bought those too. I had caught fish on it for 20+ years when it was discontinued. I have fished with it for another 20 years from my stockpile. I don’t need to buy them on eBay. I will never be disappointed about not having the lure. It still has not been brought back into production. As I get older and need less of a stockpile, I give them away or sell them. I do use a lot of different lures. I try to have backups of my successful ones.
-
I sort of figured that was what you were thinking, but wasn't sure, lol. I thought there might be a very slim chance you had a weird way to build spinnerbaits and was curious as to how it could be done without at least one bead behind the clevis to prevent the spacer sleeve from wearing through the end of the clevis.
I never thought of beads as spacers until I started targeting pike. On pike/musky spinnerbaits, alot of companies do not use spacer sleeves or tubing. They just use a whole bunch of beads as spacers. I don't really like the look of 6 beads in a row. Maybe it's marketing to make them appear more similar to bucktails.
I have made some with extra beads for pike/musky just to throw in some more obnoxious color. I have not noticed those baits performing any better than those using sleeves.
-
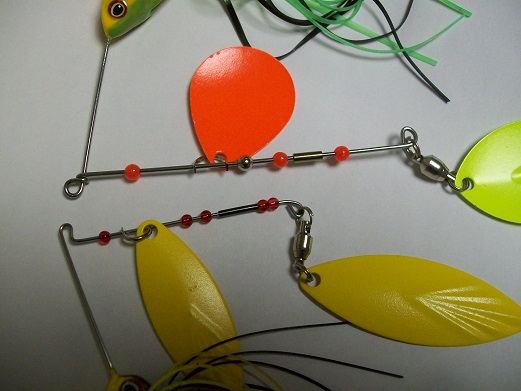
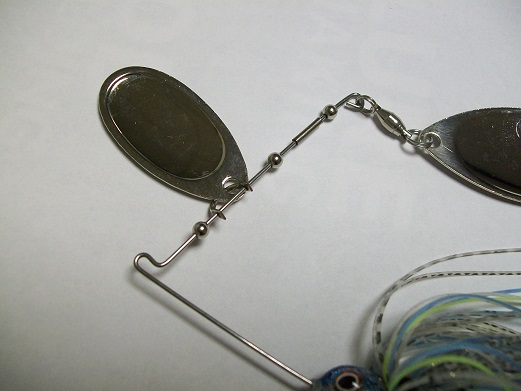
On the blade arm of the spinnerbait wire, I usually put a bead before and after the clevis to give the clevis a bearing to spin on.The front bead helps the clevis to keep spinning if the bait goes through lake snot. I also usually put a bead after the spacer sleeves and before the loop the swivel goes on. I just do this in case I am not perfect in bending my loop. The last bead prevents the spacer sleeve from potentially sliding into the loop.
Pic - I spaced out the components to make them easier to see. Order put on the arm: bead, clevis with front blade, bead, spacer sleeve(s), bead, end of wire loop with swivel and rear blade.
The beads on this bait are 1/8". The frame is a compact hidden weight LPO frame.
Full pic of the bait is in this post.
http://www.tackleunderground.com/community/topic/37610-blade-weight/
-
I use 1/8" and 4mm beads on small to average size spinnerbaits with .040" wire or thinner. I prefer 1/8" beads on small spinnerbaits (1/4 oz) as they are a bit smaller than 4mm. I use the 4 mm on typical 1/2 oz and 3/4 oz spinnerbaits. For 3/8 oz spinnerbaits, I use 1/8" beads if I have them otherwise I just go with 4mm.
You have to check the hole size in the bead and make sure the spinnerbait wire will go though it. The hole size can vary depending on seller. The hole size on the 4 mm beads I bought is 1.2mm or .047". You will need bigger beads for heavy spinnerbaits with .051" wire and possibly .045". The 4 mm beads I bought usually slide on .045" but sometimes they don't. There can be small variations in the hole size in a given pack so don't cut it too close.
For larger spacing like separating 2 willows blades, I use spacer sleeves like Jig Man or clear spacer tubing.
-
Several companies make a hook very similar to those hooks. You may have to do a direct comparison to a package for a perfect match.
The first hook could be a Gami Nautilus Circle 42411. Maybe an Owner 5114 circle hook, Eagle L2045 Circle, or Mustad Demon Circle.
The second hook could be a Gami Octopus Circle SE (Straight Eye) or Inline Octopus Circle. Maybe a Mustad Live Bait Hook or Eagle Claw Lazer Sharp Live Bait Hook or Light Wire Live Bait Hook in those brands.
The third hook could be the Gami Shiner Hook SE 51410 if it's not the Eagle Claw Kalhe L141. The Gamie Shiner Hook SE is the same shape as the Eagle Claw L141.
I believe the last 1 or 2 digits of the Gamie stock number change depending on the size of the hook. I noticed the last digit on the number was different on my packs of hooks in different sizes of the same hook type.
-
They are definitely ripe for competition. I am not saying the musky lures I see or buy are the best constructed lures. Many aspects of their builds could be improved. Alot of the baits I see were better constructed originally and then went cheap when more of a mass production model was adopted. They just have a good action that catches fish. All that means is the design of the lure is a solid concept for the style of fishing done with the lure and the construction is consistent so you get the same action in each bait. The screw eyes and lip are straight. Clear coat is even. The paint schemes are good enough to get the job of catching fish done.
I have occasionally bought lures just to try and make my own version where I didn't know anyone who had one. I may like the profile, action, or some concept(s) in the design, but thought some aspect(s) of the lure could be better. There is usually a lot of room for an existing lure to be improved. At the prices they go for, it would be nice to see wire-through.
Most of the lures out there had a predecessor they borrowed some aspect from. Sometimes I know the name of predecessor and still purchase it. So buying a 'copy' doesn't bother me. The high end market always appreciates a 'better' build, an improvement in a concept, or new twist on an existing idea.
-
Hopefully, this will make some of you feel better. The following is not legal advice or meant to be political in away.
As for the FET-
It sucks that others cheat the system. Cheating the tax man drives up the rates for everyone else no matter what tax you’re talking about. The tax enforcement right now is lax so more people tend to cheat. Enforcement levels come and go in cycles. Proving a tax case can be rather easy (see Al Capone). If you get caught once, you can be doomed. Generally, there is no statute of limitations if no return is filed or if intent to defraud is established. So, all those years in the past can come into play once you get caught.
All you can do is the right thing. Don't worry about what other people are doing. You see them cheating and get pissed. But, what most people never see or hear is the shit storm that explodes when someone gets caught. I have seen it in my line of work. People tend to get very quiet once they get in that type of trouble. The website goes down. Facebook and social media accounts get deleted. I have seen a person audited on FET. I know someone was who representing a person’s wife on a different but similar tax. The auditors came with screen shots of the husband’s website, photos of his booth at expos, affidavits from customers, bank records, etc. He knew he was screwed. He died of a heart-attack during the audit and left a grieving wife to clean up the mess. Death was his only escape from jail time. I know of another person who used some ‘creative’ record keeping for years. He suddenly vanished. He had quietly taken a plea deal for fraud and served several years. He is on a long probation with travel restrictions and has to pay back massive restitution. Some people that know him still don’t know he was a guest of the feds. All it took was one disgruntled person to report him. The person who reported him was committing the same type of fraud. That person told on numerous people doing the same thing to lighten his own sentence.
Sometimes they do get caught. You just never hear about that. No one posts about their tax evasion conviction on their Facebook page.
-
3
-
-
An interesting thought, but as I mentioned - the lures are otherwise identical, save for paint. Looking at it from the consumer side, I'm not sure I see how that would be differentiated. Do you happen to have an example of such a lure?
I have purchased an excessive amount of lures through the years. At one point, I had over 10k lures organized in boxes and inventoried on spreadsheets. So hopefully, I can provide a viewpoint as a consumer
I have seen paint price ‘differentials’ numerous times on custom baits as wells some mass produced baits. It doesn’t bother me. Lucky Craft charges a $1-2 differential on some paints schemes in some of their models. If you look at their squarebills and pointers, they charge extra for colors like American shad, crack, impulse shad, flake Rayburn red. Their squarebill is only a $7 lure and that has a $1 upcharge on some colors. The 9” Grandma ($23) has a $7 upcharge for the Viper paint series. Bull Dawgs cost more for the ‘Pro Series’. G2 Shellcrackers ($30) are $5 more for ‘Custom’ colors. You are correct about Suick. Suick has a wounded series that has paint scheme sideways on the bait to look like a fish on its side and another series with holographic foil. TW has some mass produced lures sold in custom colors only available on TW’s website. Sometimes there is a differential on the Suick’s and TW lures, sometimes there isn’t.
People pay money just to have a factory lure or blank custom painted ($15-20 for a 2.5 squarebill in the bass realm). They will pay more in a musky realm to get a color they want unless it is out of line for the price of the lure. When you look at the Lucky Craft American shad color squarebill, it clearly stands apart from their regular paint schemes with those scales. Most tackle consumers in the upper price range can discern the difference of the extra effort. The number of different colors, scale netting use, blending, stencil work, fine detail work, properly applied foil a/o glitter, and the paint scheme overall appearance are all easy to see on a big lure. I would not pay say $50 extra for a certain paint scheme on a $70 lure as it is close to buying another lure. $15 would not be out of line on a $70 lure. I may even go to $25 if I really like the paint.
I usually find custom lures at fishing shows/expos (when those were open). When I look to buy a lure over $30, I look at construction quality first. I try to find video of the action next. I look for any reviews and fellow anglers experience with the lure. If I am at a show and buying a rod (or any other non-lure product), I will ask that seller if he/she knows about the lure. He/she is already getting money from me and isn’t competing with the lure maker. Color detail may be my last consideration. I paid $75 for a lure with a moderately detailed paint job a couple of years ago. After fishing with it for a year and having success, I bought another one the following year for $80 that was just an all-black paint job.
I don't think the musky baits need to have to a highly detailed paint job to sell. Just look at the Headlocks and other lures at muskyshop.com for the level of detail in the paint schemes. The Headlock lip and the action sell that lure. The design and paint scheme aren’t complex. Just well thought out and well executed to get that action.
I am not saying whether or not you should do a price differential/up charge on paint. I think either way, one price or 2-level pricing, a quality lure will sell. I would not go more than 2 levels. If you want 2 price levels, I would try to stay at or below $20 extra on a $70 bait. And of course, give that series a cool name.
If you want to go with just one price like Hillbilly, simplify your most complex paint jobs. Go for a good level of detail but not ridiculous and see how many of those you can still do with your $70 price tag, or whatever price you can keep the bulk of them at. Keep the basic paint schemes at the same price even if it is less effort for you. That could help make up for a couple that would otherwise be at the higher price level. Maybe even spice up a basic color scheme a bit to make it more comparable to the other schemes. That all black lure could have had red gill line, a red fin, and red belly fading into orange at the tail. It goes from black to ‘night raider’ with not that much effort.
I wish you the best and hope it goes well.
-
2
-
-
Dave, in an alternate reality, I see you working with the Tall Man from Phantasm.
'I think those spheres could be improved a bit'.
-
2
-
 1
1
-
-
I understood it with the hand in the water example. It's definitely counter intuitive.
-
2
-
-
I am not a physicist either. I saw Dave’s video. His videos are always worth watching. I think it is about both turbulence/vortex shedding and cutting through the water. It just seems that both factors come into play. No doubt the thin edge helps the water recombine or smooth out. I guess cutting the water is better called inertia. The initial force required to get a thicker edge to move or cut through the water is greater. The thinner edge will start easier. The same happens on the opposite edge of the when the lip starts the other way on its return. The lip has to start moving before it can create turbulence. This is one the claimed reasons the Jackhammer Chatterbait is so popular. It’s thinner blade starts immediately on the retrieve, after a pause or bumping an object.
-
1
-
-
The theory just makes sense that with 2 identical items, except for thickness, the thinner item would pass through any medium more easily. I certainly don't know if chamfering is effective on a lure or when incremental lip thickness would reduce action. I don't see how it can hurt to have the edges chamfered. I figure I might as well do it before I install the lip when it is easy to do.
My baits tend to be between 5" and 12". A lot of my baits use 1/8" (.125") or 3.175 mm polycarbonate. The lips are typically 1" long by 1" wide and larger. Chamfering could just be a confidence thing for me. A polycarbonate lip at .125" thick just looks thick when you have it in your hands. It just looks like it would be tough to get that flat side edge on a big lip to cut through the water easily. I'll take anything that can help get the maximum waggle on a big bait. I don't chamfer 1/16" (.0625") or 1.5875mm when I do occasionally make smaller baits. I am on the fence about chamfering .093" (2.3622 mm) but I tend to do it. I don't have 2 mm (.07874") readily available where I am. That would be a nice in-between size to have.
-
1
-
-
That's a great point on chamfering the lip edges. I don't have confidence in Lexan thinner than .093" lasting long on musky/pike lures. I usually chamfer the edges of .093" Lexan and thicker just in case the thickness could reduce action. I don't get the edge to quite a sharp edge though. I reduce the edge thickness by using a file on an angle at the edges on both faces (except the edge that goes in the lip slot). Then, I use very fine grit sandpaper to smooth any roughness. I leave a thin flat section maybe a 1/3 of the lip's original side that angles out on both sides to the faces. After you get the hang of it, it takes a minute or two to chamfer a lip.
I also usually slightly round any very sharp corners to reduce the chances of cracking the corner off if the lure hits a rock or hits the side of the boat during a fight/netting. I don't like any sharp corners or edges on the lips of musky/pike baits.
-
1
-
1
-
-
Congrats on getting the belt sander.
I would go with .093 on a 5.5" lure unless it is going to be over 2 oz. or have a long lip.
From the other post: Generally, I go with .093" Lexan for small lures 4" to 6.5" usually under 1.5 ounces. I go with 1/8" (.125") Lexan for bigger lures 6.5" to 11" that range from 1.5 to 3.5 ounces. For lures bigger or heavier than those, I go with 3/16" Lexan. Lures near the gray areas in between those ranges may get a thicker or thinner lip depending on the way the lure will be fished and the size of the lip. If the lip is going to be a long lip, I usually go thicker on the lip material because the risk of the lip breaking is higher.
As for weight, I agree with testing on the weight especially using a wood like German Beech. That wood is up there with oak in density. I did not have much luck with oak for lures. You can soft glue or rubber-band the weight on the sealed body to see how the lure sits in a bucket or drag through the tub or other unfrozen spot to see if you get any action. If you put the weight on the center of balance, the lure will sit close to flat. If I am using one ballast weight, usually I put the ballast on the center of balance or slightly forward of it for a shallow diver. On deep divers, I move the weight forward more so the lure sits more nose down. If I am using multiple ballasts, I place the weights on each side of the center of balance and locate them to achieve the same type of nose positions. I like 2 ballast weights on big musky/pike jerkbaits and trolling lures with one on each side of the center of balance.
-
2
-
1
-
-
Etex seems to be one of the more sensitive epoxies. I don't have the best luck with it. Don't forget to check for high humidity as well as temp. High humidity can affect the curing of some epoxies. Etex cures best at below 50% humidity. I was surprised at how much humidity there was in my basement during winter. When using Etex, I run a dehumidifier.
https://www.eti-usa.com/sites/eti-usa.com/files/bulletins/Envirotex-Lite-Professional-Tip-Sheet2.pdf
Lately, I have started using D2T more just to carry me through until I stop procrastinating and build a UV setup. D2T seems to be more tolerant of environmental factors.
I might be a good idea to have a weather gauge set hanging in the shop to show temp and humidity.
-
2
-
-
You might be able to find a black metallic power paint that matches the black nickel blades. I know it is available. I just don't know if you can get a small container to test for matching. It is usually sold in large containers for car parts. I use metallic black nail polish or just a regular black with a glossy clear like epoxy on my bodies. I only have to make a few so that doesn’t help you.
Paint will hold up much better on the body than it will on the blade. Paint on a blade will end up wearing down eventually. There is just so much rotation and a thin edge that the paint wears off the edge eventually. Once the paint is off the edge, the flaking and cracking migrate in.
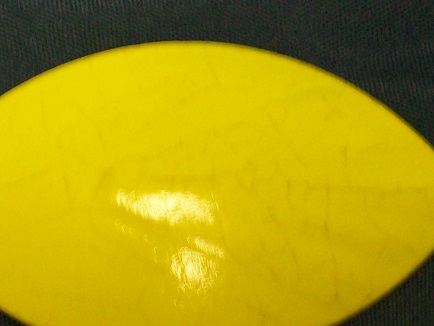
Another issue with painted blades is spider web type cracking. Some blades never get it, some do. This seems to happen randomly. It could be cold temps and high temps causing the blades to contract and expand just a bit and the paint cracks. Once that happens, it is just a matter time before a paint chip flakes off.
It is tough to see in the pic of a sz 5 mag willow. There are fine cracks all over the surface. I fished with that blade on spinnerbait one day and put it in my spinnerbait hanging box. The next time I took the bait out the cracks were there.
-
1
-
-
I have painted spinnerbait blades, Colorado sz 3-6, willow and Indiana sz 4-7. They worked fine but I did keep the paint thin and those are bigger blades. Some have a thin coat of spray clear on top of the paint and they still spin fine.
A size 1 blade is fairly small. If the paint goes on too thick, it may be hard to get the blade spinning.
Have you taken a look at the painted French blades or the black nickel French blades sold by the usual suppliers? Just buying the blades may be cheaper than buying the spray gun and paint, plus it saves the labor.
I like the black nickel French blades. You never have to worry about the paint chipping off or not bonding to the blade. They spin easy as there is no paint on them. I bought some LPO black nickel French in size 4 for inlines and spinnerbaits. They look great and are durable. They give the black look but also give off some some flash.
LPO sells the black nickel in the regal French blade line.
Lakeland also sells some. Their website is not the easiest to use. Pages 63-64 on the link.
http://lakelandcomponentsolutions.com/Flipbook 2020/mobile/index.html
There are probably other companies that sell them.
-
You’re welcome.
I have seen a few posts lately from people new to lure making. It’s nice to see. A couple of decades ago when I really started trying to make lures, I was usually disappointed my lures did not look like the masterpieces you see on this site or the hand-made lures I would see at fishing expos. I found painting in particular to be frustrating to do well. My painting skills have improved over time. I am even proud of some of my paint jobs now. They still don’t look like masterpieces. But, they catch fish.
I just want some of the new people to know your lure doesn’t have to look like a work of art to be a great fish catcher. Never get disappointed with your efforts. Every mistake is a lesson learned. No matter what your skill level, all you have to do is keep trying to improve your lure making skills, bit by bit. The satisfaction of catching fish on a self-made lure is worth the effort.
-
1
-
Wobble
in Hard Baits
Posted · Edited by JD_mudbug
Take a look at this post by Dave aka Vodkaman
http://www.tackleunderground.com/community/topic/35283-how-do-lipsbills-work/?tab=comments#comment-290212