


JD_mudbug
-
Posts
419 -
Joined
-
Last visited
-
Days Won
55
Content Type
Profiles
Articles
TU Classifieds
Glossary
Website Links
Forums
Gallery
Store
Everything posted by JD_mudbug
-
I use 1/8" and 4mm beads on small to average size spinnerbaits with .040" wire or thinner. I prefer 1/8" beads on small spinnerbaits (1/4 oz) as they are a bit smaller than 4mm. I use the 4 mm on typical 1/2 oz and 3/4 oz spinnerbaits. For 3/8 oz spinnerbaits, I use 1/8" beads if I have them otherwise I just go with 4mm. You have to check the hole size in the bead and make sure the spinnerbait wire will go though it. The hole size can vary depending on seller. The hole size on the 4 mm beads I bought is 1.2mm or .047". You will need bigger beads for heavy spinnerbaits with .051" wire and possibly .045". The 4 mm beads I bought usually slide on .045" but sometimes they don't. There can be small variations in the hole size in a given pack so don't cut it too close. For larger spacing like separating 2 willows blades, I use spacer sleeves like Jig Man or clear spacer tubing.
-
Several companies make a hook very similar to those hooks. You may have to do a direct comparison to a package for a perfect match. The first hook could be a Gami Nautilus Circle 42411. Maybe an Owner 5114 circle hook, Eagle L2045 Circle, or Mustad Demon Circle. The second hook could be a Gami Octopus Circle SE (Straight Eye) or Inline Octopus Circle. Maybe a Mustad Live Bait Hook or Eagle Claw Lazer Sharp Live Bait Hook or Light Wire Live Bait Hook in those brands. The third hook could be the Gami Shiner Hook SE 51410 if it's not the Eagle Claw Kalhe L141. The Gamie Shiner Hook SE is the same shape as the Eagle Claw L141. I believe the last 1 or 2 digits of the Gamie stock number change depending on the size of the hook. I noticed the last digit on the number was different on my packs of hooks in different sizes of the same hook type.
-
They are definitely ripe for competition. I am not saying the musky lures I see or buy are the best constructed lures. Many aspects of their builds could be improved. Alot of the baits I see were better constructed originally and then went cheap when more of a mass production model was adopted. They just have a good action that catches fish. All that means is the design of the lure is a solid concept for the style of fishing done with the lure and the construction is consistent so you get the same action in each bait. The screw eyes and lip are straight. Clear coat is even. The paint schemes are good enough to get the job of catching fish done. I have occasionally bought lures just to try and make my own version where I didn't know anyone who had one. I may like the profile, action, or some concept(s) in the design, but thought some aspect(s) of the lure could be better. There is usually a lot of room for an existing lure to be improved. At the prices they go for, it would be nice to see wire-through. Most of the lures out there had a predecessor they borrowed some aspect from. Sometimes I know the name of predecessor and still purchase it. So buying a 'copy' doesn't bother me. The high end market always appreciates a 'better' build, an improvement in a concept, or new twist on an existing idea.
-
Hopefully, this will make some of you feel better. The following is not legal advice or meant to be political in away. As for the FET- It sucks that others cheat the system. Cheating the tax man drives up the rates for everyone else no matter what tax you’re talking about. The tax enforcement right now is lax so more people tend to cheat. Enforcement levels come and go in cycles. Proving a tax case can be rather easy (see Al Capone). If you get caught once, you can be doomed. Generally, there is no statute of limitations if no return is filed or if intent to defraud is established. So, all those years in the past can come into play once you get caught. All you can do is the right thing. Don't worry about what other people are doing. You see them cheating and get pissed. But, what most people never see or hear is the shit storm that explodes when someone gets caught. I have seen it in my line of work. People tend to get very quiet once they get in that type of trouble. The website goes down. Facebook and social media accounts get deleted. I have seen a person audited on FET. I know someone was who representing a person’s wife on a different but similar tax. The auditors came with screen shots of the husband’s website, photos of his booth at expos, affidavits from customers, bank records, etc. He knew he was screwed. He died of a heart-attack during the audit and left a grieving wife to clean up the mess. Death was his only escape from jail time. I know of another person who used some ‘creative’ record keeping for years. He suddenly vanished. He had quietly taken a plea deal for fraud and served several years. He is on a long probation with travel restrictions and has to pay back massive restitution. Some people that know him still don’t know he was a guest of the feds. All it took was one disgruntled person to report him. The person who reported him was committing the same type of fraud. That person told on numerous people doing the same thing to lighten his own sentence. Sometimes they do get caught. You just never hear about that. No one posts about their tax evasion conviction on their Facebook page.
-
An interesting thought, but as I mentioned - the lures are otherwise identical, save for paint. Looking at it from the consumer side, I'm not sure I see how that would be differentiated. Do you happen to have an example of such a lure? I have purchased an excessive amount of lures through the years. At one point, I had over 10k lures organized in boxes and inventoried on spreadsheets. So hopefully, I can provide a viewpoint as a consumer I have seen paint price ‘differentials’ numerous times on custom baits as wells some mass produced baits. It doesn’t bother me. Lucky Craft charges a $1-2 differential on some paints schemes in some of their models. If you look at their squarebills and pointers, they charge extra for colors like American shad, crack, impulse shad, flake Rayburn red. Their squarebill is only a $7 lure and that has a $1 upcharge on some colors. The 9” Grandma ($23) has a $7 upcharge for the Viper paint series. Bull Dawgs cost more for the ‘Pro Series’. G2 Shellcrackers ($30) are $5 more for ‘Custom’ colors. You are correct about Suick. Suick has a wounded series that has paint scheme sideways on the bait to look like a fish on its side and another series with holographic foil. TW has some mass produced lures sold in custom colors only available on TW’s website. Sometimes there is a differential on the Suick’s and TW lures, sometimes there isn’t. People pay money just to have a factory lure or blank custom painted ($15-20 for a 2.5 squarebill in the bass realm). They will pay more in a musky realm to get a color they want unless it is out of line for the price of the lure. When you look at the Lucky Craft American shad color squarebill, it clearly stands apart from their regular paint schemes with those scales. Most tackle consumers in the upper price range can discern the difference of the extra effort. The number of different colors, scale netting use, blending, stencil work, fine detail work, properly applied foil a/o glitter, and the paint scheme overall appearance are all easy to see on a big lure. I would not pay say $50 extra for a certain paint scheme on a $70 lure as it is close to buying another lure. $15 would not be out of line on a $70 lure. I may even go to $25 if I really like the paint. I usually find custom lures at fishing shows/expos (when those were open). When I look to buy a lure over $30, I look at construction quality first. I try to find video of the action next. I look for any reviews and fellow anglers experience with the lure. If I am at a show and buying a rod (or any other non-lure product), I will ask that seller if he/she knows about the lure. He/she is already getting money from me and isn’t competing with the lure maker. Color detail may be my last consideration. I paid $75 for a lure with a moderately detailed paint job a couple of years ago. After fishing with it for a year and having success, I bought another one the following year for $80 that was just an all-black paint job. I don't think the musky baits need to have to a highly detailed paint job to sell. Just look at the Headlocks and other lures at muskyshop.com for the level of detail in the paint schemes. The Headlock lip and the action sell that lure. The design and paint scheme aren’t complex. Just well thought out and well executed to get that action. I am not saying whether or not you should do a price differential/up charge on paint. I think either way, one price or 2-level pricing, a quality lure will sell. I would not go more than 2 levels. If you want 2 price levels, I would try to stay at or below $20 extra on a $70 bait. And of course, give that series a cool name. If you want to go with just one price like Hillbilly, simplify your most complex paint jobs. Go for a good level of detail but not ridiculous and see how many of those you can still do with your $70 price tag, or whatever price you can keep the bulk of them at. Keep the basic paint schemes at the same price even if it is less effort for you. That could help make up for a couple that would otherwise be at the higher price level. Maybe even spice up a basic color scheme a bit to make it more comparable to the other schemes. That all black lure could have had red gill line, a red fin, and red belly fading into orange at the tail. It goes from black to ‘night raider’ with not that much effort. I wish you the best and hope it goes well.
-
Dave, in an alternate reality, I see you working with the Tall Man from Phantasm. 'I think those spheres could be improved a bit'.
-
I understood it with the hand in the water example. It's definitely counter intuitive.
-
I am not a physicist either. I saw Dave’s video. His videos are always worth watching. I think it is about both turbulence/vortex shedding and cutting through the water. It just seems that both factors come into play. No doubt the thin edge helps the water recombine or smooth out. I guess cutting the water is better called inertia. The initial force required to get a thicker edge to move or cut through the water is greater. The thinner edge will start easier. The same happens on the opposite edge of the when the lip starts the other way on its return. The lip has to start moving before it can create turbulence. This is one the claimed reasons the Jackhammer Chatterbait is so popular. It’s thinner blade starts immediately on the retrieve, after a pause or bumping an object.
-
The theory just makes sense that with 2 identical items, except for thickness, the thinner item would pass through any medium more easily. I certainly don't know if chamfering is effective on a lure or when incremental lip thickness would reduce action. I don't see how it can hurt to have the edges chamfered. I figure I might as well do it before I install the lip when it is easy to do. My baits tend to be between 5" and 12". A lot of my baits use 1/8" (.125") or 3.175 mm polycarbonate. The lips are typically 1" long by 1" wide and larger. Chamfering could just be a confidence thing for me. A polycarbonate lip at .125" thick just looks thick when you have it in your hands. It just looks like it would be tough to get that flat side edge on a big lip to cut through the water easily. I'll take anything that can help get the maximum waggle on a big bait. I don't chamfer 1/16" (.0625") or 1.5875mm when I do occasionally make smaller baits. I am on the fence about chamfering .093" (2.3622 mm) but I tend to do it. I don't have 2 mm (.07874") readily available where I am. That would be a nice in-between size to have.
-
That's a great point on chamfering the lip edges. I don't have confidence in Lexan thinner than .093" lasting long on musky/pike lures. I usually chamfer the edges of .093" Lexan and thicker just in case the thickness could reduce action. I don't get the edge to quite a sharp edge though. I reduce the edge thickness by using a file on an angle at the edges on both faces (except the edge that goes in the lip slot). Then, I use very fine grit sandpaper to smooth any roughness. I leave a thin flat section maybe a 1/3 of the lip's original side that angles out on both sides to the faces. After you get the hang of it, it takes a minute or two to chamfer a lip. I also usually slightly round any very sharp corners to reduce the chances of cracking the corner off if the lure hits a rock or hits the side of the boat during a fight/netting. I don't like any sharp corners or edges on the lips of musky/pike baits.
-
Congrats on getting the belt sander. I would go with .093 on a 5.5" lure unless it is going to be over 2 oz. or have a long lip. From the other post: Generally, I go with .093" Lexan for small lures 4" to 6.5" usually under 1.5 ounces. I go with 1/8" (.125") Lexan for bigger lures 6.5" to 11" that range from 1.5 to 3.5 ounces. For lures bigger or heavier than those, I go with 3/16" Lexan. Lures near the gray areas in between those ranges may get a thicker or thinner lip depending on the way the lure will be fished and the size of the lip. If the lip is going to be a long lip, I usually go thicker on the lip material because the risk of the lip breaking is higher. As for weight, I agree with testing on the weight especially using a wood like German Beech. That wood is up there with oak in density. I did not have much luck with oak for lures. You can soft glue or rubber-band the weight on the sealed body to see how the lure sits in a bucket or drag through the tub or other unfrozen spot to see if you get any action. If you put the weight on the center of balance, the lure will sit close to flat. If I am using one ballast weight, usually I put the ballast on the center of balance or slightly forward of it for a shallow diver. On deep divers, I move the weight forward more so the lure sits more nose down. If I am using multiple ballasts, I place the weights on each side of the center of balance and locate them to achieve the same type of nose positions. I like 2 ballast weights on big musky/pike jerkbaits and trolling lures with one on each side of the center of balance. http://www.tackleunderground.com/community/topic/37010-i-built-a-simple-bait-balance-to-find-center-of-mass/
-
Etex seems to be one of the more sensitive epoxies. I don't have the best luck with it. Don't forget to check for high humidity as well as temp. High humidity can affect the curing of some epoxies. Etex cures best at below 50% humidity. I was surprised at how much humidity there was in my basement during winter. When using Etex, I run a dehumidifier. https://www.eti-usa.com/sites/eti-usa.com/files/bulletins/Envirotex-Lite-Professional-Tip-Sheet2.pdf Lately, I have started using D2T more just to carry me through until I stop procrastinating and build a UV setup. D2T seems to be more tolerant of environmental factors. I might be a good idea to have a weather gauge set hanging in the shop to show temp and humidity.
-
You might be able to find a black metallic power paint that matches the black nickel blades. I know it is available. I just don't know if you can get a small container to test for matching. It is usually sold in large containers for car parts. I use metallic black nail polish or just a regular black with a glossy clear like epoxy on my bodies. I only have to make a few so that doesn’t help you. Paint will hold up much better on the body than it will on the blade. Paint on a blade will end up wearing down eventually. There is just so much rotation and a thin edge that the paint wears off the edge eventually. Once the paint is off the edge, the flaking and cracking migrate in. Another issue with painted blades is spider web type cracking. Some blades never get it, some do. This seems to happen randomly. It could be cold temps and high temps causing the blades to contract and expand just a bit and the paint cracks. Once that happens, it is just a matter time before a paint chip flakes off. It is tough to see in the pic of a sz 5 mag willow. There are fine cracks all over the surface. I fished with that blade on spinnerbait one day and put it in my spinnerbait hanging box. The next time I took the bait out the cracks were there.
-
I have painted spinnerbait blades, Colorado sz 3-6, willow and Indiana sz 4-7. They worked fine but I did keep the paint thin and those are bigger blades. Some have a thin coat of spray clear on top of the paint and they still spin fine. A size 1 blade is fairly small. If the paint goes on too thick, it may be hard to get the blade spinning. Have you taken a look at the painted French blades or the black nickel French blades sold by the usual suppliers? Just buying the blades may be cheaper than buying the spray gun and paint, plus it saves the labor. I like the black nickel French blades. You never have to worry about the paint chipping off or not bonding to the blade. They spin easy as there is no paint on them. I bought some LPO black nickel French in size 4 for inlines and spinnerbaits. They look great and are durable. They give the black look but also give off some some flash. LPO sells the black nickel in the regal French blade line. https://www.lurepartsonline.com/Regal-Finish-French-Blades?quantity=1&custcol_blade_spoon_size=24&custcol10=14 Lakeland also sells some. Their website is not the easiest to use. Pages 63-64 on the link. http://lakelandcomponentsolutions.com/Flipbook 2020/mobile/index.html There are probably other companies that sell them.
-
You’re welcome. I have seen a few posts lately from people new to lure making. It’s nice to see. A couple of decades ago when I really started trying to make lures, I was usually disappointed my lures did not look like the masterpieces you see on this site or the hand-made lures I would see at fishing expos. I found painting in particular to be frustrating to do well. My painting skills have improved over time. I am even proud of some of my paint jobs now. They still don’t look like masterpieces. But, they catch fish. I just want some of the new people to know your lure doesn’t have to look like a work of art to be a great fish catcher. Never get disappointed with your efforts. Every mistake is a lesson learned. No matter what your skill level, all you have to do is keep trying to improve your lure making skills, bit by bit. The satisfaction of catching fish on a self-made lure is worth the effort.
-
I have only used the skirt hubs a few times. I got the skirt on the hub using 3-pronged skirt making pliers.They may have been called skirt expander pliers. The company that made them was called Skirt Master. I tried finding a link and could not. They may have gone out of business. That would be a shame. I like that tool. Give Jann's and Barlow's a look. They sell skirt making pliers. Barlow's is out of stock at the moment. Not the same as the 3-pronged pliers, but they should be able to do the job. https://www.jannsnetcraft.com/skirts-material/088456030048.aspx You may want to make your post in the Wire Baits forum. It will get more attention there from spinnerbait and jig makers.
-
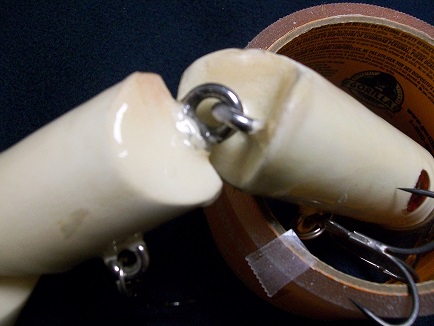
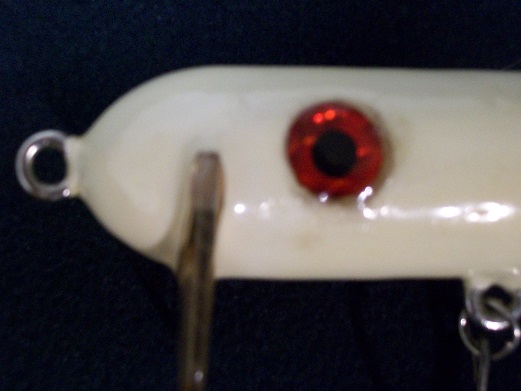
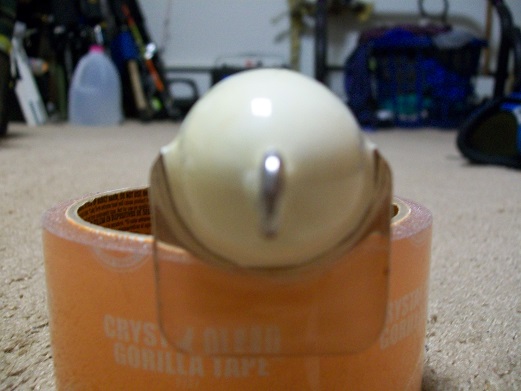
This is a tale of multiple ‘happy accidents’ making a memorable lure. I have a bond with this lure that is tempting me to not retire it, even though it belongs on the wall now. My favorite lure is one I call Dicky Moe after the whale in a Tom & Jerry cartoon. The cartoon whale was the first thing I thought of when the lure was finished. https://www.youtube.com/watch?v=bttiQVVweJE It is all white, 9.75” long, and weighs 3.1 oz. without the hooks. The bait came out longer than expected because I forgot to take into account the joint gaps would add close to an inch of length because I used big gate eye screws for hardware. The V cuts for the joints don’t mesh perfectly and are ‘close enough’. I made numerous mistakes during its construction. I was so disappointed with its appearance that I was ashamed to fish with it initially. Dicky Moe was my first attempt at a big bait. I wanted to make it a simple design. I started with a section of 1-1/8” diameter poplar dowel. I just rounded the nose and tapered the back half of the bait down a bit. It is clunky and amateurish. I screwed up the eye sockets. I eyeballed the locations with a hand drill (no pun intended). The eyes are not in the same spot on both sides. The drill bit walked making the edges of the sockets jagged and not perfectly round. The lure looks a bit cross-eyed. I made another mistake in sealing the bait. I soaked the body sections in MinWax Wood Hardener for a day. Wood Hardener will work a sealer, but it has a long off-gas time. I did not know this at the time. Soaking the sections for that long probably requires a month of off-gassing with that stuff. This would cause the paint and clear coat to separate from the body later on. I finished the parade of screw ups when I installed the lip. I was trying for a 70 degree angle. I cut the slot too big for the Lexan. I used 2 pieces of blue tape like tent rope supports to hold the lip in place while the epoxy cured in the slot. The lip shifted and I ended with an 85 degree angle lip, just slightly forward of straight 90 degree down. The lip ended up being slightly tilted, not straight across the bait. The lip reminds me of a snowplow blade, titled to push the snow off the road. Despite its ugly appearance, it has great action. It wriggles and clacks on the surface. The sections whack against each other. With my rod tip down, it bulges just below the surface. It makes a big wake. In its debut, I caught 3 fish on it, all largemouth, 2 to 3.5 pounds. After that first trip, some off the painted lifted from the body. This problem would pop-up throughout Dicky Moe’s life. Through the years, I would peel off the lifting section, cut it off with a razor blade and patch that section with random white paints and epoxies. The lure is now has uneven color ranging from bright white to some spots that have ambered. The clear coat is uneven due to overlapping patch jobs. I keep catching fish on it including several over 5 lbs. Years ago, I decided to not strip the paint. I have just kept on patching it. I don’t want to strip the paint and possibly ruin Dicky’s mojo. Dicky Moe was responsible for one of my favorite fishing memories. 3 years ago, I was fishing off the dock at my parents’ lake house. They were having an extended family bbq with over 30 people attending to celebrate my oldest uncle’s birthday. I decided to take a few casts while waiting for food. My relatives made numerous jabs about the ‘ridiculous’ size of my lure. On the second cast, I caught a 2.5 lb. largie which surprised my relatives. I was then able to respond with “never doubt the master”. A couple of minutes later, as the lure was no more than 10 feet from the dock, the lure got hammered. The strike was like someone threw a bowling bowl in the water. After a brief but intense fight, including a massive tail splash that sprayed me, I landed a 7.2 lb. largie which stunned everyone. There is nothing quite like catching a big fish in front of audience that was mocking your lure. Dicky Moe has a special place in my heart. It continually reminds that a lure’s appearance does not necessarily relate to its effectiveness. It has provided faithful service for a decade. It will probably go on the wall this year. One of the big gate screws does not look secure anymore. When I die, I want to be cremated with this lure along with some my other favorites. This pics don’t really show how mottled the paint is. One pic is with a SK 2.5 squarebill for a size comparison. After looking at the pics, I never noticed how crooked and misplaced some of the eye screws are.

-
I use mostly Lexan (polycarbonate). I know Lexan is just a brand name. It is easier to type and is shorter than Makrolon. In addition to the fish species, I also look at the size of the bait. If I make a 10" 3 oz slammer type bait for bass, I am still going to use a thicker 1/8" lip. That size bait will crack a thin lip when it hits the water on the cast. Generally, I go with .093" Lexan for small lures 4" to 6.5" usually under 1.5 ounces. I go with 1/8" (.125") Lexan for bigger lures 6.5" to 11" that range from 1.5 to 3.5 ounces. For lures bigger or heavier than those, I go with 3/16" Lexan. I haven't made too many baits over 4 oz. that had a diving lip. Most of my baits over 4 oz. have been unlipped multi-section swimmers. Lures near the gray areas in between those ranges may get a thicker or thinner lip depending on the way the lure will be fished and the size of the lip. If the lip is going to be a long lip, I usually go thicker on the lip material because the risk of the lip breaking is higher. I just started making lures with aluminum lips. I have gone with 1/16" aluminum for lures under 2 oz, between 2-3 oz will be a gray area, and over 3 oz will be 1/8" aluminum. I don't see myself going thicker than 1/8" aluminum. I have cut .093 Lexan with compound snips. It's doable. It leaves a crappy pinched-off edge on each size of the cut that requires a good amount of filing/sanding. I have made cuts in 1/8" Lexan around 1" length. This requires a good amount of hand pressure, leaves a crappy edge, an occasionally makes small cracks in the Lexan. Sometimes, I have to do the 2-handed power squeeze to get the snips through 1/8". I don't recommend it. I mostly use snips if I want to lop off a corner for a coffin lip.
-
If you don't have money for a band saw, you can make the rough wood cuts with handsaws and the jigsaw to get the shape close enough to finish with the belt sander. I use the end of the sander belt for curves. There are lots of different handsaws for $8-15. You probably already have some. I started off with 2 like the ones below and still use them. https://www.harborfreight.com/12-in-flush-cut-saw-62118.html https://www.homedepot.com/p/Stanley-14-5-in-Deluxe-Clamping-Miter-Box-with-14-in-Saw-20-600D/100034395 If you are comfortable with the Dremel for lips, keep using it. Just stay outside your lines. It won't matter if the cut is rough. Use the sander's shelf and disk, to get straight lip edges. See Dave's video at 3:00. I think table saws, especially older table saws without a riving knife, and routers are far more dangerous than a band saw. I would put Dremel cutoff disks ahead of a band saw as for being dangerous. I hope you are wearing eye protection in case a cutoff disk breaks. Cutting Lexan with a handheld jigsaw is all about clamping it securely preferably on both sides of the cut to stop the flapping. A fiber board blade should work if the blades you have don't work. https://www.lowes.com/pd/Bosch-4-in-T-shank-Carbide-Tooth-Jigsaw-Blade/50247177 https://www.youtube.com/watch?v=JIv0ZB0rVfk When I didn't have any place to make lures except outside next to a shed, I did figure a way to cut 8" x 10" Lexan sheets with a handheld jigsaw. You need a big piece of scrap wood like a 3' long piece of a 2x12 or a 1'+ wide by 3' long piece of plywood at least 3/4" thick for the top of a makeshift cutting platform. It was faster than hand cutting which doesn't say much. I am not sure if it is worth posting.
-
Welcome aboard. 1. Dave is right. A band saw and belt sander make Lexan lips a lot easier to make. I use a bench top belt sander that also has the side sanding wheel with a shelf. If you can’t tool up, I would take a look at pre-made lips that are sold by numerous suppliers. Pre-made lips come in a lot of sizes. You can file/sand them down to change the shape a bit if you can’t find the exact dimensions you are looking for. This way you can focus on your designs and get to making lips when you can get the tools. I have cut Lexan with shears but it usually messes up 1/8” (or more) around the cut so you still have to do filing/sanding. You have to stay further away from your template line with shears . As for metal lips, I find stainless too hard to work with. I use aluminum for my metal lips, 1/16” thick for smaller baits, 1/8” thick for larger baits. Because I only make a few baits with aluminum lips, I cut the lips with a hack saw outside the line and use a file to get it to the line. A steel hacksaw and file go through 1/16" aluminum fairly easily, 1/8" takes more effort. This is definitely not the way to go if you want to make more than a few baits at a time. I buy aluminum flat stock in a width close to the length of the lip to minimize the amount of cutting (ex. 1” wide flat stock for 1” long lips, so you are really only cutting the sides of the lip). If that machine can cut stainless, it should be able to cut aluminum. Ask you friend about being able to do that. Even if you have to supply the aluminum, it saves you the cutting. 2. If I am going to do a wire through bait, I usually use Dave’s two-halves method. You start with 2 equally thick blocks glued (or double-sided taped) together, cut the rough flat shape out and the lip slot before doing any rounding. Once you have the rounded shape, you can separate the halves, make grooves for the wire/swivels, and make pockets for ballast and rattles. This way you are not cutting a shaped body in half and you don’t have to patch ballast holes. If you want to try a shortcut wire-through method, Dewalt makes some 12” long drill bits that will go through most body lengths. I don't recommend this way for any sort of volume beyond personal use. This way you don’t have to do the tough job of getting 2 drill holes from each end to line up. This method can be easy but has its drawbacks. The 1/8” diameter bit can sometimes flex passing through the wood and may go off course and not be perfectly centered. I cut 2" off the chuck end of the long bit with a hack saw to reduce the flex and make the bit easier to work with. When I use this method, I drill through the unshaped piece of wood first. Start the hole with a normal length drill bit of the same diameter first to get the start of the hole straight. Then, go back in with the long bit. Once drilled, I draw a lines on the outside of the block marking the path of the shaft hole. I line up my template or draw my outline on that line so my line tie and tail loop will be in the right spot. Basically, I adjust my shaping to make the shaft hole centered. If the drill bit goes really far off course and I can’t fit my template on the block, it becomes firewood. The wood is wasted but you only have minimal time into the build. On such a 'wasted' block, I try to cut off some of the length of the block to make it usable for a shorter lure. https://www.lowes.com/pd/DEWALT-1-8-in-x-Standard-Twist-Drill-Bit/3419822 3. Again, Dave is right, too many variables to narrow down without pics. If the lures sits right in the water and isn’t tilted to one side, I would guess the lip size and/or shape are not right for the body without seeing any pics. If you can find a place to test lures, I would do this. Go through your build process but don’t permanently install the lip. Cut the lure shape out, cut lip slot (make it so your lip material is a tight fit in the slot , and do not install lip just test fit the slot for thickness), sand to final shape, add twist eyes and install ballast, seal. Once sealed, you can temporarily install the lip with tape or soft glue on the back side of lip, attach rings, put bent over hooks/paper clips/wire on the rings to simulate hooks. If the lip fit is sloppy in the slot, you can put some tape on the base of the lip to make it fit tighter. Take easy casts or just drag to test the action. You don’t want the lip to fall out. This way you can try different lips on that lure. Once you find a lip you like, make a note of it for future reference. I have about 30 different lips in a bag for testing.
-
Another thumps for Mark's idea. Mark, I know you posted this tip a while ago. It has made my lure making easier. You can get a near perfect cylinder that fits the ballast hole tightly. It will reduce the margin of error in Travis' formula caused by irregular ballast weights made with wood molds or ballast poured in a drilled ballast hole. In a pinch, if Bass Pro is out of the coil lead, you can use the XPS finesse weights as a substitute . They do have a hole through the middle that can be filled with wire. The 1/2 oz finesse weights are 1-1/16" long and have a diameter of 5/16". They have a hole that can be filled with .051 wire. I don't know the dimensions of the other sizes. https://www.basspro.com/shop/en/bass-pro-shops-xps-finesse-weights The finesse weights also make cheap bodies for inline spinners.
-
I bought some of their painted Colorado blades: chartreuse with white stripe, red with white stripe, chartreuse with red diamonds. The quality is decent, nothing spectacular, but good for the price. The chartreuse & white stripe and the red & white stripe Colorado blades were nickel on the backside. I had to give the back side a quick buff with a microfiber cloth to get them to shine. I use Nu Finish Scratch Doctor car polish for blade cleaning. After a quick buff, the nickel finish is pretty good. The chartreuse with diamonds blades had a back side that was painted chartreuse with no diamonds. I have only fished them maybe 6 times and all the paint is still there. I don't know about the long term durability of the paint. If the paint doesn't last, I will hit my remaining blades with some rattle can clear. I ordered size 5s and 6s from them. Their blades run a bit small. Their size 5 is the same as a size 4.5 in other brands. Their size 6 is around a size 5.5 in other brands. The shipping was fast and nothing was missing from the order.
- 1 reply
-
- 1
-

-
New member from New Jersey... anxious to get started!
JD_mudbug replied to Smugg's topic in All Aboard
Welcome to the site. I mostly fish freshwater and mostly make hard baits. A few times a year, I fish saltwater from piers, jetties, or just off shore in MA, NH, and ME. I don’t have as much SW gear as FW so I bring several bags of FW plastics with me when fishing SW. I use smaller 4” and 5” grubs and shads for down-sized bucktail jigs. 10” and 12” (and bigger if you can find them) ribbontail worms work as an eel imitator. I have had luck with black and other dark colors. I have always thought a big white, pearl, or silver ribbontail or a laminate to resemble a sand eel would work great. Most companies do not make big ribbontails in those colors. The eels with harnesses like the Savage Gear eel are pricey. I have caught a few SW fish on Lake Fork ring fries and centipedes like the Arkie Crawlin Fry. I have even caught a couple of Tautog off a pier using a green pumpkin Yum Crawbug on a high – low rig. People were catching them on crabs and I didn’t have any. I think a lot of FW baits would work if they had the local SW baitfish and prey colors on them. So, if you can find a good deal on a FW mold it might be worth a shot. I don’t know if a ring worm or centipede mold are worth it for SW if you can find a sandworm mold. I think Zoom super fluke type baits would work just about anywhere. I have caught stripers and blues on them. In case you have not come across it yet in the videos, there are different plastisol formulas and some are designed for saltwater. On smaller baits, you may want to try a blend of FW and SW plastisol. When searching on this site, don’t just use the search at the top right on the screen. There is another search feature under the ‘Activity’ link. I don’t know if it is just me, but sometimes I can’t find a post I am looking for unless I use that search button. Most importantly, don’t forget safety. I am no expert, so search this site and anywhere you can think of for safety tips. Good ventilation, respirator mask, safety glasses, long sleeve shirt (plastisol burns are painful), gloves, no flip lops, etc. The cumulative effects of fumes can be devastating. Have first aid and burn stuff on hand. Have some clean water on hand, in a small bucket, for burns. Make sure your cups and butter knives are dry. Water and plastisol do not mix and can cause explosive splattering. Use good clamps and cups. Do not use the microwave you use for plastics for cooking food. Do not put a hot cup on a cold surface. I am not trying to scare you off. It is a great hobby. I was very enthusiastic to start making lures. Safety was almost an afterthought. I really wish I had taken safety more seriously when I started. And please send the stripers north earlier this year. -
I had a few Sugar Shads and never had much luck with them. I had more luck with the Cordell Super Spot in 1/2 oz and 3/4 oz. The bigger Cordell Hot Spot and King Spot with the one large knocker is great too.
-
I get smooth wire tags end by over-wrapping a bit, pulling the tag end back around a bit to clip it as close as I can with side cutters (or a mini-bolt cutter for .051 wire), hitting the cut end with a file to clean off any burrs, and then squashing the tiny tag end down with needle nose pliers. The overwrapping gives it that pre-bend for the squash down.

