All Eyes
-
Posts
690 -
Joined
-
Last visited
-
Days Won
30
Content Type
Profiles
Articles
TU Classifieds
Glossary
Website Links
Forums
Gallery
Store
Everything posted by All Eyes
-
 A 2" rattle bait. This is a color scheme that I have painted on several different styles of my baits.
 -
 Also a quick sketch showing the approximate placement of weighting that I used on these. They are mid rising floaters.
 -
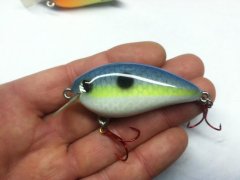
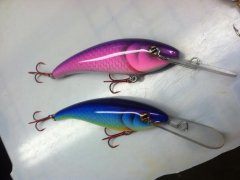
Thanks again Mark. Here is a picture of that pattern shown in mid stage that may help you see the underlying color better. I begin by painting the sides a dark color (black or other high contrast) Then shoot it white through mesh screen for scales. I then unwrap it and fade the belly and scales with more white. Then its a bit of transparent Carribean Blue Createx on the back side, and transparent Flamingo pink on the front. I then use a stencil and paint the gill and head white. That's where it's at in the picture. More of the same blue goes on the bottom edge throat area using the gill template. I then mix transparent green with a few drops of transparent brown, and paint the rest of the gill plate, head, and back. The stripes are done by adding one drop of black to that same mix. I also use this blend of green/brown/black to darken the back a bit more and create the shading around the eyes and gill. Belly is flouro orange and yellow, with opaque red trim for bleeding gill. Also, pics of the simple paper templates I made to paint these. I rarely ever use the same ones twice. Hope any of this helps!
-
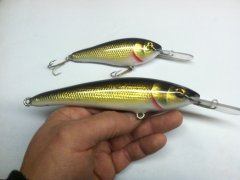
Thanks a lot for the kind words Mark! The weighting in these is done in 2 spots. One behind the front hook hanger, and a smaller one in the throat. If I remember right, there is close to 4 grams total in these, which are 2 1/4" cedar bodies (minus the lips). I've played around a lot with weighting and prefer this over one belly weight for these type of baits. They sit slightly head down in the water. The lips are a bit wider than the bait at the front edge and taper back more narrow at the slot. There are 8 colors in this bluegill pattern, not including the white base coat. Fluorescent orange and yellow, black, transparent green, brown, yellow, Caribbean blue, and Flamingo pink.
-
Tested some crankbaits today. Looking for suggestions.
All Eyes replied to MarkNY's topic in Hard Baits
Glad to hear it was salvageable. Those baits look very nice. -
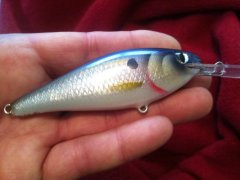
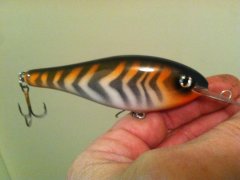
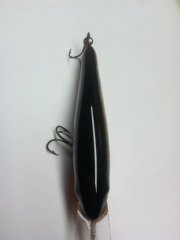
 Thank you D.harper! These are done by cutting a head/gill shape out of thick paper, laying it on a piece of a metal screen, then placing foil on top and rubbing and pressing it lightly. It makes the scale pattern and slightly raised gill in one step. I find it easier to cut the foil into the shape of the bait before hand. A light coat of transparent green Createx on the sides and top, followed by a light coat of black on top and on the stripes. For those, I cut a stencil and hold it a half inch or so away from the bait which helps fade the edge lines a bit. The belly is pearl white. Hope this helps.
 -
TY! Good stuff guys. I have used the twisted wire method on a limited basis in the past, and went back to the way I learned from the start. Like Rayburn Guy said, there are a lot of different ways to skin a cat. Any tunable line tie that's durable and lets the bait move freely is a good one in my book. After that it's just personal preference. I also drill a small hole thru the back of the lip and rough up the material to help the epoxy bond to it. My line tie hole and lip slot are drilled and cut on the small side, so that it takes a bit of pressure to fit them into place. I use 2 ton epoxy, and shove a lot of it into the hole with a piece of wire before installing them. After testing on some mock ups to the breaking point, I am positive that no fish out there is going to pull the lips out. Especially before the line snaps or the hooks fail. That epoxy is no joke.
-
Hope it helps. Here is what the end result looks like. I like to drill the hole for the line tie before cutting the lip slot. Too hard to drill that close to the slot without blowing it out. My line ties are usually longer than the one shown in the picture. I also like to put a slight bend at the very ends of them to grab a bit better.

-
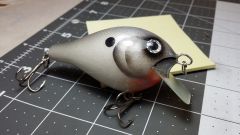 Have to agree with Robzilla. A very cool looking bait. Nice work on the shape paint and finish.
 -
Tested some crankbaits today. Looking for suggestions.
All Eyes replied to MarkNY's topic in Hard Baits
As Jigginpig pointed out, symmetrical profile is very important. Even good eyes can be fooled. One way to check during the shaping process is with templates that you can make in different sizes. Some use C-shaped templates that check one side at a time. The way I go about is is to fold a piece of plastic masking film, or cardboard, etc. in half and cut out half of an oval (on an oval shaped bait) so that when you unfold it, you have a hole that is perfectly even on both sides. Slide your bait into the hole you cut and line the top and bottom centerline up to the fold in your template. (Hope this is making sense- I'm terrible at explaining things sometimes) With different sized templates, you can check the bait from head to tail. What you are looking for is daylight on one side but not the other. It's just easier to tell where more material needs taken off. -
Tested some crankbaits today. Looking for suggestions.
All Eyes replied to MarkNY's topic in Hard Baits
Thanks a lot for the kind words Mark! Your baits are looking great also. Very clean work. -
Tested some crankbaits today. Looking for suggestions.
All Eyes replied to MarkNY's topic in Hard Baits
First off, your baits look fantastic! Jigginpig summed it all up rather nicely. Lots of trial and error. Lip size, shape and angle, wood type and bait shape/size, ballast and line tie placement all work together to create a specific action. Sometimes just adding a bit more ballast will stabilize a bait enough to keep it from blowing out. Easy enough to test by adhering weight before drilling into them. -
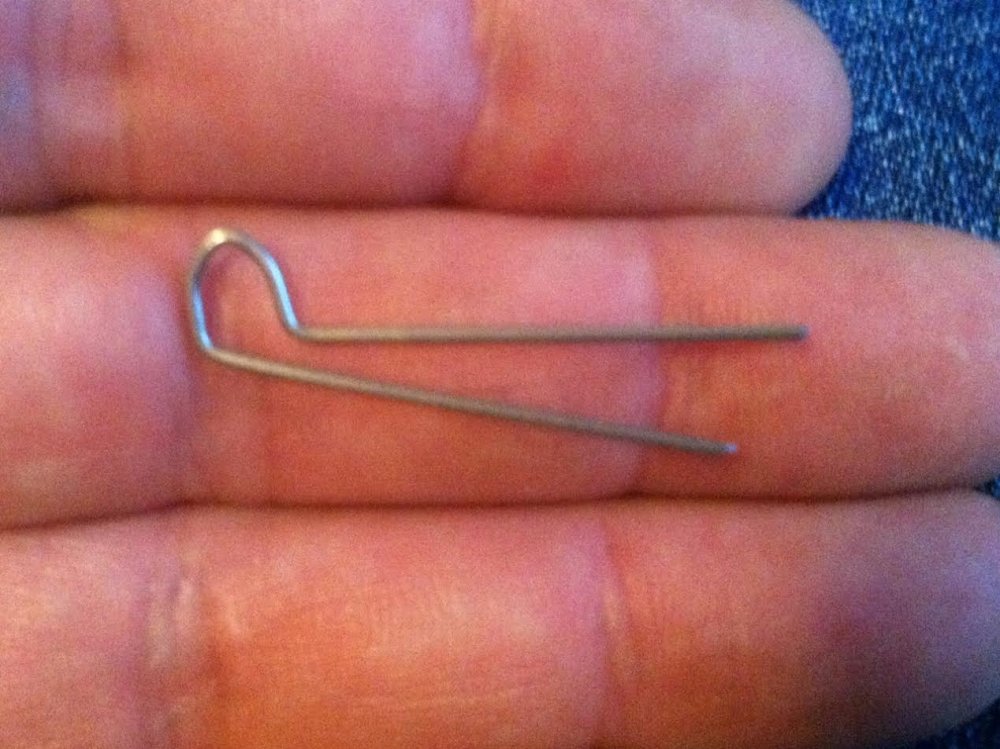
.35 is what I use, but I drill two holes in the lip and shape the wire before inserting it thru. Trying to get a proper bend with the lip attached is a pain in the butt. Here is what my wire basically looks like before installing it. It takes a bit of manipulation to push through at the bends, but I do this with both polycarbonate and circuitboard lips. Both tag ends go into one hole in the bait body, which force the wire tightly together and also acts as a bit of resistance against pulling out.
-
dpalinsk- I use reduced Auto Air Sealer White on my homemade wood baits with an Eclipse HP CS, and also have experienced trouble with particulate spatter. I now stretch a doubled up piece of nylon hosiery over the bottle top as a filter and it makes all the difference in the world.
-

-
 Thanks Braided!
 -
-
-
-

-
 Thank You Gliders!
 -
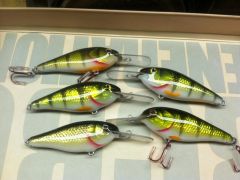
Thanks Douglas. I'm hoping to run a few of these larger baits on Lake Erie before ice.