


Hillbilly voodoo
-
Posts
1,138 -
Joined
-
Last visited
-
Days Won
90
Content Type
Profiles
Articles
TU Classifieds
Glossary
Website Links
Forums
Gallery
Store
Everything posted by Hillbilly voodoo
-
Congrats to the winners I may need to hire a photographer next year if I hope to stand a chance lol
-
Personally I don’t find KBS complicated I brush it on thin no dipping. Thin coats prevent bubbles. I only had bubbles when I first tried KBS I store it in small canning jars with plastic wrap between the lid and jar. Nothing else but I go through a jar reasonably quick once I start using it. Unopened canning jar no issues even after a year(miss placed one and found it later still good). I don’t thin KBS at all and have never used floor wax or bloxygen I heat set all my paint layers and have had no issues with KBS within a few hours. Without heat setting you need to wait longer. Heat setting is just good practice regardless of what clear coat you use I use multiple coats of clear regardless if it’s Etex or KBS because my main target is pike. I do apply 2 extra layers with KBS but the durability is not an issue especially considering how thin the layers are I hang my lures to dry in a Rubbermaid with wet paper towels in the bottom and tape the lid. This controls the smell and the moisture speeds up curing time. Nice bonus is it also helps prevent dust ex from getting in the clear coat Personally I would say KBS is actually really simple from my experience but it’s like any clear coat you need to work with it. Pick your poison all clear coats have positive’s and negative’s
-
Forgot to put index features in the first half of a mold
Hillbilly voodoo replied to aulrich's topic in Hard Baits
I use the Lego method and the clay does a good job of preventing the RTV from leaking. I have never used glue of any kind. I have been reusing the same clay and Lego for years -
Forgot to put index features in the first half of a mold
Hillbilly voodoo replied to aulrich's topic in Hard Baits
Yup I have made this mistake once or twice lol It’s no big deal if you have only poured one half of a two piece mold. I have either cut out cones with a scalp or taken a large drill bit and drill some shallow holes. Make sure you use lots of mold release and pour the other side Now if you poured both sides you can create locator pins with small doweling. Use your master to make sure your mold is aligned and close it up. Drill through one side and part way into the next side of the mold. Push the doweling through the one side of the mold part way into the opposite side. Cut the doweling flush to the outside of the mold And there you go you have wooden locator pins I have made this mistake a few times rushing well making molds before I go to work or running out the door. The wooden dowel trick is how I fixed molds I forgot to use mold release and had to cut them in half hope the above makes sense -
 Maybe one up it and create a design with the color pencils too
 -
Cool idea too bad you missed the deadline
-
Welcome lots of knowledge around here when in doubt run a search or ask You may not get the right answer all the time but you will get some great opinions lol
-
05656855-0A21-4D47-A7E0-1733C92FFFE0.jpeg
Hillbilly voodoo commented on Hillbilly voodoo's gallery image in Best Wire Bait
 It’s another one of my redneckered baits that was designed for personal use with no concern on what it’s supposed to be She will definitely get bit and don’t think it’s going to take many casts to make it happen
 -
Are you able to sand down the joint to improve clearance with this material?
-
I have only used/made stickbaits that are more of a baitfish body shape but they work. Never used a needle fish Truth is some of my jerk baits use principles from saltwater stick baits. Really lipless jerk baits, gliders, and stick baits are all in the same family where the lines blur at times. Any truly predatory fish will hit them it’s often just using the correct size that runs at the correct depth and how the angler works it Now catch something on these 3D printed crankbaits
-
This 3D printing stuff sounds like a real pain and would likely result in me breaking my computer if I tried it Aulrich I can tell you for a fact pike smash sinking stick baits and are another great underutilized pike lure
-
Tracer Trout
Hillbilly voodoo commented on danthefisherman's gallery image in Best Homemade Hardbait
 Nice work and hope your hard work gets you the results you are shooting for
 -
C0AF6D59-7C1A-4DC2-9B84-7C2E5665E75F.jpeg
Hillbilly voodoo commented on Big Bass Man's gallery image in Best Soft Bait
 Still a cool looking swimbait and would be interested in see some of your other work. But if I remember you won with this same lure last year
 -
2022 Lure Contest Starting April 1st!
Hillbilly voodoo replied to Curt - NC's topic in TU Site Info & Updates
Nothing new I do feel like I am slacking only entering one lure in each of the 4 categories I entered But I have not entered the soft plastic category yet and I just got all the supplies 4days ago. Maybe I will go shoot my first 20 injection lures and enter them all You know just so I can be one of the cool kids -
I like the squeeze bottle idea. Right now I just keep filling a small container and use a scoop. It works but I have spilled it everywhere a few times
-
 You definitely keep developing different skill sets since you first started posting
 -
Interesting and something I have not experienced but I don’t experience big humidity swings. All my lures are poured in my house One thing I do that helps with bubble is warm my molds with a heat gun before pouring
-
Never attempted pouring fins or anything really thin so I am not much help solving any issues there. Myself I just can’t get into the time involved in carving gills, scales, and adding fins because I feel it’s a lot of work for cosmetics My focus has always been dominated by achieving action So I am awake now and no one wants to talk resin baits lol
-
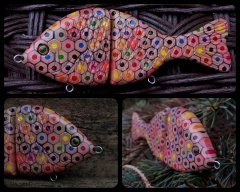
A7B28B56-B2AF-4A82-A3C3-695CB567F5EA.jpeg
Hillbilly voodoo commented on Hillbilly voodoo's gallery image in Best Homemade Hardbait
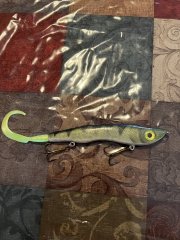 This is a 7inch without the tail resin jerk bait. The master was carved out of wood then molded in silicon. The curves of this bait have a purpose when it comes to distributing the weight and buoyancy. They also impact the fall on a pause. This was poured with a layer of pure resin, another layer of moderate buoyancy mix of resin/micro balloons and some lead shot in the correct location to cause some shimy as it falls and give some side roll on the jerk painted with with a yellow and black blotchy base coat to give a faint modeled look. Followed by lime pearl scales. Then a pearl black back and bars. Face is lime pearl and black pearl for gills. Fine gold glitter in first layer of clear coat followed by multiple layers to protect against pike teeth. The tail is held on by a threaded pin made from a large eye screw.
 -
A7B28B56-B2AF-4A82-A3C3-695CB567F5EA.jpeg
Hillbilly voodoo posted a gallery image in Best Homemade Hardbait
-
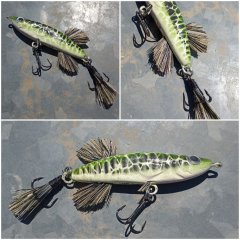
AB0C78C8-D81D-46E2-946F-9086AFBD1601.jpeg
Hillbilly voodoo commented on Hillbilly voodoo's gallery image in Best Custom Painted Hardbait
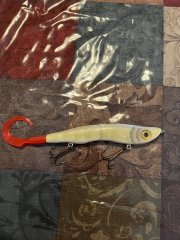 I hate taking photos of baits painted with pearls because I loose part of the details lure was painted with a white base. Next a cream color with faint dark bronze pearl bars and a copper pearl back. Small silver scales over the sides and back. White spots freckled over the back and sides. Then a white belly slightly faded into the sides. The face I faded in some white and add black gill detail. The first layer of clear coat has fine gold glitter and then 4 more coats of KBS
 -
AB0C78C8-D81D-46E2-946F-9086AFBD1601.jpeg
Hillbilly voodoo posted a gallery image in Best Custom Painted Hardbait
-
Don’t know if they come any bigger but odds are you could cut your own
-
 Oh come on man go out and fish it lol may get you a new PB musky
 -
Recipes do transfer pretty well but if I remember right smooth on just slightly lighter. I didn’t notice an impact on action though. for issues with air bubbles cutting small air vents in the mold is the real key. If I notice air bubbles in an part of the blank I cut a vent. I maybe overkill but it is not uncommon for me to cut 8 vents on a 6-8 inch bait As for pouring I have done some interesting things pouring baits with different layers. I actually pour on different angles for different layers for some baits. When I first start drawing up a bait there is a lot of thought into how things settle into the body shape but I need to get ready for work


