Bassbme
-
Posts
56 -
Joined
-
Last visited
-
Days Won
3
Content Type
Profiles
Articles
TU Classifieds
Glossary
Website Links
Forums
Gallery
Store
Everything posted by Bassbme
-
Dink Master, thank you very much for your reply. It is much much appreciated and helped a ton! When you said the number of molds was spelled out on the website I was perplexed because I didn't see it list the number of cavities. Going back I see the number of cavities is in the model number? The dash 05 means 5 cavities? And the video you linked is awesome !!! Thank you very much for that. It appears to be the same mold I'm interested in. Definitely loving the quality looking baits it produces. Oh and looking at extra rods I did see that the molds include rods. So thank you for that as well. Les, thank you very much for your reply as well. It too is very much appreciated. Yes, after watching the video I see how the rods are notched to create different thickness heads. For some reason I misinterpreted the review I mentioned and thought it referred to wall thickness. I made an ejection mold out of DWP that is a tube bodied craw and I use different length rods to change the head thickness. That notching the rods idea is quite the slick little deal. I may remake the mold and incorporate that into my new mold. Once again thank you guys very very much for the responses. I truly appreciate them. Gonna go order the mold right now
-
Specifically, their tube bait 737DD-05 3.75" Double Dipper Mold. Does anyone have experience with this mold? And if so, how many cavities does it have? Does it come with rods? Also, in reading the reviews, one of them said tubes can be made two different ways. One with thin walls, and one with thicker walls. Surely that has to be accomplished using rods of different diameters. Any information that can be provided about this mold will be greatly appreciated.
-
On the adding of Pro Cure scents to the plastic. I tried adding their Crawfish Bait Sauce (it's oil based) to the plastic and it made the plastic burn. I thought maybe I wasn't paying enough attention and I just let the plastic get too hot, so I tried it again, with the same results. I just add it to the bags now. Love the stuff, just not going to try cooking it in anymore.
-
Lureworks Medium vs. Medium/Soft vs. Medium Hard Pourasol
Bassbme replied to fishyfish21's topic in Soft Plastics
If you are willing to try a plastisol from a different manufacturer, the Super Tough from Bait Plastics is just as its' name implies. That stuff is tough as nails. I use it to make chunk trailers for bass jig, and also for dipping the heads of drop shot baits in. It is hard to tear off a hook, and it has decent action for the chunk trailers as well -
My experience has been that baits with salt added in the plastisol soak up scent more readily than baits that don't have salt added to the plastisol. Also, water based scents soak into baits better than oil based scents.
-
And I don't mind saying kind of jokingly, that it was a somewhat emotional lesson learned. I broke both of the crawtube injection molds that I made. Pretty positive about the cause of the breakages. I have a tournament tomorrow and I was doing up a bunch of baits. I noticed the molds were getting hot and I was getting a little more flash with the usual amount of clamp pressure I've been using, and I squeezed the clamps just a little tighter. Pop !!! The top half of the mold for the larger bait broke in half, crossing the cavity of the two bait, mold. When that happened I looked at the mold for the smaller bait, and found a crack that's about half way across the top half of that mold. It's still together, but probably not for very long. Very disheartening to say that least. I'm going to be remaking both molds, but in the mean time, do you guys think there is any shot at salvaging them? The one that's completely broken is a very clean and well mating break. I was wondering what I could glue it with. I'm thinking some Elmers? Anyhow .... I now know that when the molds start getting hot, take a break and let them cool down. I should have got my head out of my you know what, and thought that needing to increase clamp pressure to keep the flash down was a warning sign to let them cool down. I was just in a hurry to get enough baits made for me, and for some to give to my tournament partner. Ah well. Lesson learned.
-
hpssports, thanks for the reply. I appreciate it. I'm going to give that stuff a shot. I never really used Mend It until I started making my own baits. Just always put on a new bait when it got tore up. I needed it for making baits because a couple of the masters I've made molds from are Frankenstein baits. Mend It works great for that. After making the master, I put it in a plastic sandwich bag to save for later. Anyhow, I glued eyes on some baits to try it out, and I left the baits out on my work bench. The smell is almost zero. Still a little bit of smell, but nothing like when its only a couple of days old. I'm going to use it and let the baits sit out for a few days before I bag them up. And you aren't kidding about the HH-66 being a lot cheaper than Mend it. Thank you for that recommendation. It's definitely the way to go.
-
18 baits and only 1 that had any hint of a dent. And that it because it was the bait closest to the sprue of the mold, and I didn't have enough plastic in the injector. Once again a huge thank you to Mark for his help. And a huge thank you to all the members that have given me help and offered suggestions on any of my threads. Your thoughts and input are appreciated more than you can know. This place is the Rodbuilding.org of bait making. I love this place !!!
-
Mark, I wasn't sure if you check back on threads that you've commented in before, so I made this thread just to say, Thank you !! The advice you offered me in my injection mold problem thread was spot on! Trying to keep the story short ... I tried opening the gate up a bit and added a vent channel with a hole drilled at its end, at the nose of the bait. It didn't help at all. In fact it made it worse. The vent wouldn't let me build up any pressure in the mold, and I think it actually caused the gate to cool closed more quickly. So I got the Dremel out again and really went to town on opening up that gate. I didn't quite take it to the entire width of the runner (but I will) but it's almost there. I left the hole I drilled at the end of the nose vent channel plugged with plastic, and shot the mold again. Almost perfect !!! When I opened up the mold, the now funnel shaped gate was actually hollow. Opening it up that much allowed the bait to pull in more hot plastic. Which is what the problem most likely was from the very beginning. Your advice to me tells me you knew exactly what the problem was. And you told me how to fix it. I can't thank you enough for steering me in the right direction. I really wanted this bait to be right. And you made that possible. Once again. Thank you. Your help is truly appreciated.
-
wallyc14 and hpssports, thanks a lot for your replies. I really appreciate them. wallyc, it's hard to tell from the pictures offered on Lurecraft's web site, just how realistic those eyes look. Judging from what I can tell, I'm thinking not very. I am looking to use them on drop shot baits, in at times, some pretty clear water, so the fish will get a good look at them. And as I said in my first post, probably not going to make much if any difference to the fish, but it does for me. hpssports, I just tried using the 3D eyes that I have and encapsulating them in Mend It, (I have it on hand) It worked well, but man that Mend It stuff stinks, and I know from past experience that it retains its smell for a pretty long time. Does the HH-66 not stink as much as Mend It? And does it lose its smell any faster? If so it's definitely something I will use. Again, thank you guys for your replies. I really appreciate them.
-
Just wondering if anyone has tried the soft plastic eyes from Lureworks, and what are your thoughts on them? Do they look as good as the more standard hardish plastic type of eye? If you had a choice of ease of installation (Mend It versus super glue) or more realistic looking, which would you choose? Personally I would lean heavily towards as realistic looking as I can get. I know the fish probably wouldn't see much of a difference, but I would. lol Your bait looks good, you fish it with more confidence. At least I do. Of course I've caught some nice fish on some pretty ugly baits. Anyhow.... Lureworks soft plastic eyes ..... yay or nay? Thanks guys !!!
-
Just wanted to drop a post about the craw tube I made. I fished my first tournament with that bait on 6/6. It was a smaller tournament, 34 boats total, with a 5 fish limit. It was an open so you could either fish as a team, or fish my yourself. I fished it by myself and while I'm not sure, I probably ended up somewhere in the upper half of the field. I had a 5 fish limit of 10.15 lbs. Every fish came on one of the craw tubes I made. I tried a few other soft plastic baits, (Jackal Cover Craw, and a grub/ringworm bait I made) but when you get a fish on your third pitch with one of your baits, you kind of stick with it. lol I fished my craw tubes probably 75% of the time I was fishing a soft plastic bait. The tourney payed 6 places, 13.04 took first. 11.99 took 6th. Of course we all lose fish, but I lost 2 that would have probably gotten me a check, and if the one was a bass, probably would have won it for me. The one I am sure was a bass was about a 2 1/2# fish, which would have been about a 1 pound up grade. The other fish I never saw. Whatever it was it was a good one. Pitched in by a bush and the line starts swimming off. I set the hook and the fish pulled about 6' of line off against the drag, which I had as tight as I could get it without using pliers. lol. Anyhow.... had it on for another 3 or 4 seconds and it pulled off. I'd like to think it was a bass, but I've caught some big flathead catfish when flipping and pitching at this lake, so it may have been a catfish. If the water temp wasn't in the mid 70's I would have thought it might be a big pike, but with how shallow the fish was and water temps, it was either a bass, or a catfish. Oh well. sorry for in indulgence, but it's pretty awesome catching a fish on a bait you made.
-
Mark, thank you much for the reply. I appreciate it. Definitely not going to scrap it until I get the venting process figured out, and until trying your suggestion of enlarging the gate. I know I have to vent the trapped air somehow, but with your suggestion are you thinking that the long skinny runner is cooling and not letting the body suck in more hot plastic from the runner? Anyhow ..... I'll be starting a new thread in a day or two. I've got a few ideas for the new mold I'd like to bounce around with you guys. I really want to get this bait right and I'm sure that with the help of you guys and other helpful members of this site, I will be able to do just that. Thank you guys again for all your help. It is very much appreciated!
-
jigmeister, thanks a lot for your response. I truly appreciate it. And yes, I definitely need to redesign the mold. Like you said, and as I also suspected, the ring worm characteristics are only adding to the problem. Since I was already planning on remaking the mold. I took the easy way out on venting the existing one and just simply drilled a hole near the nose of the bait. I figured I needed to be able to make the vent closable because I need pressure to be able to shoot the curly tail. The tail vent actually works perfectly, and I will probably use the same set up for the new mold. I know that shooting the two color bait is causing me problems because that vent is shut off by leaving the tail in the mold when I shoot the second color, so there is no venting at all. But I still have the trapped air bubble problem even when shooting a single color bait. I'm thinking of going to a two bait mold and putting the sprue and gates near the curly tail junction. then venting the nose in the same fashion that I have the tail vent set up on my current mold. That way I will be pushing the air towards the end of the bait. I think I need those little channels because they add some resistance so the body cavity can get some pressure in it. That single hole I drilled in the current mold just took away any chance of building pressure in the mold. I got one good bait out of three, and even that one has a little trapped air. Anyhow .... Also going to a two bait mold will leave me more room for adding venting channels with drilled holes on the ends of them, That seems to be working pretty well. Like you said though, it's going to take some experimenting until I get it right. I know that once I get it right it is going to be a great bait for me. Thank you again for the reply. Much appreciated. Oh and at least I have 5 baits that are usable for Saturday's tournament. Not the numbers I was hoping for, but that's what I get for putting off working with this mold. Live and learn
-
bryanmc, Jig Man, and McLuvin175, thank you all for your replies. they are much appreciated. bryan, I was wondering about that. I wasn't aware of the siphoning affect of the cooling plastic drawing in hot plastic from the gate and runner. Think maybe that long gate is cooling too much and effectively shutting off the chance for the cooling bait to draw in more plastic from the runner? May even be closing any chance of air leaving the body of the bait. I do plan on remaking the mold, so I will shorten the gates when I do that. Just trying to make it work right now because I have a tournament Saturday and I pretty much made this bait to fish this lake. Anyhow .... Jig Man, I have tried your suggestion. Still get the same results. I've even tried keeping pressure on for 30 seconds, and not just slight pressure. McLuvin, I am thinking that I need to try adding a vent as well. As I said in my original post ... these are not plastic shrinkage dents, they are collapsed air bubbles. I do find it odd that on to of the baits it's always near the nose, and with the one bait, it's always in the mid portion of the body. I'm thinking that it being a ring worm type bait that it is catching even more air. I'm going to add a vent at the nose and see if that helps. I'd like to get it figured out before I go making a new mold. Once again, thank you guys VERY much for your replies. Got some ideas to work with now, and that's what I needed. Thanks again!!!
-
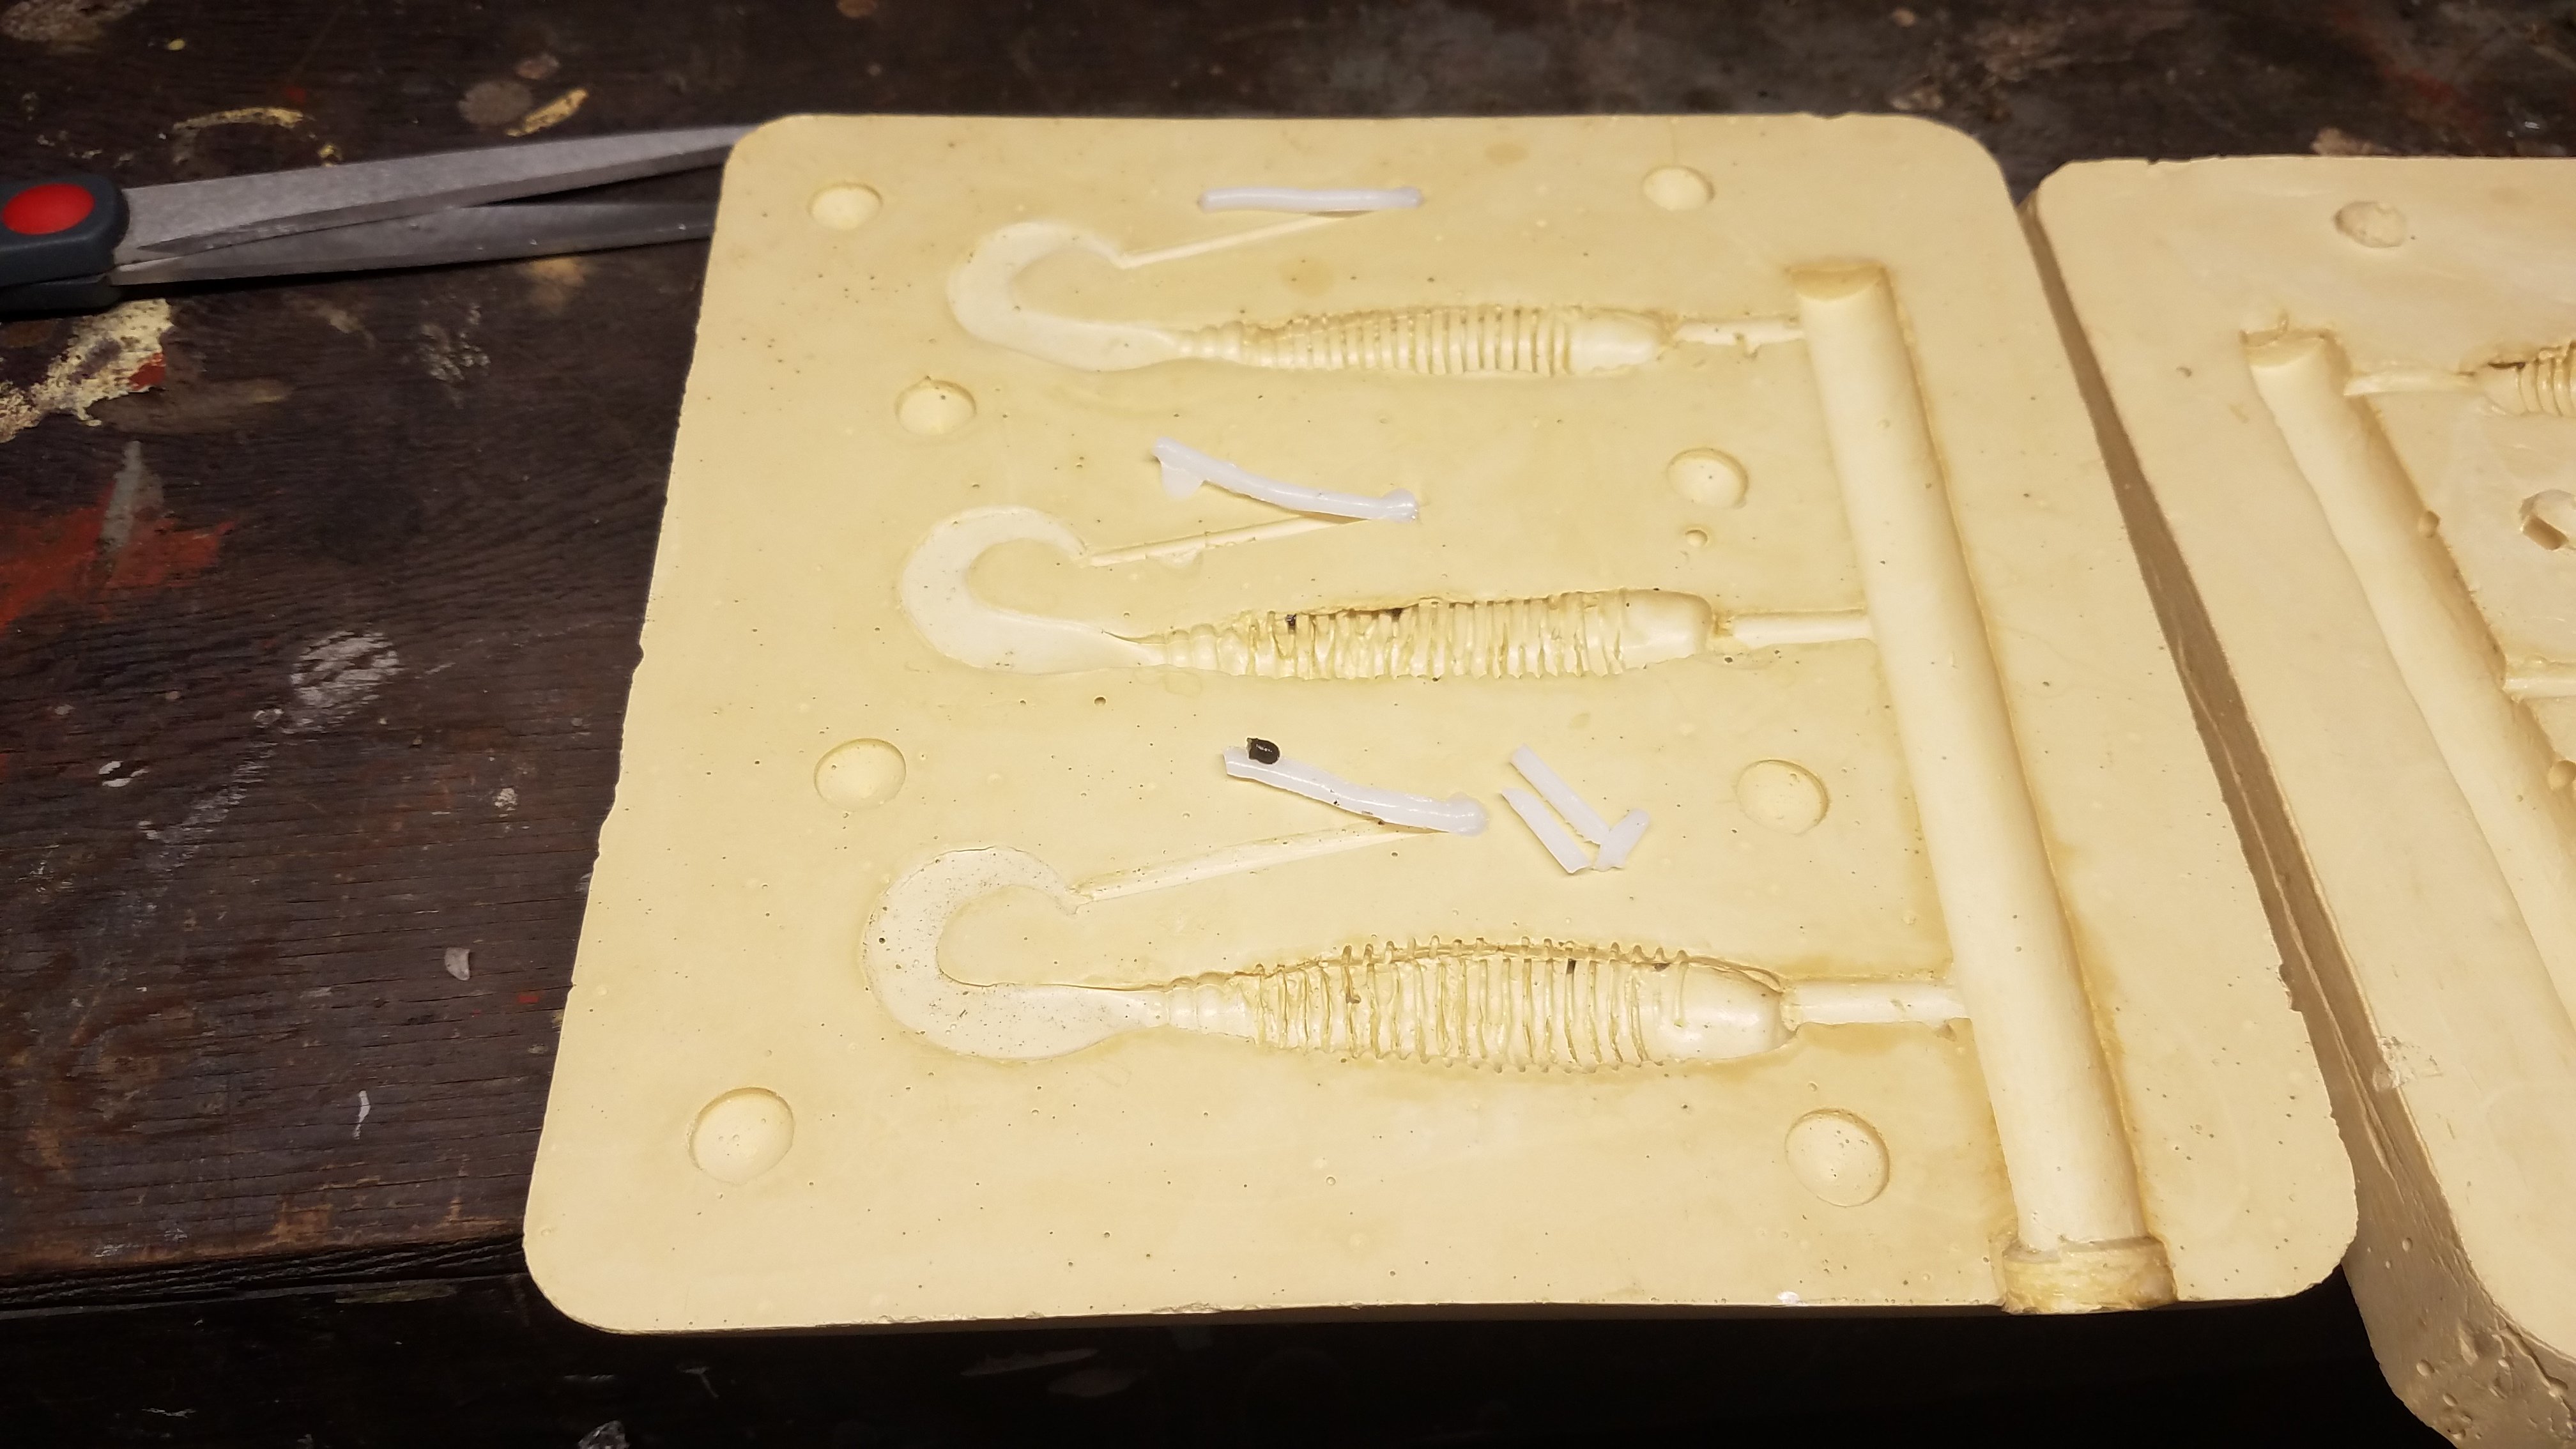
Need some help guys. I'm still very new to this soft plastics bait making thing, and made some injection molds out of Durham's water putty. My crawtube baits turned out pretty well, but I am having trouble with a fat bodied ring worm. I Frankensteined a couple halves of a bait together for the body and put a curly tail on it. I am consistently getting air bubbles in the bait. At first I thought it was dimples from plastic shrinkage. But now I know by cutting into a bait, that it's actually some decent sized air bubbles that are collapsing once the bait cools. I vented the mold to get the tails to fill fully and that worked well, but I am thinking I probably need to vent the body cavity? I've tried shooting the mold fast, with the plastic at around 340 and down to about 310. Haven't tried much lower than that because it's a ring worm kind of thing and figured I need the plastic pretty hot to get a good fill. Like I said. It's pretty much collapsing air bubbles causing the problem. Below are pictures that I hope you can see what I am talking about. I am not happy with the mold so I am going to be remaking it, but my guess is I will probably have the same problem. Any help you guys can provide will be greatly appreciated.
-
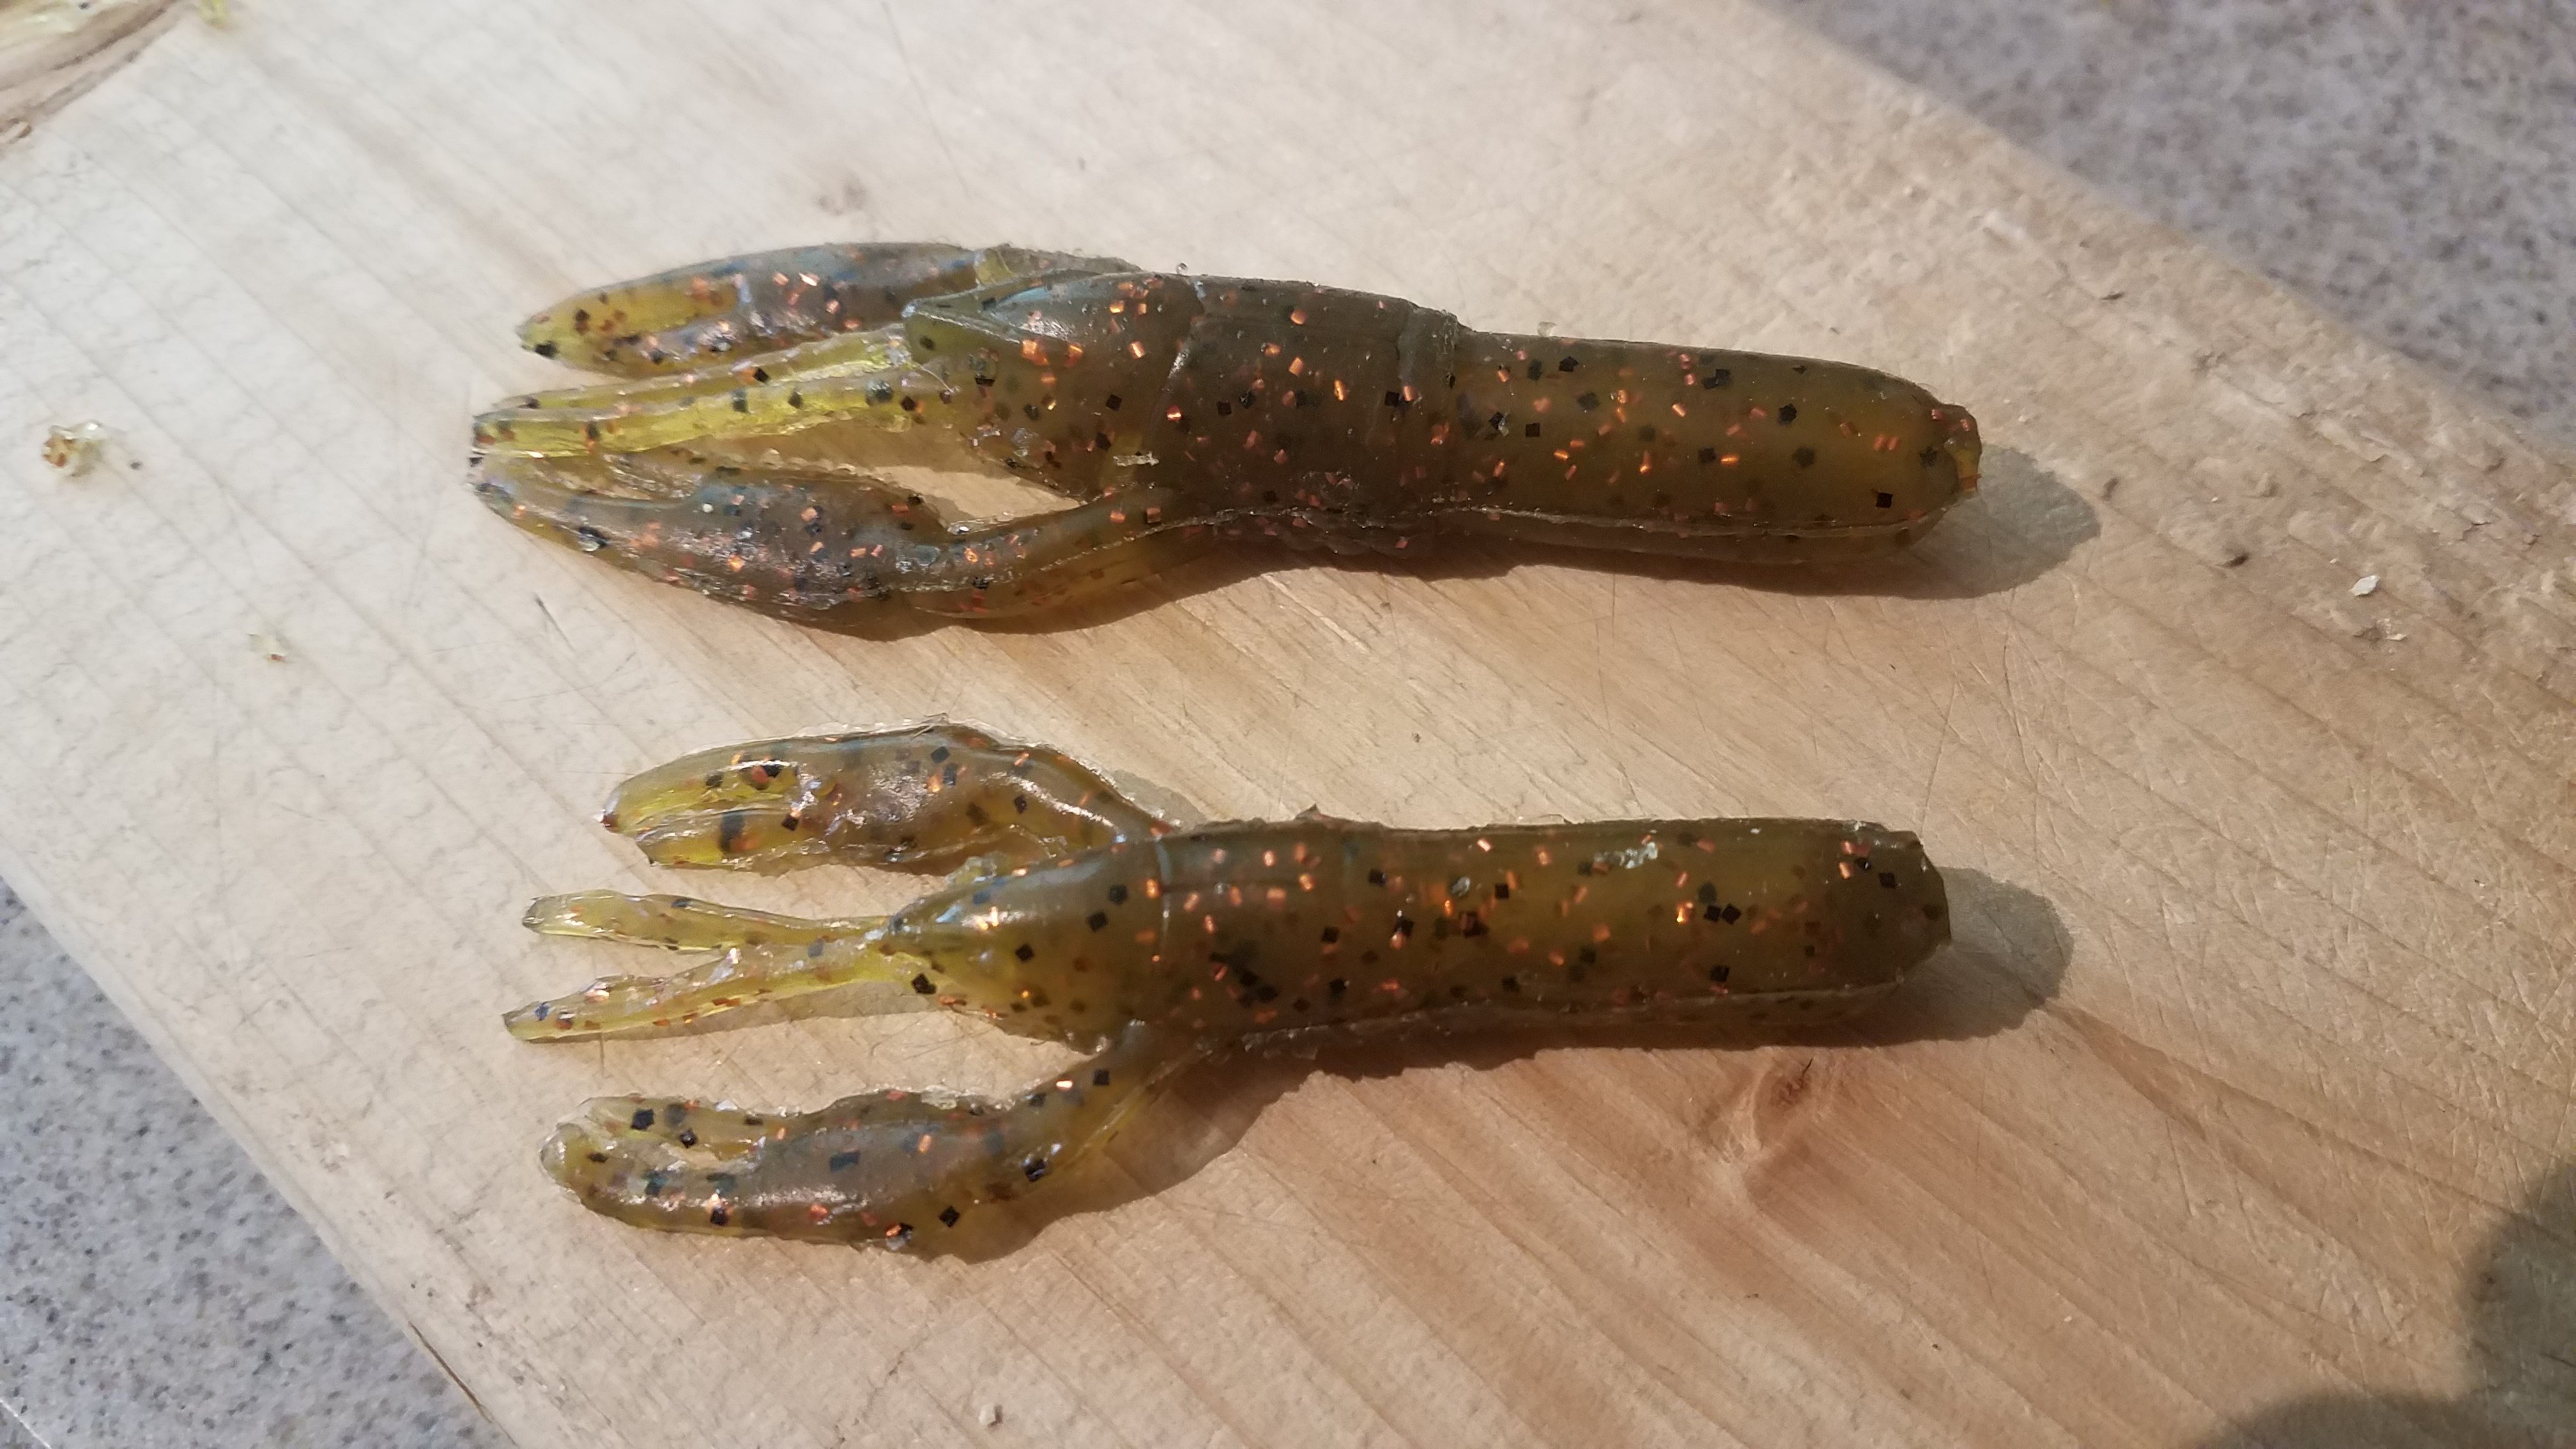
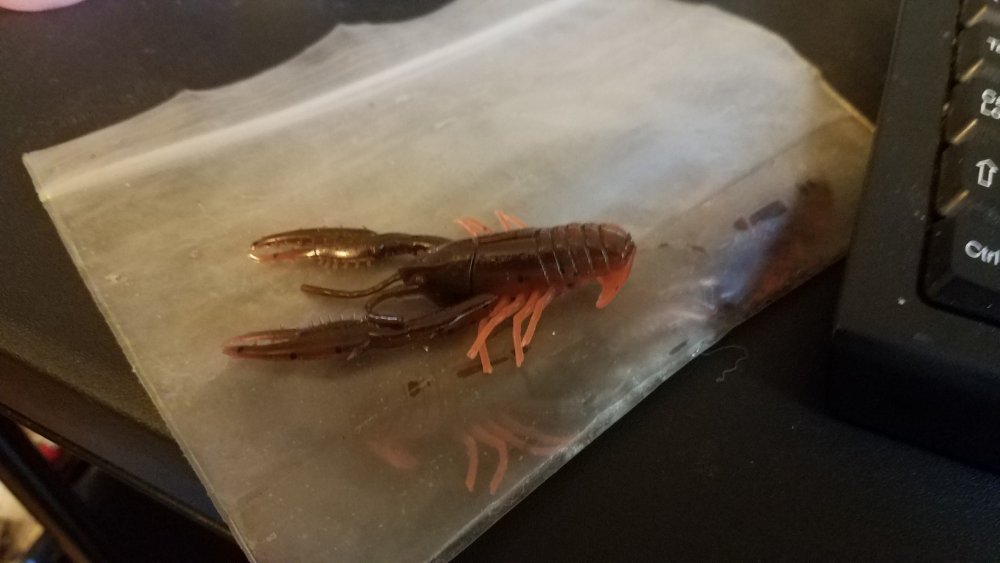
Jigmeister, those look really good. And you can definitely tell they're made using a Mad Man bait as the original. Those little hairs on the claws are what gives it away. I know exactly what you mean about the legs not looking natural. That's why I cut them off of the baits I was making. They just didn't look right. I was thinking of doing something similar to what you did, but for now I'm going to leave them as is. The antennae idea is a good one. I made a couple of open pour craw worm molds using a Venom hollow body craws, (pretty much the same as the Mad Man craw worms but with a hollow body. Since it was an open pour I couldn't leave the antennae on when making the mold so I was going to use living rubber strands for the antennae, because I could get it in thicker widths. But the colors are limited. I may do the same as you did with the silicone strands though as I am not real happy with the antennae on my baits. Thanks for sharing the photo of your baits. They look sweet, and even though it's a dark color, I can still see the detail really well. This mold making stuff is a lot of fun !!! lol
-
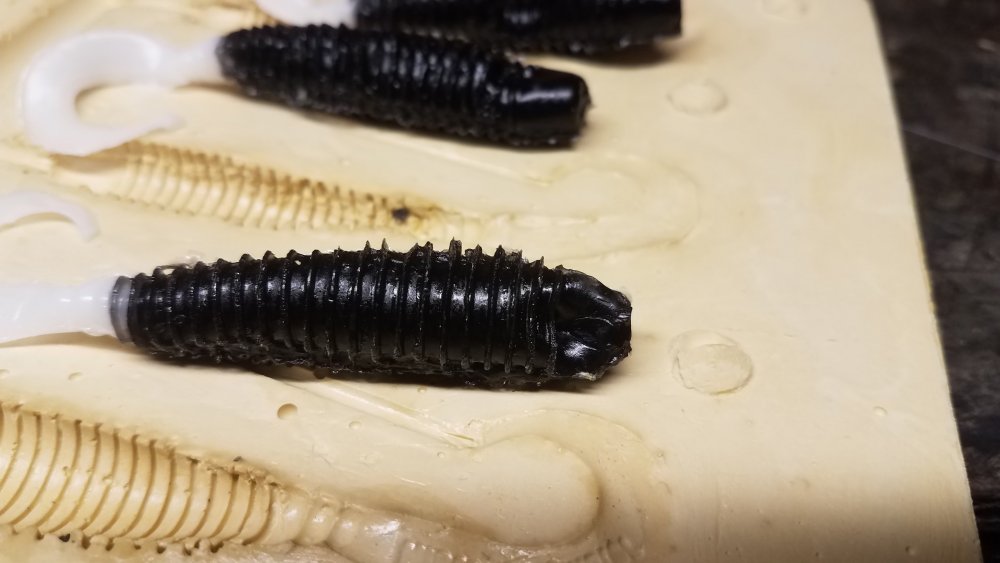
Oh and does this picture look familiar? It's one of the last 3 that I have.
-
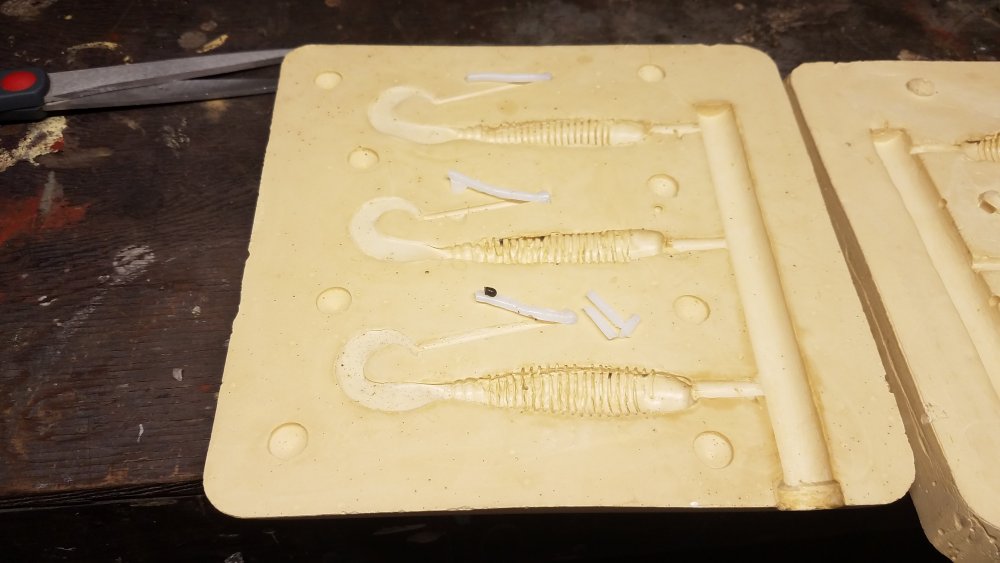
jigmeister, thanks for the response, and the compliment. Much appreciated. Those Mad Man craws were awesome baits. I still actually have 3 of the original Mad Man Craws left. I loved those baits, This is pretty much a Mad Man craw front half, as I used the front part of a Yum Craw Bug for that part of the bait. From what I read way back then, Yum bought the molds from Mad Man, or something to that effect. Anyhow, the entire reason I made these baits is to have a bait that would actually accept an actual tube jig. As I am sure you know, the Mad Man's and the Yum Craw Bugs are just too short. I have two different length rods that I can use for shooting these baits. One that has a thin head so it will accept the length of a tube jig, and another that's shorter and will leave more meat in the head to accept a Trokar TK190 tube hook. I use Owner Wide Gap Plus hooks for a lot of my soft plastics, and the thicker head will probably accept the Owner hooks as well, but I determined the head thickness with the TK 190 in mind. I had been using baits that I Frankensteined together using Mend It. But these are much better and I can make them in any color combination that I want. That's a slick idea you had with the vacuum system. And I know what you mean about the need to vent molds. I don't have a problem with these molds filling completely, but I do have a thick bodied ring worm type bait that I am currently playing with the mold. It has a small curly tail on it and I am having a little trouble getting the curly tail to fill completely. I built it with grooves at the tip of the tail, but I think I need to drill a hole at the end of grooves to let more air out. I'm going to go down and mess with it here shortly. Once again, thank you for the response and compliment. Truly appreciated.
-
Thanks Mark. Much appreciated !!! I was down shooting some more baits and think I may have solved the little bit of flash problem I have. In reading past posts I had read that to avoid the dimpling that can happen with injected baits, that you need to hold pressure on the injector for a period of time before you remove it from the mold. On my first shoots I wanted to make sure I got a good cavity fill so I used a lot of pressure and held it like that for a bit. I thought the amount of pressure I was bringing the mold to was probably causing the flash, so I decreased the pressure a bit. 3 of the 7 baits I shot had slight dimples in the side of the craws head. But I had almost zero flash. I'm thinking maybe the same amount of pressure but holding it a little longer will eliminate the occasional dimple. The dimples aren't bad, but they're there. And thanks again for the compliment. Truly appreciated
-
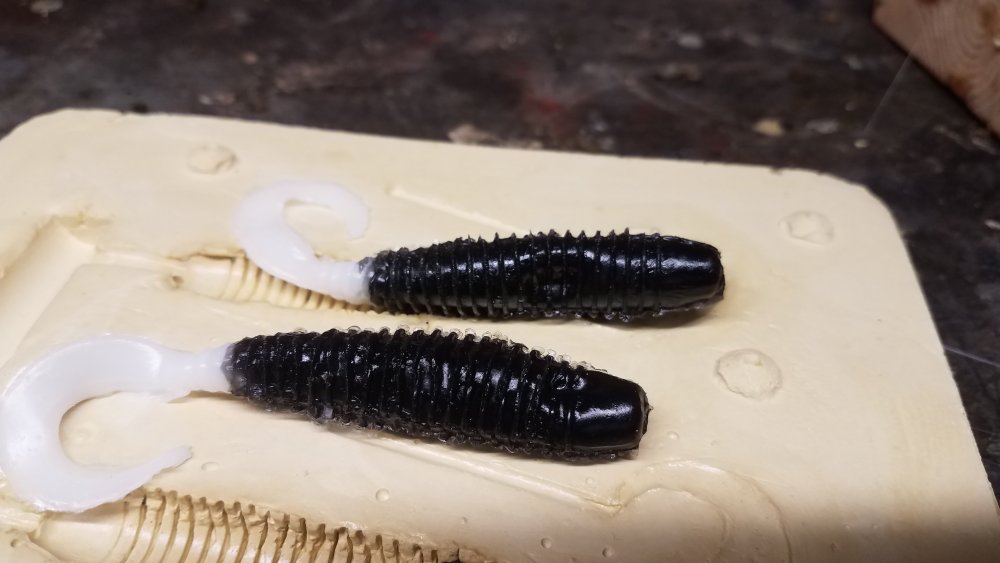
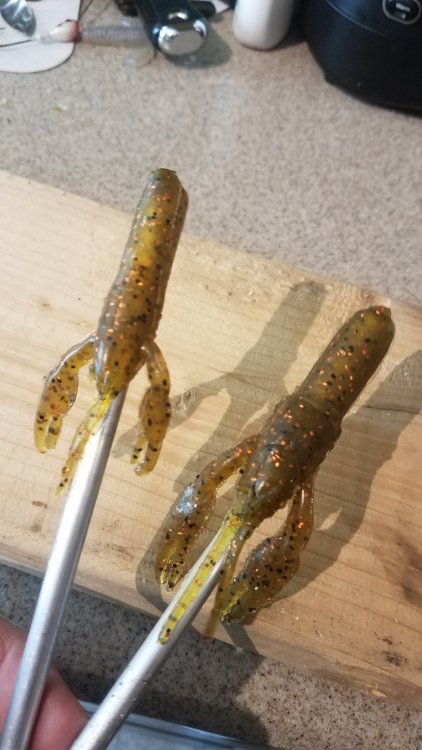
Finally got around to sealing the new injection molds I made and shot the first baits from them. The design is much better, and aside from a little of that pesky flash, I think baits turned out pretty well. They're actually 3 1/4" and 4" respectively.

-
Fishermanbt, thank you very much for responding. I definitely appreciate the vocabulary lesson. Knowing the names of what I am talking about is kind of a pet peeve of mine. So as I said, I appreciate the definitions you provided. I also didn't know about the bait cooling and drawing hot plastic from the runner. That's pretty cool! The bottom half of my new molds are drying right now. They're both Frankenstein baits. A Craw/ tube bait. so none of the walls or parts of the bait are really all that thick. I used pieces of 1/8" diameter plastic rod to mold the runners. One of the baits will be 3 1/2" and the other 4 1/2" I haven't tried shooting them yet. Just hope the 1/8" diameter is good enough to get a good fill. Nice thing about making them out of Durham's is that it will be easy to open them up if need be. And your reply concerning mixing the different firmness plastics is about what I expected. Do it and see what I come up with. Again thank you for replying. I truly appreciate it.
-
I've been making some injection molds using Durham's Water Putty. I tried my first one out today, and other than a serious design flaw, the bait itself turned out pretty well. The design flaw is that I had the sprue ( I guess it's called) coming in on the side of the bait, and I used a trimmed down Yum dinger for the channel. I butted the dinger right up to the bait which made it way too big. Should have looked at a different Youtube video lol Anyhow, I'm changing that part of the design and I'd like to ask how large of a gate or channel would you have going to the bait cavity itself? 3/16" diameter? Smaller? Larger? It's only a 2 bait mold, if that makes any difference. Also, as part of my newbie getting started orders, I had gotten one of the plastisol samplers from Bait Plastics. I really liked the firmness of their medium/saltwater, so what I would like to do is mix the bottle of medium that came with the sampler, with the bottle of saltwater that came with the sampler, to come up with what would be equivalent to their medium/saltwater. Would anyone know if I need to use a 50/50 mix, or is it just something I am going to have to experiment with? Any help would be much appreciated. Also, can anyone clue me in to the terminology for the different parts of an injection mold? If so I would greatly appreciate it. Drives me nuts not knowing what to call something. Especially when I am asking questions about it. lol Thanks again peoples
-
alsworms, I appreciate the reply .... thank you. And yeah, I actually feel like I'm becoming a pest with all the questions I'm asking. lol I'm about at the point now where I just need to swing the bat, so to speak. I really do appreciate you and the other guys that have responded to my posts, taking the time to help me out. This is a great web site. I'm glad it was suggested to me to give it a look. It ranks right up there with Rodbuilding.org as being the best place on the web for getting advice from some really talented individuals. Thanks again to everyone. Batter up !!!
-
Mark, thank you much for the response. As always, it is definitely appreciated. Question? Have you ever added more hardener than what is recommended by the manufacturer? The reason I ask is I figured I'd be able to add as much hardener as needed to get whatever firmness I wanted out of the plastisol. Most of the baits I'll be pouring will need a soft or medium firmness plastic, but I also was planning on dipping some tube baits. From what I understand those are better if they're made from a medium hard plastic. Personally I think it depends on what you'll be using the tube for. If you're fishing the bait on a tube jig, then I don't see that a tougher bait is really needed. But if you're flipping and pitching the bait, then I can definitely see the need for a tougher plastic as the hook wouldn't tear it up as bad. I was kind of hoping, with the use of hardener, that I could make a soft plastisol into a medium hard. Probably just going to have to run a cup of the maximum suggested amount of hardener, and see what I get. And oh yeah, I have already started writing stuff down. Thanks again for your reply. They are always appreciated.