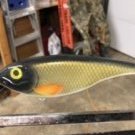
BrunZ320 Posted April 20, 2020 Report Share Posted April 20, 2020 I have been painting/making my own spinnerbaits and plastic/wooden baits for the last few years with airbrush and createx paints. I haven’t had many issues at all with epoxies until now. I made a cheap fast lure turner with a grill rotisserie set up, and I turn lures to dry overnight in my heated garage. I live in the northwest, and the current temps out are 55-60 degrees with around 50% humidity. I keep the garage heated between 65-70 any time I am painting or clear coating my lures. I purchased extra large jointed musky crankbaits from barlows tackle. Every single one of these baits have had epoxy issues on the turner. I have used devcon2ton 30 minute, flex coat gel, East coast resin, and true coat to coat my lures. I had success with d2ton on smaller lures not on a turner. I also had success with east coast resin on a musky bait in a turner, but it took 3 or 4 coats to even out. Most large baits I make are taking multiple coats to get looking nice on the turner, when I had very little issues without a turner and devcon2ton on small baits. I am going to try some smaller baits again to see if I have the same success as before. All of my bigger baits seem to have some minor issues with waves or pitting, and it is getting discouraging. I also wipe down my plastic baits with alcohol before painting them and do not touch any part of the baits before epoxy. I am hoping to get more experienced help on this topic. Here are my questions: 1. These jointed musky baits are made of a different plastic than the others. Could this be the reason I am having all these sudden issues? I have heard of spraying createx clear coat Over the paint before epoxy, and this is supposed to help trap impurities that affect the epoxy?? I ordered some of this and will try, but I am also worried about spraying this clear coat through my nice air brushes and having cleaning/clogging issues. Any advice on this? These Musky baits have been the primary issue, but I had some issues on a large wooden jerk bait also recently that took numerous coats to fix 2. I was worried that vibrations from my rotisserie motor traveling down the turning rod may be causing the waves in the final cure. I have installed rubber grommets on all the fastening screws for the motor to help this morning. I still feel light vibration when I touch the turning rod. Could this cause issues? Advice? I posted a few pics of set up/ baits with waves on finish. This site has been a great help in starting out, and this is my first actual post. 1 Quote Link to comment Share on other sites More sharing options...
Anglinarcher Posted April 21, 2020 Report Share Posted April 21, 2020 Northwest? Like Washington? I lived in Spokane for 20+ years and found that the high humidity in outbuildings caused issues. I did my clearcoat in my bedroom/mancave. I also found that higher heat caused the epoxy to cure faster before it "waved" on me. Next, epoxy does not react with very many impurities, so I seriously don't think that is it. But, lsome plastics do cause issues because nothing sticks well to them. Still, your paint is sticking so I doubt that is it. You might consider something like a UV cure. I use Alumilite UV, have used Solerez, and the fast cure means it does not have time to fish eye or wave on you. I know others will have perspective on this as well. 1 Quote Link to comment Share on other sites More sharing options...
BrunZ320 Posted April 21, 2020 Author Report Share Posted April 21, 2020 Thank you for the reply. I had a typo on the original post and meant Midwest in Indiana. My next move was trying to bring the drying rack indoors in an area with an incandescent bulb near the rack and see if that helps. The house is at 70 and the garage is around 65, but I’m sure with less dust inside. I’ve heard a lot of good about the uv cures, and I am planning on going that route to save time and hassle in the future, but with all of the epoxy that I bought to try different products, I want to get it right and get my money’s worth!! I also feel like the epoxy is best for the musky lures do to the thickness. I was fine with curing all of the spinnerbaits, smaller crank baits ,and jerk bait lures I was doing before until I went onto the musky lures. It seems the larger the bait the harder it is for a good epoxy cure on my end. Quote Link to comment Share on other sites More sharing options...
JD_mudbug Posted April 21, 2020 Report Share Posted April 21, 2020 (edited) I have used D2T on similar musky blanks. So, I don’t think the type of plastic is the problem. I don’t think the vibration from the rotisserie is the problem either. Many people use rotisserie motors for turners without problems. Mine has a slight vibration to it. I don’t think they have the power to create vibrations drastic enough to effect epoxy curing. In theory, I guess massive vibration could cause the epoxy to heat up and cure before it has time to level out. But, I doubt that is achievable from a rotisserie unless it defective. I have seen other posts on here where people have sprayed Createx clear as a mid-coat. I have never done it. You could also use a rattle-can acrylic clear and not have to worry about cleaning your airbrush. Rustoleum X2 clear is pretty good. I have used that as final coat on small baits. With 2 part epoxies, improper mixing is always a suspect. You had good luck on smaller baits. Maybe not enough mixing when doing a larger batch on the larger lures? You could add a couple of drops of denatured alcohol to thin it a bit and get the components to mix more thoroughly. I seem to have better luck mixing with a plastic stick. I usually cut off half the handle of the paintbrush that I apply it with and use that for a mixing stick. Also, you could try doing the lure in several small batches, one for each section. On really big lures, I do a small batch to coat the eyes, gill plate, around the lip, basically the first 2 inches of the bait. Then, another batch for the rest of the front section. Then check for missed spots under a bright light. Then, a small batch for each section afterwards. What is the rpm of the turner? It could be too fast or slow? 5-8 rpm seems to be good. I make mostly large lures and sometimes you need weight distributed evenly around the turner. When a heavy lure reaches the top of the rotation, make sure it doesn’t sling downwards faster than when it is on the upswing. Another problem with larger lures on a turner is they pivot and rock on its long axis. I have to put something on one of hook hangers to a fixed point to prevent the rocking/flopping (loop a rubber band around the main shaft, tape it so the wrapped part so it doesn’t move, bend a small piece of wire/paperclip into an S shape, hook the S on the rubber band and stretch to the hook hanger). The fast down rotation and rocking/flopping will prevent leveling I mostly use D2T as it is pretty forgiving. So, I don’t know about your other clear coats. As for D2T, 50% Humidity is at the bottom end for D2T. It works best at above 50% humidity. Maybe try a humidifier. Also 70 degrees is good for D2T, 72 is optimal. When you get below 68, its spreading and leveling are decreased. It could be combination of both the humidity and temp being a bit low. Edited April 21, 2020 by JD_mudbug typo Quote Link to comment Share on other sites More sharing options...
Vodkaman Posted April 21, 2020 Report Share Posted April 21, 2020 D2T because of its consistency has to be applied thick. I am guessing that you may have made the coating too thick. Dave 1 1 Quote Link to comment Share on other sites More sharing options...
eastman03 Posted April 21, 2020 Report Share Posted April 21, 2020 I have used a few different epoxies on big muskie baits. It does seem hard with a big flat sided lure to get that perfect flat 'mirror' of epoxy. But I see people post them so I know it is possible. I have never used D2T, but it does appear like you have a very thick layer of epoxy. I run into constant problems when I have a thick layer, from waviness, to pooling, to trapped bubbles. I make sure my epoxy is warm when I'm applying it (so it is slightly thinner), and I can achieve a smooth coating. Hopefully you can figure it out. Epoxy looks amazing on lures, nice paint jobs too!! Quote Link to comment Share on other sites More sharing options...
BrunZ320 Posted April 21, 2020 Author Report Share Posted April 21, 2020 Thank you for all the input so far. So I brought my drying rack inside yesterday and did a batch of 2 small Plastic jerk baits and one large wooden musky jerk bait. I used true coat to cover these ones. After an overnight cure, the small jerks look perfect, and one side of the musky jerk had pitting. I applied one more coat today, and I have the musky bait on the turner. I am hoping the second coat turns out perfect. I do two coat minimum on the musky baits. Still hit me hard to see the pitting on the large jerk after last night. I might be forced to spend the money and move to uv alumilite cure if this problem doesn’t stop. I still don’t understand why all of my smaller baits look good and the big ones are hit and miss, or take multiple coats to get right. Quote Link to comment Share on other sites More sharing options...
eastman03 Posted April 21, 2020 Report Share Posted April 21, 2020 Man that does suck, from everything I've heard and seen, True Coat can have an amazing finish. The only thing I can think of is something off gassing? or contamination from oils? How to you measure out the epoxy? I once used syringes that had some silicone gasket/lube and it gave me very frustrating inconsistencies. Quote Link to comment Share on other sites More sharing options...
Hillbilly voodoo Posted April 21, 2020 Report Share Posted April 21, 2020 Looks like you need to make sure your paint is good and dry or you have got dust or oils on your lure before applying epoxy if you are trying to go to thin of a coat and not cover the whole lure that will do it too. It’s not too much epoxy because that results in the lure getting full coverage but you will often have lots of bubbles these are the 3 mistakes I made in the past that gave me clear coats that looked just like your pic make sure your paint is dry and clean your lure before your clear coat. Apply a moderate coat put them on the turner give them a little time to level out. Look them over brush the coat to smooth out any voids or add if needed. Walk away and cross your fingers That is my take on what I see Quote Link to comment Share on other sites More sharing options...
JD_mudbug Posted April 21, 2020 Report Share Posted April 21, 2020 Like Hillbilly said, you could hit the lure with a hair dryer/heat gun to warm it, dry the paint fully, and blow the dust off before clear coat. Also, you could build a quick lure holder like the one I made in this post. http://www.tackleunderground.com/community/topic/33862-big-lure-holder/?tab=comments#comment-278455 Put an eye screw in each end on the side so you can hang the holder on a nail with the lure nose down or nose up. You could just stand it on end and fasten it with tape to something so it won't fall over. Clear coat another big lure on the holder. Hang the holder nose down for 5 minutes, then nose up 5 minutes, maybe do that process one more time. If the epoxy comes out fine and all the other conditions are the same, that would have to mean there is something wrong with the turner. Quote Link to comment Share on other sites More sharing options...
All Eyes Posted April 21, 2020 Report Share Posted April 21, 2020 The Devcon 2 ton may be your problem on these larger baits. It has a fast set up time and the brush may be dragging and pooling up a skim of partially dried epoxy in spots. I would suggest cleaning your baits with denatured alcohol and trying a long set epoxy such as Envirotex. Let it stand for 10 minutes after mixing to help reduce any bubbles. Blowing on it also pops bubbles as the carbon dioxide in your breath helps them rise to the surface. Quote Link to comment Share on other sites More sharing options...
Atlas Lures Posted April 22, 2020 Report Share Posted April 22, 2020 Looks like you’re putting coats on too thick. I’ve used a bunch of epoxies, and the flex coat for me is the best. Some of my lures have 6-7 topcoats and never any issues if you keep them light. The alumi uv is good for 1 piece lures and can be a bit tricky. Quote Link to comment Share on other sites More sharing options...
BrunZ320 Posted April 22, 2020 Author Report Share Posted April 22, 2020 (edited) After the second coat with true coat epoxy indoors, the large musky jerk bait and both smaller plastic jerks look perfect. Maybe it was the environment in the garage that ended up causing most of my issues , even with with it heated. I also used a thicker coat and spread it out faster this round. I will try to go back to the plastic musky jointed crank baits again next to see if being inside the house with two coats is the ticket on those too. This time I also used no heat at all on the true coat and had great results. The true coat epoxy cures from the bottom up and is supposed to help push bubbles out while curing. I was very happy after this second coat and have no bubbles or waves at all . Darker photo of the end result, but you can still see the nice clear shine on it!! Edited April 22, 2020 by BrunZ320 Quote Link to comment Share on other sites More sharing options...
RTFX Posted June 5, 2020 Report Share Posted June 5, 2020 I have only just found this forum, but felt compelled to have my say! I am based in Calgary, Alberta, Canada. Humidity is normally quite low due to the altitude. I used to have exactly the same issues as BrunZ320 until I tried 2 things that worked. I tried more than 5 different epoxies that all blistered and bubbled until I found Crystal Clear Epoxy from www.eastcoastresin.com, which is the easiest I have ever tried. It doesn't seem to matter if it has been handled without gloves or if there any contaminants on the lure surface. However, I find that if, after painting is completed and left to dry overnight, I airbrush a coat or two of Varathane Triple Thick Clear Finish diluted with 20% water (It is an acrylic product), it provides the perfect key for Crystal Clear epoxy. I let the final coating dry for 24 hours before painting on the epoxy. Beautiful high gloss perfect results every time using using a cheap barbecue spit with 2.5 rotations a minute. I got the idea of using this mid-coat from Engineered Angler on YouTube, he is amazing! 1 1 Quote Link to comment Share on other sites More sharing options...
turtlela Posted July 6, 2020 Report Share Posted July 6, 2020 RTFX, you haven't had any issues cleaning your gun after using the Varathane? Quote Link to comment Share on other sites More sharing options...
eastman03 Posted July 7, 2020 Report Share Posted July 7, 2020 I really like the Engineered Angler channel on YouTube! Great ideas from him. I also have started using a mid coat for several applications and it really preps the paint for the final smooth epoxy finish! I dilute Minwax polycrylic with water and shoot it thru my airbrush to give a nice smooth mid coat for the final epoxy. I have also used it between painting and stencil layers where I want to tape a stencil or something like that to the bait. I clean out my airbrush immediately after spraying the polycrylic and haven't had any issues with it clogging up or doing any damage. If you let it harden in there I could see it being tough to remove. But airbrush restorer would probably take it off as it seems to dislodge everything (love that stuff). 1 Quote Link to comment Share on other sites More sharing options...
MonteSS Posted July 12, 2020 Report Share Posted July 12, 2020 Quote Link to comment Share on other sites More sharing options...