


markbxr400
-
Posts
30 -
Joined
-
Last visited
Content Type
Profiles
Articles
TU Classifieds
Glossary
Website Links
Forums
Gallery
Store
Posts posted by markbxr400
-
-
I drill and glue in the small (1/32 oz or 1/16 oz) bullet shaped worm weights along the bottom of my lures. I space them as needed to get the best orientation and action in the water.
-
Good idea. Just started turning, carving and painting my own River Runts and Vamps. Search "Carving the face of a river runt" to see my tutorial. Search my gallery, or search on the hard baits gallery for "runt" to see the accompanying pictures. Each pic also has a description of that step.
Thanks to everyone who have and are contributing to my learning.
Mark
-
I went ahead and took pictures of each step in my process and posted them in the gallery in the hard baits section. Each pic has a description of the process. You can find them by searching for "runt" or looking in my gallery (member name "markbxr400"). While there seems to be quite a number of steps, the whole process takes me less than 5 minutes per lure, and I get fairly consistent results from lure to lure. These lures dive well, and action is very good. I've caught dozens of speckled trout and redfish on these.
I hope this helps.
Mark
-
I try not to over think this. I tend to lose lures, so I don't get too hung up on them having to last forever. I'll usually knock out a dozen at a time.
I use Minwax sanding sealer - dip the lure, use a wire or disposable Oral-B dental brush dipped in the sanding sealer to work it in all the hardware holes. I probably dip each one for 2-3 minutes. I'm more interested in making sure I have the sealer in the holes thoroughly, rather than the exterior. I let them dry about 12-24 hours, lightly sand and start my painting. After painting and installing eyes and hardware, I coat with a single coat of E-Tex, and turn 4 lures at a time for 8 hours on a simple rotisserie. I let them dry 48 hours total, clean up the eye hooks, install the rings and hooks and go fishing.
I notice you don't have a rotisserie - Lowes is clearing them out for $22 now. I just screwed two 1x4 boards about a foot long standing up off a 3rd 1x4 board about 30-36" long (depends on the rotisserie you get). Mount the rotisserie, add 8 alligator clips, one to each rotisserie prong, and then use wire and a rubber band to mount the lures to the alligator clips.
-
Does it shrink?
I've not noticed any shrinkage. I fill the hole completely, and just proud of the surface of the lure. Once dry, I use a small file to shape the filled area back to the surface, then sand. Once I've sealed and painted, I can no longer tell it was ever drilled/filled. It's a pretty quick and effective way for me.
Mark
-
I have been using Durham's Water Putty. Mix a little of the powder in a small cup with water to a putty consistency, spread it in, let it dry, file and sand it off. Waterproof when dry.
-
Sounds like you have it down pat, you should post your results so we can see how you did. Always thought about using a gouge to get that scalloped face, now I know someone was successful. Seems more personal to carve one rather than use the sander. Honestly whatever works for you is all that matters right? I see you like your vice, which reminds me that my Dean VMNT has been buried in the closet for the better part of a year...should dig it out and see if the fingers still work.
I bought the vise to build a replica Martin OM acoustic after retiring. Amazing the things these vises can hold throughout the process without the jaws messing up the piece.
-
I found one that looks similar to the strike king square bill but I am not sure on the size. I will keep an eye out for the Mirrolure 17MR or Rapala Twitchin Rap KO's. Thank you for the suggestions though.
I'd also be interested in the Mirrolure 17MR-like blanks if anyone happens to come across them. My go to bait for inshore Alabama reds and specs.
-
I've just started lure-making and am making vamp-style lures with the river runt-like nose. Here's what I've learned to be my best method after trying several.
I start by drawing a centerline and marking a perpendicular line how far back I want the carving to extend back onto the body.
I mount the lure body into my guitar/gun vise (I love this vise!):
http://www.stewmac.com/shop/Tools/Vises/Guitar_Repair_Vise.html
Using a curved shaft flat chisel carving tool, I start pushing the tool from my perpendicular line toward the mouth of the lure, along one side of the centerline. Then I do the same on the other side, and keep going one side to the other to keep the two as symmetrical as possible. When I get about halfway done, I then carve right down the centerline to create the curved nose. I redraw the centerline along the new nose profile, and then start carving the left/right sides again until I get somewhat close.
I then take a Dragon Rasp, which has a curved side and file across the lure on each of the two sides (using the part of the file very close to the end).
http://www.stewmac.com/shop/Tools/Files/Dragon_Hand-cut_Rasp.html
This gives a nice round finish.
I pull the lure out of the vise often to make sure I'm making a symmetrical nose and getting the shape I'm after.
Last, I take a piece of sandpaper wrapped around a 3/4" dowel and work the two sides smooth.
I've tried the small bench top belt sander, oscillating spindle sander and a dremel, But I haven't been successful, and have ruined a number of lures. I can't really see what's going on with any of these.
While my approach seems to have a lot of steps, the whole process takes about 5 minutes max, and I can see exactly what's happening throughout each step. I'll do 4-8 lures at a time which speeds up the process even more and helps me to get 4-8 just alike.
BTW, did I mention I love my vise! Rubberised, non-marking pads, heads that spin to conform to the shape of whatever object they are holding, and the whole thing spins to put your work in whatever direction makes it easy to do the work.
Regards.
Mark
-
Tractor Supply sells a roll of SS wire for $2.
-
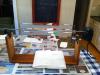
Here's a pic of my rig.
-
Just picked up a rotisserie at Lowes today. They had them marked down from $49 to $22. I built a stand in about 5 minutes and are turning my first batch of lathe turned lures with etex.

Weighting Method
in Hard Baits
Posted
I then use Durham's water putty to fill the remaining hole, and file/sand to shape.