CrawChuck Posted February 24, 2006 Report Share Posted February 24, 2006 Can I do this? I want to post this in the steps as it happens so it is easier for me. Maybe when it is done the Admin can move it to the member submitted tutorials. Please if anybody has questions wait till the tutorial is complete or send me a PM. Making a real craw mold... This is a pic of a moulted craw shell laid out on a paper towel to dry. The tail is right side up so it's bottom side lays flat on the table. The head is upside down so the shell dries without getting disfigured. Since I raise craws I have access to their moults. You get to this stage with a live craw after killing it and removing the guts and legs. The meat will remain in the tail and takes longer to dry as will the claws. For a live cray you will need to pin the claws open and pin the tail down flat. Drying meat and tendon will cause them to draw up. Quote Link to comment Share on other sites More sharing options...
CrawChuck Posted February 25, 2006 Author Report Share Posted February 25, 2006 The tail section should be laid out straight as possible. The body section which contained the guts need to be filled with wax before it dries out to retain its shape. Left to dry without wax will result in curling of the sides as the example on the right. The wax needs to be dripped off a candle a little at a time to let it build up. A wad of paper towel was held on the big open end to contain the wax. The wax will cool and shrink so keep dripping till it's built up good. Don't worry about getting it everywhere on the craw. Cleanup and detail will come later. Quote Link to comment Share on other sites More sharing options...
CrawChuck Posted February 25, 2006 Author Report Share Posted February 25, 2006 When working with cray moults, there is no meat left in the tail to provide stiffness when dried. I filled this tail with wax as soon as it was dry enough to handle to make it ridgid. Quote Link to comment Share on other sites More sharing options...
CrawChuck Posted February 25, 2006 Author Report Share Posted February 25, 2006 The open ends of the tail and body are held close to the candle flame and warmed enough to stick them together and wax is dripped into the space to build it up some and wax is also dripped along the sides of the tail underneath. The place where the eyes were is dripped with wax to fill in the space... And the claws are dripped with wax to build up the thin arm parts... Next comes the tedious and careful detailing. I use a large stick pin to scrape away all excess wax from the body and claws... Quote Link to comment Share on other sites More sharing options...
CrawChuck Posted February 25, 2006 Author Report Share Posted February 25, 2006 This pic shows the body and claws groomed of the excess wax. A small knife scrapes away all the big stuff and the stick pin gets nicely into the fine grooves. Follow the contours of the shell and imagine flowing plastic...will it get in there??? You want to bring out the detail but leave wax in areas to allow molding. Next a groove is scraped into the body section with a small screwdriver bit where the belly is to form a hook groove...sorry I can't take better quality pics! A crayon is just touched over a candle and stuck at the tail and some wax is dripped around the adjoining point and excess is scraped away and a little forming is done. This will be the pourspace and hookup point when fishing the finished bait. Quote Link to comment Share on other sites More sharing options...
CrawChuck Posted February 26, 2006 Author Report Share Posted February 26, 2006 Ready to mold... Didn't have any scales so I guessed at the mix for the Ultracal. 5 fluid oz. water to two cups of unpacked Ultracal. Seemed to work pretty good but it probably could have been thicker to suit me better. Pour it into the mold box and shake gently just enough to level the plaster. Lay the craw body in and poke it down enough to get the crayon and the tip of the nose in halfway. Lay the claws in as close to the body as possible and poke them halfway paying careful attention to the claw tips as you don't want to bury them. Let it set up, going through the heat stage. After it's set enough to touch without leaving a mark, take a round tipped object and twirl it to carve out three craters. Use a soft brush to sweep out all the dust. These are the alignment holes. Now you need to apply a mold release to the entire surface with a hair brush but not getting any on the craw. I recommend Johnson's Paste Wax for plaster molds since it works good and is easy to see where its been applied. Couldn't find any so I tried an experiment and brushed on silicone rubber. Good darn thing it worked or I would have been screwed for this tutorial Mix another batch of plaster and pour it in the box and shake to level. After it's cured a little remove it from your box... And round the sharp edges with a pocketknife. Using a dremmel to carve your name backwards in the bottom of the mold box will personalize your molds! Tap the blade into a corner seam till the mold releases then pull it apart gently with your fingers... It looks like a mess now but all this will come out with some needle picking and tweezers... It can be done! Now you need to do a little sculpting with a knife. Enlarge the armpits a little to allow flow into the claws and funnel out the pourspace by holding the halves together and turning your knife blade around to carve it out. Somebody said UltraCal was hard...They were not kidding!!! With all this done you are ready to dry your mold and apply your choice of sealer. For a good detailed plastic master to make all the other molds with, I recommend a single coat of Envirotex with no puddling. I have enjoyed making this tutorial. It's the first mold I've made in a very long time and I guess that's the end. Any questions? Quote Link to comment Share on other sites More sharing options...
tactical bass Posted February 26, 2006 Report Share Posted February 26, 2006 Chuck, let's see a pour outta this thing! That's a great tutorial man. I've just started making epoxy molds for beavers 'n such but now that you've explained a 2 piece plaster mold I might have to give 'er a whirl... tight lines TB Quote Link to comment Share on other sites More sharing options...
CrawChuck Posted February 26, 2006 Author Report Share Posted February 26, 2006 LOL, thanks and I'm wanting to get away from plaster and go with RTV. I'll pour one in a few days after I find some Envirotex. My Wal Mart doesn't carry it any more and hope I can find some at a hobby store somewhere or some web source. Quote Link to comment Share on other sites More sharing options...
jm Posted February 27, 2006 Report Share Posted February 27, 2006 Crawchuck, Try Silmar 41 http://www.shopmaninc.com/polyesters.html hope it helps, jm Quote Link to comment Share on other sites More sharing options...
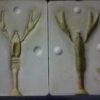
CrawChuck Posted March 1, 2006 Author Report Share Posted March 1, 2006 Here's some of the craws poured today in this mold Quote Link to comment Share on other sites More sharing options...
millsryno Posted March 1, 2006 Report Share Posted March 1, 2006 Dang, looks nice! Hey, I was looking at your molds on eBay and was just thinking that you wold probably get more money for them if you included a pic of the finished product like you did on the frog mold. Keep up the great work! Quote Link to comment Share on other sites More sharing options...
CrawChuck Posted March 2, 2006 Author Report Share Posted March 2, 2006 You're probably right and I may have to. There's alot of watchers but no bids on the craw mold yet. Quote Link to comment Share on other sites More sharing options...
littlebait Posted March 3, 2006 Report Share Posted March 3, 2006 AWESOME Quote Link to comment Share on other sites More sharing options...
spungee Posted January 30, 2007 Report Share Posted January 30, 2007 I recently followed this tutorial to pour my FIRST pop mold and my results were not as professional looking as Charlie's but it will be servicable and I know that with a little practice I'll get better.... One small note that I will pass on to the other newbies following this same tutorial........If you use the Johnson's Wax as a release agent it smells a lot like a gas leak when you put the mold in your wife's oven to dry.......It provided a good laugh after we discovered that there was not a leak in the house........... -spungee- Quote Link to comment Share on other sites More sharing options...
Hooked4life Posted January 31, 2007 Report Share Posted January 31, 2007 All I can say is Wow that is sweet. Thats what i call thinking inside the box. Great work Charlie. Quote Link to comment Share on other sites More sharing options...
jmik26 Posted January 31, 2007 Report Share Posted January 31, 2007 I wish he still sold these molds. We have a frog mold from Charlie and it pours some of the best frogs! Quote Link to comment Share on other sites More sharing options...