

LooksLikeSinbad
-
Posts
338 -
Joined
-
Last visited
Content Type
Profiles
Articles
TU Classifieds
Glossary
Website Links
Forums
Gallery
Store
Everything posted by LooksLikeSinbad
-
My First Photo Finish Bait & Questions
LooksLikeSinbad replied to LooksLikeSinbad's topic in Hard Baits
Wow, nice work! -
Make sure your knot is strong!
-
My First Photo Finish Bait & Questions
LooksLikeSinbad replied to LooksLikeSinbad's topic in Hard Baits
I'm trying to figure out this Dick Nites stuff. The first coat went on great but when I went to do the second coat I couldn't get the top off! I followed the directions that came with it and cleaned the threads on the top and jar before I closed it. Is that normal? I just punched a hole in the top to pour out some more and covered it with duct tape. Is that ok or should I transfer it into something else? -
My First Photo Finish Bait & Questions
LooksLikeSinbad replied to LooksLikeSinbad's topic in Hard Baits
True. When it comes to tweaking an image to fit on a bait, I would recommend experimenting with: EDIT -> TRANSFORM -> SKEW/DISTORT/PERSPECTIVE This will allow you to resize your image in non-uniform ways. For example, if you want to make the tail part of the image larger but not the head. Also the WARP option can help with this. -
My First Photo Finish Bait & Questions
LooksLikeSinbad replied to LooksLikeSinbad's topic in Hard Baits
I applied the sticker to one side of the bait and rounded out the edges and trimmed it with scissors as I went along. Then, on the 2nd half I rubbed down only on the middle part first. Then, I would go around the perimeter of the image trimming it with the scissors and rubbing it on with my finger. My seam overlaps, it does not butt up against each other like Rofish's. I think the fact that the belly has a scale pattern helps cover up the seam. I used photoshop to extend parts of the image that did not cover the lure properly. Here is a lower-res version of my templated version: For reference, here is a smaller version of 76gator's original bluegill image. I experimented with a few others but for some reason this one works really well: On mine you can see that I cloned scales from the belly and tail below them to fit the lure better. I also made the belly orange. You can also see that I added the drop shadow to the gill plate to give it more depth. I also saturated the colors a little bit to make it richer. See the red outline? That is my tracing of the bait that I scanned in as a guide. I turn that photoshop layer off before printing but I can turn it back on to use as a reference when i am applying the sticker. -
My First Photo Finish Bait & Questions
LooksLikeSinbad replied to LooksLikeSinbad's topic in Hard Baits
Rofish - The seam on your example above is much better then mine. I can tell it took years for you to get it looking that good. Don't forget that mine has epoxy on it and that makes it look better. -
My First Photo Finish Bait & Questions
LooksLikeSinbad replied to LooksLikeSinbad's topic in Hard Baits
I have only been making these baits a couple weeks, but I have been using photoshop for many, many years so I have a real advantage in that department. These have 1 coat of d2t and 1 coat of dick nites. I am planning on adding more dick nites though. -
My First Photo Finish Bait & Questions
LooksLikeSinbad replied to LooksLikeSinbad's topic in Hard Baits
Avery 8165 -
My First Photo Finish Bait & Questions
LooksLikeSinbad replied to LooksLikeSinbad's topic in Hard Baits
Thanks to everyone who advised me on repairing my first photo finish crank. But as expected I have abandoned those first 2 cranks and moved on. In the past week I have made some changes to my technique and I think the baits are progressing nicely. And I just got my Dick Nites in the mail and am experimenting with that too. Here are the 2 latest ones. I added a drop shadow to the gill plate to give some depth to it and I think the image is applied to the body better: I also tweaked the image and applied it to a similar but different crankbait body. This shape is more like the bill lewis rattle trap shape: I also applied the same image and technique to a 2 1/4" crankbait body. I don't like these eyes on it so I am going to get some different ones for the next version. I am psyched to see how this swims: Thanks again to everyone for helping me with this and everyone who has shared info, photos, tutorials, etc. -
who makes/sells the v-spools?
-
I upgraded my 4601 last year with ceramic bearing, bearing-supported idler gear and drag. If I was going to do it again, I would do the worm gear upgrade instead of the drag or do both. I really enjoyed taking the reel apart and rebuilding it.
-
Great work! I especially like the bottom one in the trio.
-
Exactly. Tadpole poppers?
-
I am a little late to this thread, but I can definitely vouch for the Vanndalizer unpainted crankbaits. I recently ordered a bunch and am using them for my photo finish lipless cranks. I am very happy with them and will be ordering more soon.
-
I thought this might help those of you who are painting hard baits with spray paint: custom spray paint caps for graffiti artists. You can buy them a lot of places, but I found that artprimo.com has this set of assorted thin caps for creating thin lines with standard spray paint cans: Might be worth a try.
-
My First Photo Finish Bait & Questions
LooksLikeSinbad replied to LooksLikeSinbad's topic in Hard Baits
I should have phrased this as a question. Do you guys think I should do a 2nd coat of D2T before the Dick Nites, or will a coat of DN adhere the eyes to the bait like D2T does? -
My First Photo Finish Bait & Questions
LooksLikeSinbad replied to LooksLikeSinbad's topic in Hard Baits
Thanks for the tip. What grit sand paper do you recommend? Great work! -
My First Photo Finish Bait & Questions
LooksLikeSinbad replied to LooksLikeSinbad's topic in Hard Baits
I used Husky's tutorial to start. But I could not get tissue paper to work with my printer so I ended up using regular printer paper instead. I still glued it to aluminum foil though because I found that the foil was malleable and allowed me to wrap the paper around the bait better. But I have since found a better way, printing onto full-size sticker sheets without the tin foil. I think the foil adds a lot of unnecessary bulk to the lure. Here is my latest work in progress: This is the same image (with alittle photoshop tweaking) printed on to sticker paper without the foil and with 1 coat of D2T. I think there is a pretty big improvement in quality between these 2. I jut ordered Dick Nites and I am planning on adding 1 more coat of d2t to affix the eyes and a coat of the dick nites to finish it off. Oh, here is 1 more that I did using the first technique with a Rock Bass image. I will probably redo this one too with the newer technique: Thanks again for everyone's help and advice with this! - Zak -
 Very cool!
 -
My First Photo Finish Bait & Questions
LooksLikeSinbad replied to LooksLikeSinbad's topic in Hard Baits
I just read the 5 page thread about Dick Nites and it sounds like a great product. But I have 1 concern: these photofinish baits do not have a perfectly even finish (because of the application of the paper) and according to that thread the DN would not even it out the way epoxy does. Would it be better to do 1 coat with D2T to even and smooth everything out, then apply Dick Nites on top for additional protection? -
My First Photo Finish Bait & Questions
LooksLikeSinbad replied to LooksLikeSinbad's topic in Hard Baits
Thanks for all the compliments and advice. I am going to see if I can repair this bait using the suggested techniques. But to be honest I am more excited to make some design changes and work on the next version - I guess I'm hooked . I already know a bunch of ways to improve on it. Is Envirotex something I can find at a local hardware or crafts shop? Or should I order it online? -
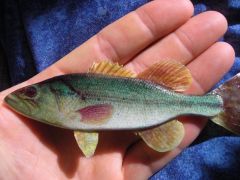
Hey all. For those that don't know me I have been making jigs and spinnerbaits for a while and usually post in that forum, or in threads about websites and graphic design. I recently decided to try my hand with photo finishing. After reading a ton of great info on the site (thank you everyone!), I decided to use a plastic lipless crank and finish it with a bluegill image taken from the gallery (thanks again!). There are a lot of mistakes on here but I don't mind. I learned a lot from the mistakes I made and I have a lot of ideas to improve my technique. So I tried it out at my local pond and it worked! I caught 2 bass on it and lost 1 in less then an hour. But then, wouldn't you know it, I banged it off a rock and broke the finish on it. Can I fill in the chipped devcon with more devcon to fix it? Or is it trashed if the devcon is chipped off in a big chunk? In the future, how many layers of devcon should I apply?
-
Foil Baby & Black bass Jerkbaits
LooksLikeSinbad commented on Bert_meert's gallery image in Hard Baits
 That looks GREAT!
 -
How phallic is that?! LOL!
-
Alternative Lipless Crankbait Designs?
LooksLikeSinbad replied to LooksLikeSinbad's topic in Hard Baits
me too...