

robalo01
-
Posts
465 -
Joined
-
Last visited
-
Days Won
9
Content Type
Profiles
Articles
TU Classifieds
Glossary
Website Links
Forums
Gallery
Store
Everything posted by robalo01
-
Well, I assume it is ABS plastic that is heated and extruded, so I would think it would break down with heat over time. Maybe not. I also know it takes alot of time and is somewhoat expensive to be done repeatedly. You can make an RTV mold and copy it with epoxy resin. That would last longer and be cheaper in the long run, in my experience. Might need a mold release.
-
This is the first one I have seen offered, but I wonder how long it will take for this to take off... http://www.ebay.com/itm/3d-printed-worm-craw-fish-mold-/272016700332?hash=item3f557573ac:g:hQQAAOSwwbdWHtxC I would be interested in printing a mold and them copying it in a more durable/heat resistant material.
-
I am looking for something similar to a Zoom Speed Vibe. Anybody make something like that?
-
If you mix harbor freight black and yellow, you get a really good GP.
-
I made something similar back then (1999-2002 I believe). They were 5" finnesse flat tail worms. I made a molders clay model and one sided hand pour mold. The air pockets worked. I made the holes pretty deep and rigged it holes-down. Then the Zipper Worms became popular and interest was lost. I have thought about doing something similar in the tails of drop-shot worms.
-
I will start by saying I an in Mexico. For years I imported plastic from the USA. But a couple of years ago I invested in a recipe and supplier list (initial investment was about $3k usd. I currently sell my plastic here locally.
-
I have never bought hardener. I mix my own plastic. The resin I uses comes in powder. Is hardener thick and gummy? In the pics it looks like a clear liquid.
-
I know heat stabilizer is Butyl stearate. Softener is DOP. What is hardener?
-
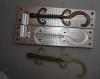
Here is a pic of one of my wooden models (not quite don yet) http://i1294.photobucket.com/albums/b602/Stephen_Ashcraft/Facebook/other/1395241_10201858975490264_1062979251_n.jpg And here is a pic of a template fo a fluke mold http://i1294.photobucket.com/albums/b602/Stephen_Ashcraft/IMG-20130630-00028_zpsb997ada5.jpg
-
I am wrting this with the assumption that the audience knows a little bit about making two-part molds. I will only go into mold design in as much as it pertains to the particulars of this technique. The biggest hurdle in making two-part poly resin molds is the fact that poly resin shrinks (5-6% in most cases), so you pour one side, it shrinks, you go to pour the other side and it warps, or shrinks more than the first side. The following process deals with this issue by 1) reducing the shrinkage factor by adding a filler and 2) allowing the two sides to shrink together. Materials: Model Sculptor’s Clay Mold Box Poliester Casting Resin Resin filler (Industrial talc, Calcite or POP) Vaseline Scrap wood 4 or 5 4” C-clamps Butter knike or wood chisel Drill (high speed preferred) with a mixing bit or a kitchen electric mixer paddle. 1. Although not required, I recommend a hard master. It is just easier to get good clean edges and thus reduce flashing and seams. I make my masters out of wood, fill with bondo, paint with enamel spray paint, sanding and polishing between coats until shiny and smooth. Ideally, you want mirror finish. You can coat with epoxy, but you lose a lot of detail and sharp edges. The model needs to be made in such a way that it can be removed from a hard material assuming the mold lines, so either avoid undercuts, or make your mold seam to account for them. And, details like scales on the vertical surfaces could potentially male it hard to remove a hard master from a hard mold. 2. Make a mold box (open on top and bottom). I make mine out of wood. I suppose Leggos would work, but you will need something sturdy, not cardboard. Keep in mind you want to leave about ¾” space between the model and the edge of the mold. 3. Embed the master in sculptor’s clay. As in any two part mold, try to split the two sides as evenly as possible and make both sides as diametric as you can. The more equal in volume the two sides have, the more successful it will be. And, of course, make the clay surface even and smooth. Make spherical keys. You can use a marble for this, but don’t leave the marble imbedded in the clay — depress the marble and remove it, leaving the half crater. The gate and vents can be drilled later. 4. Prepare the resin. Measure out enough resin for BOTH sides of the mold. Make note of how much resin you use. Mix in the filler. I use industrial talc, or calcite. In a pinch I have also used POP, but I can’t attest to its durability. You need to mix in enough filler to make it as thick as you can, but thin enough so it can still be poured. The filler will reduce how much the resin shrinks and even delay the shrinking a little bit. Mix thoroughly with the drill. The resin will absorb the filler. Keep adding filler until you arrive at the thick but pourable consistency. It usually takes me a bout 1:1 per volume of resin to filler. Essentially, what you will have when you are finished is something like Bondo, but smoother. Let the mixture set for about 10 min to release air bubbles. Then mix it up a little bit more by hand and pour half of the mixture into a separate container. Add hardener according to the amount of RESIN in your mixture. Add ONLY the correct amount of hardener. There is NO need to compensate for the extra volume. In fact, I tend to add little less than the instructions recommend. Mix it up with a mixing stick, or something disposable, unless you want the hassle of cleaning mixer paddle. 5. Pour the first half of the mold. As you would with any other two-part mold, start with a thin layer to make sure everything is covered well, the keys are filled and the edges where the clay meets the model are covered with no bubbles. Pour the rest of the mixture for the first half into to mold box. Here is where you have to PAY ATTENTION. Test the surface of the mixture every couple of minutes. It will gel, then start to heat up. This will take about twice as long as it would without the filler. 6. As soon as it is hard enough, and I mean JUST as soon, (it will be solid, but still in a flexible, gel state) mix the hardener into the rest of the resin mixture, turn the mold box over, remove the clay. It should come out very easily, as the warm resin will loosen it up. Apply the Vaseline to the exposed mold surface paying special attention to the keys, and pour the second half of the mixture the same way you did the first part. Work quickly. 7. The heat from the first half will cause the second half to cure faster than the first half did. PAY ATTENTION. As soon as the second half has gelled, remove the mold box, place the two halves between the scraps of wood and apply the C clamps. For an 8”X6”X2” mold I use 3-4 clamps. Apply even pressure, as the resin shrinks slightly, it will want to come apart, but if you hold it together, the two sides will shrink evenly. Pay attention to the corners and ends as they will tend to separate. You might have to retighten the clamps every few minutes as the resin shrinks. This should take about 10 min. 8. Once the two sides are hard (they still might be hot) remove the clamps and take a sharp object (a butter knife or a wood chisel will work) and “split” the two sides apart. You will probably not be able to simply pull them apart with your hands. It is really important to not let the two sides completely cool together, or you may never get them apart. Also, the spherical keys are important here, if your keys have boxed edges, they will bind and break off. Most of the shrinking occures after the resin is hard, so you don't want the model to be in the way. Remove the model. Reapply Vaseline and clamp the two sides back together and let them cure completely. 9. Once the mold is cool, It should come aprt easily. Drill out your gate. You can add vents with a hacksaw blade. Shoot a couple of tests as needed to get it right. 10. Now, take the mold you just made and lay it face-up on a flat, level surface. Make a dam around it (I just use sculptors clay for this) and pour a mold template with RTV silicon. Once cured, make another mixture of resin/filler pour into the two sides of the template, wait until the “gel” state, remove from the template, lubricate the faces of the mold, clamp together, wait until hard but still hot, split open, reapply Vaseline, clamp back together until completely hard (like in steps 7 and . Repeat until you have as many molds as you need for production. One interesting thing I have found is that the copies wok better than the original mold. I think the fact that the resin cures on the silicon rather than the enamel paint of the model make it less prone to sticking. Either way, it is still a good idea to lubricate the mold prior to shooting. With this template, you can pour clear epoxy molds, Clear polyester resin molds (as long as you don’t mind the 5-6% shrinkage) or any other material as long as it will remain flexible long enough to pull it out of the template and clamp it together while it finishes curing. I assume it is also possible to make a poly resin copy of a POP mold or evan an aluminum mold, I havent tried, but I think it would work. I use the same principles to make resin templates for copying 2-part RTV molds with 100% success. I hope this helps. Stephen Ashcraft
-

Vac-Master 5O Http://www.makelure.com/store/p/1056-Vac-Master-50.aspx
robalo01 replied to fordtech5's topic in Soft Plastics
I will right something up and start a new post. -
Vac-Master 5O Http://www.makelure.com/store/p/1056-Vac-Master-50.aspx
robalo01 replied to fordtech5's topic in Soft Plastics
I have learned how to make 2-part injection molds with Resin. It is tedioues, but results are good (as good as your master) and much cheaper than this product. -
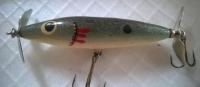
I am looking for a 5" Grub injections mold to use as a trailer en Buck tail jigs like the one in the attacher pic. It is not too complicated, but all the molds I see are for the Kalin type bass grub. On the one i am looking for the body is about 1/3rd of the overall length of the bait and the tail is a long, narrow "C".
-
I used to buy 4X7 bags from Bear's. I see he isnlt stocking them now. What is the best alternative for 1000 4X7 bags?
-
I have stated before and still believe thinner wire does NOT attract more fish, at least not through vibration. Thinner wire moves around more and absorbs the vibration. Stiffer wire transmits the vibration and sends a stronger signal. The same way a fiberglass rod that is more flexible doesn't equal more sensitity. A stiffer, lighter rod "shakes" less, but transmits more vibration to your hand. Stephen
-
Hi, Does anybody know who makes a Ringed Lizard Mold -- about 6-7"? Stephen
-
It is clear polyester resin. I have made 100's of moldes with the stuff, although now I prefer using the normal poliester resin loaded with talk -- It is harder, warps less and is cheaper. I tis possible to make injection molds with the stuff. The problem you run into is that it shrinks. So if you pour on side, wait for it to harden, then pour the other side your two halves won't match. To solve this problem, I first make the injection mold with another material, Plaster or Bondo, then I copy the mold with RTV silicon. When I pour the poliester, wait for it to harden just enough to remove the two halves from their negatives, I lubricate the faces with Vaseline and clamp together so they shrink together. This way you can make dozens of copies.
-
I always make a negative of any mold I make (soft negative to a hard mold, hard negative to a soft mold). You can then very easily replicate the mold for higher production or for back-UPS.
-
Which is the oldest site?
-
I am generally satisfied with Do-it quality considering the price, but I do keep an eye out for the older moldes and, depending on the style, I am willing to pay more for an older model in good condition than a new one. They have a better finish, the sprue is wider and the hinge pin goes al the way through both sides. I have 3-4 discontinued molds that I really like too. I think it has become more a collecting hobby than a necesity, but it is something I like to od.
-
I have about 50 do-it molds, jig and sinker. I have bought about half of them on eBay. I have found that the green and red handled ones have a better finish (some of the old blue ones too). It seems they are made with better materials and have a smoother finish. Anyone else notice this?
-
I have used both. The silicone sticks to the mold better and lasts longer. The putty eventually falls out. Both work.
-
Imho, I have been wholesaling fishing tackle for 20 years. 2 suggestions: 1) keep color selection to 8-10. Have more models, fewer colors. Then offer feature colors every month or two. 2) show the actual product in its retail packaging. Don't give away samples or do consignment. Onw more thing-- take stock to sell on the spot. One advantage you try to exploit over national brands is immediate fulfillment. Good luck.
-
Nope. Hagens has brass and tons of finishes.
-
Best price is hagens, but idk how much you save if only buying 100's.

