


jigginpig
-
Posts
262 -
Joined
-
Last visited
-
Days Won
7
Content Type
Profiles
Articles
TU Classifieds
Glossary
Website Links
Forums
Gallery
Store
Everything posted by jigginpig
-
Balsa is like any other wood, it varies in density. You can generally expect it will be extremely soft, soft enough to dent easily with a fingernail. But there are variations in natural materials and you really must examine each piece to ensure uniformity. Even in a single board there are denser portions and less dense portions. In my experience the softer balsa is lighter in color and has a less pronounced grain pattern. I think the capillaries in the wood are what contribute to the extra strength of some sections. SS
-
 Well, the tits look great.
 -
I am not sure there is anything easier than Dick Nite. Just store it correctly. I think an HPLV spray gun could get the Etex airborne, if it was thinned all to hell, as even bed liner and acoustical foam can be sprayed, but I am not sure you would like the result. Even assuming the result was acceptable, I immagine there would be a lot of waste. Thin the Extex with DA, brush it on, bust bubbles with a heat gun, and turn the bait. Or, like you said, use auto clear. SS
-
Hey Carolinamike, have you tried mixing blue and red? Might be a dumb question, but thought I would ask. Sorry for the threadjack. SS
-
Greetings heroic tackle crafting community. I have been working with balsa a lot lately. I am sure all are aware of the plusses and minuses associated with the material. I have been thinking about ways of impregnating the wood with resin or some such similar material as a way to shore it up... I understand that in WWII the US government was experimenting with engineered wood as a substitute for metal in some applications. They succeeded in producing a wood that was impregnated with plastic through and through, and I believe that this was known as rockwood. A late luthier named Greg Curbow utilized this substance in his bass guitars. Reading the thread on sealing with superglue, it was mentioned how well capillary action wicks the glue into balsa. I was wondering if anyone had tried impregnating balsa with chemicals prior to usage, ie before it is worked or carved. I don't think the density would be severely affected but the increased strength and impact resistance would be significant. My thought was vacuum sealing a thin sealer of some sort into a block of balsa. I know that some chemicals will not cure without gas exchange, but if the wood was left to draw the chemical, it could then be removed to cure. There are also some chemicals that would cure regardless of gas exchange, and these could of course cure in situ. Thoughts? SS
-

Foiled Photofinished Yellow Perch On A Spoon
jigginpig commented on Big Bass Man's gallery image in Hard Baits
 Dang, that thing should be MURDER on the 'eyes. Smallie candy too!
 -
http://www.tackleunderground.com/community/topic/21821-lure-rotisserie/ SS
-
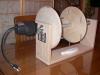
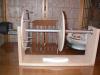
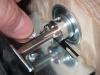
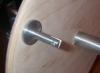
Those are door stops, the sort that screw into baseboards to prevent the doorknob from contacting the wall. I got them from Ace Hardware. They were a dull brass color and rather uneven in places. I cut the knob off the end and chucked up the bottom piece in my drillpress. I reshaped the piece slightly and cleaned them up a bit before I put them on the board. The end piece that sets in the bearing and the male drive link are also door stops. They were critical to my interpretation of the mechanism. Thanks for the nice words... I am a hack, but I am getting better. Cheers! SS
-
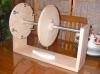
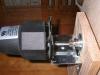
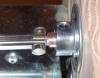
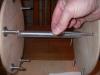
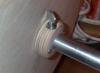
Hey crew- I would like to post my new lure turner. I have got a lot of very useful information from the site, and it would please me greatly to be able to contribute something of value! I have had the motor for some while, but it was configured for single bait duty. I am hoping to go into small scale production to supplement my meager income as a student, thus multiple bait capacity (in this instance six) is in order, for what I would assume are obvious reasons. Full view from left hand side Full view from right hand side Full view center Motor and drive shaft linkage assembly Detail of drive shaft linkage. There is a nail that has been cut off and pinned in place with a rare Earth (neodymium) magnet that secures the original rotisserie Bar-B-Que drive shaft to the drying wheel. I slotted the original drive shaft and drilled a hole perpendicular to the slot to accommodate the nail, which serves the purpose as a cotter pin. Pic of nail and magnet in situ on drive linkage This is where the line tie of the bait will connect with the wheel. I like this feature, and think it may be unique. The line tie sits inside the slit cut into the end of a door-stop. I cut off the door stop to length, and slotted it with the Dremel tool. A nail and magnet will secure it as with the drive shaft. I like this feature, as it allows a very rigid coupling of bait to wheel. Detail of the traction spring assembly. This is a simple eye-hook and spring system. This is a very simple, but very useful feature. It allows the device to function with multiple lengths and weights of baits by facilitating lateral movement of the right hand wheel on it's drive shaft. By adjusting tension on the set screw in the threaded insert, greater or lesser length between the individual wheels may be achieved. This is handy for going from a batch of seven inch baits to a batch of ten inch baits, and so forth. I am confident that you crafty people will find way of improving on this design. I am pleased with the results of my plans, and am gratified to report that the construction of this device was 100% without error or mishap. This is cause for celebration in my ham-fisted universe! Cheers! Shaun
-
A good thought! If nothing else, it would be a great way to use any excess epoxy mixed for topcoats and not used! Cheers! Shaun
-
 More like "for the smallies!" Good stuff! Jigginpig
 -
wow, those are really nice, esp. the paint. super!
-
anybody out there grind up the foam in a coffee grinder or spice mill and add that to the resin instead of the micro balloons? might work...
-
like i said up front, i dont think i am going to be dropping any bombs on the world of bait design, but i am still very much in R&D, so who knows! i just wanted a bit of advice and perspective from talented bait makers like you all. i am leaning toward just spilling my guts, when or if i get going with this. i guess if i DID have a good idea, at least it would be proof of concept if anyone else made a bait similar. i cant make up my mind if i would even care. i am still just trying to get up to speed on this, so sorry if i came off the wrong way. Shaun
-
thanks for bringing me up to speed boss. yours is the first rude response I have seen on this site. I will try not to get too butt-hurt about it, maybe you are having a rough day? Cheers!
-
I am playing arround with the notion of putting ALL of my designs on the web as public knowledge. Any one who wanted to copy my designs would be free to do so, but I would be the known source of the designs. In addition, I would be cleared of the stigma of having put forth yet another variation on the well trod theme of swimbait. do you think that this is ill advised? or do you think that by being open people would respond favorably to it and I would see more reward than harm? I am not sure that people have taken this aproach before, and am looking for opinions from forum members.
-
I am working on some ideas for some "new-ish" swimbait designs. Let's say up front that I like my ideas, and think well of them. But I am not sure that they in any way qualify as origional. I am not the type of guy that is prone to having an inflated ego. I know that any advancements I may be able to suggest will be of modest scale, and perhaps almost purely derivitave of prior designs. This is not due to my desire to copy the work of others, but because the designs of others have so much colored my perception of what it is that constitutes a "swimbait"... I am playing arround with the notion of putting ALL of my designs on the web as public knowledge. Any one who wanted to copy my designs would be free to do so, but I would be the known source of the designs. In addition, I would be cleared of the stigma of having put forth yet another variation on the well trod theme of swimbait. I guess the only way any of this would matter is that I am wanting to sell my baits for a profit. If any of you scholarly bass anglers and bait builders in the forum wish to weigh in on this, please do so. I am very much interseted in anything suggestions you may have... Shaun
-
if you are doing wood baits, there are scale tips for woodburners that decoy and fine art fishcarvers use... bit o' time there, though. Shaun
-
 that is superb! first bait?! gimmie a break, thats amazing. GREAT JOB!!
 -
Andre Moore is a tool. There is nothing new under the sun. I use the bait in all sizes and most colors. That is not to say that he has any new ideas, just that of the A. V. type baits, I happen to like his version the best. Face it, R. I. does make sick baits. But Andre is a tool. Without his help from Japan, Andre would have little to offer than adolescent humor... Dirty Sanches? that anyone would name a color after a feces moustache is telling of that persons psyche.
-
Anyone Wanna See Cool Looking Baits ? Check Out Lure Art Finland
jigginpig replied to solarfall's topic in Hard Baits
these are crazy! -
I like the idea very much. In fact, I had a very similar idea for a tail. the issue I can see for the articulated joint is one of friction. If the channel for the pin is large enough, there would be less friction, as contact between the two components of the hinge would be limited to the back of the joint. But the contact would extend vertically, and so have a large surface area. (this is assuming a good alignment in the joint components is acheived) the beauty of the screw eye and pin joint is the fact that there is very little friction, due to the fact that there is limited contact. The drawback is that it is as ugly as home made soap. If you are making a bait that is meant for steady retreive, ala Tripple Trout, less friction is a must! Dead stick baits, or very realistic baits like the Rago Tool or 3:16 wakebaits, require a better looking joint to complete the illusion of realisism. Of course these high end lures are great swimmers as well, but they look dead nuts when at rest. Joints are an area of particular interest to the amateur builder, and the more we work on the issue the better we will be able to ply our craft! Good work, keep it up. Shaun
-
that looks a lot like an area of the house many people call the "kitchen" Walleyeman, are you single, or just have a very, very cool spouse? Hookemhard, i am in Denver, CO. not sure if i made a sports reference by mistake, i was talking about the War Eagle brand spinnerbaits. these are wire wrapped. or am i now totally confused? my idea is that out of chaos comes inspiration. so my area is an homage to entropy and the forces of random chance... oh, who am i kidding. i am a slob.
-
another idea- could paint eye directly onto the bait, then just stick on the bumper. etex over that...
-
this is another idea. you can find little clear self adhesive soft-ish plastic feet for the bottom of items to be placed on hard surfaces, these come on a sheet of wax paper. you could trace the diameter onto another sheet of paper, then paint the eye detail in the circle you have traced. after dry, place the foot sticky side down onto the paint, and cut it out. these would be glued onto the bait. nice thing is they are tuff and flexi. theye are a bit large, but i think pike, musky, LMB, stripers, lake trout etc. lures would work well with this method. i have not tried it yet, let me know if you do how it works. Shaun


