


A-Mac
-
Posts
833 -
Joined
-
Last visited
-
Days Won
6


A-Mac's Achievements
")


-
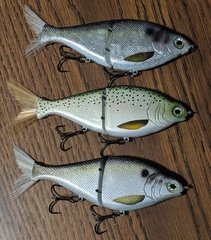 Glide-style swimbait. Lures are ~7" long to end of tail. Lure bodies are made from PVC.
© Aaron McAlexander Lures
-

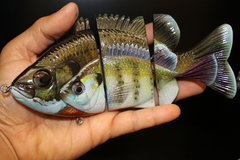
Bluegills SwimbaitIMG_2082.JPG
A-Mac commented on Yohan Custom Lures's gallery image in Best Homemade Hardbait
 Wicked paint and very cool idea!
 -
I'm a big fan of gorilla glue! You get a good amount for the cost and the bottle punctures the bottle. I normally put some in a small syringe and inject it into my pilot hole with a needle. Normally, the needle and syringe will be shot after a few uses, but for what I use it for, it works well. As far as durability, I haven't had any issues. If you are gluing in wood, it will work very well. With resin, it's ok, but not any worse than other glues. A slightly larger pilot hole in resin (in comparison to the eye screw) tends to hold better. Hope this helps!
-
15-30 seconds? Even to go from shooting black or a dark color back to white? I feel like I need nearly dissemble a brush to do go from dark back to light colors. If you can do this in 15-30 seconds, then I've spent several years doing it all wrong. What are you dipping your brush in? Is this still effective with pearls (Createx pearl blue is always a bear to clean from a brush)?
-
I agree entirely. Beautiful bait. I've made gills before with the large dorsal fin protruding above the caudal area and the swim action was certainly hindered. I removed the fin from that section and it began to swim beautifully. You can get by with a very low profile fin, but it doesn't take much to impact the action. That would be my first crack at trying to fix your problem anyway. Good luck!
-
Thanks guys. Yeah, I was interested in trying out there 60D hardness resin on a couple tool pieces. However, I was interested in trying it out on perhaps trying to make a 2-part crankbait (similar to an injection molded crankbait), only using resin instead. It was recommended, but not a necessity with the alumilite 60D resin
-
Would you mind posting a picture or a video of it swimming? This may help us figure out what is causing this. I've made a few gill designs myself, but don't recall the top portion wobbling. Lol, it actually sounds like a cool action if the rest of the lure is still swimming.
-
I use the Elmers spray adhesive. It's less tacky than 3m, and much cheaper too. I tend to spray a light mist on, then can use the mesh about a minute later (allow it to no longer be wet, but tacky still). I tend to get about 2 applications before needing to start the respray process over. After a certain amount of use, I pitch the mesh material and start with a new piece.
-
lol. I suppose this suggests that this is not a popular method.
-
Cool video. Thanks for sharing!
-
Hey everyone! Has anyone tried vacuum casting? I've seen this mentioned on the alumilite website, but I'm not quite sure how they actually do it. Is this done before mixing resins, after mixing, or after pouring into the mold. What type of products do people use to do this?
-
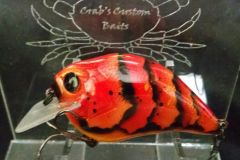 I really dig this pattern. I keep trying to figure out just how you shot the black, which makes it all the more impressive.
 -
I like using the Gorilla super glue. I haven't had any issues. I dab a little on the threads and also use a syring to inject some in the cavity. I do similar to what Dave suggests. I drill a pilot hole first, just smaller than the threads. I then drill a hole slightly larger than the threads of the eyescrew approximately half the distance of the first hole.
-
I do pour in lips too. I drill 2 small holes at the base of the lip to allow the resin to flow through. That sucker isn't coming out. Square bill (and coffin) style lips are a little tougher to remove from the mold. I recently completed one. The lure comes out nicely, but I'm afraid that the edges of the lip may reduce the life of the mold. It's much more difficult to remove than a round lip. Bass100 is right, you need to make sure your lips are all cut identical for it to work in the mold. I keep my "master" lip that I used to make the mold with as my stencil for sketching new ones. Even better, if you can punch the design in on a computer (even standard Paint can work well), you can print these out on either label sheet or on standard paper (use a light coat of spray adhesive) and adhere to the lip material (circuit board in my case). This drastically helps with consistency.
-
I used to use a sharpie fine point, but be sure to shoot createx clear over it. Some clear coats will make these run. My favorite method is creating a decal of my signature. I snap a picture of my signature, upload it into microsoft word, crop the image some, and shrink it down to the size I need. After I make the size I need, copy and paste it about 400 times to fill up a sheet, then print it out on clear label paper. Note, I still shoot clear over the label, but it's tough to fit McAlexander on a 1.5" lure with a sharpie :-)