


Unagi
-
Posts
24 -
Joined
-
Last visited
Content Type
Profiles
Articles
TU Classifieds
Glossary
Website Links
Forums
Gallery
Store
Everything posted by Unagi
-
If i understand the question correctly, the toaster oven will heat them up just fine. They will be plenty hot and you'll have more than enough time to grab one from the toaster oven and dip the jig before it cools. You're leaving the cookie sheet (or whatever vessel) in the oven with the rest of the jigs and only taking one out individually to paint. Play with the toaster oven temp to control how thick a layer of powder you want to stick. We have all heated a jig too hot and ended up with a 1/4" of powder sticking to the jig head. I have found that the right temp is when the powder looks a bit "rough/bumpy" after it dries and before I cure the jig head. The oven cure will make the powder flow and it will be perfectly smooth when done. Hope this helps, -Paul
-
As mentioned, heat the unpainted jigs in bulk in a toaster oven. Have a pail of water on the floor or bench next to your work area. As soon as you dip the jig in the powder drop into the pail of water to instantly cure the paint. Once they're all painted retrieve the painted jigs from their water bath and hang them to cure in your oven. The water bath is faster than trying to hang them when they're still warm and "wet".
-
Back in the day (now I feel old....) when I was making a ton of baits, I was always in search of the "perfect" combination. Head design, wire gauge, wire form angles, arm lengths, and hook pattern. Head design was limited to what I could find through Do-It and Hilts (dating myself again). As a broke graduate student, custom design was not part of the program. I eventually settled on piano wire forms. They were thinner (.035 & .032) and vibrated more freely. I wasn't concerned that they tarnished over time given that I never sold anything. Though I experimented with arm length, and the form geometry it seemed that I always returned to a compact design with standard angles. The last variable was the hook choice. I remember making a ton of spinnerbaits and cleverly thought that lost fish would be a thing of the past because I found 6/0 spinnerbait hooks!! Never thought to make just a few to try first...... I think I poured at least 200, custom painted all of them with 4 layers of powder, epoxied the entire head to encapsulate the perfectly positioned 3-D eyes, then hand tied the most gorgeous skirts. Well the first cast immediately revealed they they didn't run true, surprise surprise. And bending them to resemble the x-wing fighters from Star Wars still didn't correct the "torque roll" from the grossly overweight 6/0 hook. Note to self....... use smaller hooks!! As described in my first post, I found that regular gauge Owner offset worm hooks worked perfectly. The compact gap coupled with a fine wire eliminated torque roll. And despite the smaller gap, the fine wire penetrated with little effort which yielded incredible hooking success. A pet peeve has always been hook or wire movement in the head after a catching a few fish. Changing the lead alloy certainly improved the spinnerbait durability but the embedding offset hook design resulted in a rock solid lure. Hope this helps, -Paul Shibata
-
For years I have been using Owner offset worm hooks (regular shank 5301-141) in my spinnerbaits. The fine wire, hooks fish when they breathe on the baits. And the smaller gap coupled with the thin wire gauge results in almost zero torque. The baits run true even at the slowest speeds. I selected the offset hooks instead of the straight shank to help anchor the hooks inside the lead heads. Despite our best efforts, successful hook penetration is diminished significantly given that the entire wire frame acts as a spring and dampens the force applied. And for the same reasons, fish are unlikely to open the gap or deform the hook. Subsequently I have elected to run finer gauge hooks on all of my spinnerbaits with great success.
-
Nemire Ripper http://nemirefishing.com/ Older company that catered to the redfish crowd.
-
Have been experimenting with a variety of rattles for years now. Though I am not a hunter, i have tried every brass cartridge available including some of the smaller rifle calibers. Sealing them was easy enough if you inserted the bb's or glass beads then used a ball bearing which was just slightly larger than the opening which required a bit of tapping to persuade it into position. The ball bearing would easily bulge the brass sealing the hole nicely. The volume and frequency of the sounds could be "tuned" by manipulating; (1) brass caliber, (2) rattle materials (steel, copper, glass etc.) (3) quantity of rattles inside the chamber. Making the rattle was the easy part, attaching it now became a bit of a challenge. My objective was to create a "better" rattle for flipping jigs which proved to be quite difficult. I tried everything from soldering, wire wrap, epoxy etc. None were sufficiently durable and aesthetically pleasing. In the end I switched to making aluminium rattles. Though less than ideal as a material considering the softness of the metal, aluminium rattles were easier to make and attach. They proved to be still loud as heck and quite effective. I used 3/8" to 1/2" aluminium tube which is readily available at hobby stores. The tubing came in 36" lengths. Start by crimping one end with diagonal cutters as if you wanted to cut a small piece off. With one end now "sealed" drop in a few bb's and then cut the rattle with the diagonal pliers "trapping" the bb's between the crimped ends. I would make the rattle approximately 1.5" long. Now further crimp one end "flat" which will enable you to drill a hole through the crimped aluminium. The hook of the jig could be inserted through this hole like a trailer hook and with the addition of a piece of vinyl or plastic tubing, the rattle would swing freely and stay attached. You could also cut the crimped ends to a point which would facilitate the insertion of the rattle into a plastic chunk. Push the rattle lengthwise in a plastic chunk starting at the end where the tails/legs start. push the rattle through the plastic chunk body ending shy of the nose of the chunk. If inserted properly, the hole in the crimped aluminium would be perfectly positioned as if you were going to nose hook the plastic chunk in the same way that you would for pork. Hope this helps!
-
Please contact me. I'll take a bunch. Thanks, fishsbc (at) sympatico (dot) ca
-
The ebay picture may be somewhat deceiving. I think that the hook depicted may be an "EWG" variety from Mustad, specifically the 91768BLN. If this is the case and you need a 5/0 hook I have found the 28 degree hook manufactured by Hookerz to be both superior in quality and much better value.
-
Hey Mark, Weather is a lot nicer than a couple of weeks ago at BassTalk eh ! -Paul Shibata
-
Complete pours and sharp barbs were a constant frustration. Hours of research and ensuing alloy manipulation still yielded inconsistent results. Venting was also tried with varied success. In the end a $5 auto-ignite butane torch remedied all problems. As described, the heat capacity of the wire form and hook shank are the culprits which are causing your problems. After laying in your wire forms and hooks, a quick shot of the butane flame over the cavity and especially the collar will ensure complete pours every time. A quick shot is exactly that, don't try to weld anything!!! You will destroy the temper and have the lead exploding out of the pour hole. Wave the flame a couple of times over the described areas. The delay caused by this step will soon become insignificant as you find your rhythm. Furthermore 1 re-pour more than compensates for the time spent preheating your hooks. Hope this helps, -Paul
-
Spectacular tutorial. Clearly this has become a true passion. Thank you for sharing your knowledge
-
Real Pros in Ontario has a really nice big bait mold. http://www.luremaking.com/catalogue/catalogue-index/catalogue-items/molds/muskie_spinnerbait_mold.htm
-
Please pardon my ignorance, I am not sure what you are asking. The mold is symmetrical and as such I have performed identical modifications to both sides. The aluminium plugs were counter bored using a forstener bit yielding a flat bottomed hole. The hole did not continue through the entire mold. I hope this helps. -Paul
-
It is a relatively easy modification and can be done with a few basic tools including a drill press. I modified the Do-It Shad head Jig (SHB-5-A) to accept 0.25" eyes using appropriate sized round aluminium stock readily available at hobby stores. Once the mold is drilled, high temp glue will secure the aluminium plugs. Good Luck, -Paul
-
Jigmaster, thanks for the heads up on the Cast Industries site. I am forever cross referencing hooks in the search for the perfect jig, spinnerbait etc. Upon closer examination I think that the hook that "Cast" uses is the Gamakastu straight eye Shiner hook (5141). The shape of the shiner hook including the crossed eye could easily be incorporated into a custom mold yielding the appearance of an EWG style jig, furthermore the Pro weedless football jig has a similarly forged hook. The other tell tale is the size selection offering which includes 6/0 hooks which is otherwise rare for Gamakatsu flipping jig hooks which often top out at 4/0. http://www.gamakatsu.com/catalog/shiner.htm Good luck, Paul Shibata
-
Basskat, Not to contradict widowmaker, but the rattles that you are searching for are still being made by the Woodies Rattle Company. I do remember that Arkie distributed the same product. I've attached the link below. Good luck, Paul Shibata http://www.woodiesrattlers.com/html/versatile_rattles.html
-
Hi DJ, I ran accross the following colour at Barlows, in the bleeding bait section within the silicone skirt area. Your post requested red flake, this is speckled red dye on a chartreuse skirt pad. Hope it helps. Regards Paul Shibata http://www.barlowstackle.com/acb/showdetl.cfm?&DID=6&User_ID=2903567&st=5682&st2=62096116&st3=66973472&Product_ID=2445&CATID=65
-
Madbass, The Gamakatsu 614, 60degree, flat eye, light wire jig hook is a model that I have not used before and as such I am not certain if it is forged or not. However I have looked at the hook online (Barlow's Heavy jig hook section) as well as a few other sites and it does not appear to be forged. Furthermore as identified this is a light wire hook intended for lighter line situations and would probably be strong enough, particularly since Gamakatsu uses a resaonably high carbon content in their steel. regards, Paul Shibata
-
The characteristic that you describe is "forging". This is the process of compressing a material (generally steel) resulting in an increased dimension or thickness to maximize the resistance to bending in a particular plane. Many hooks are forged to reduce the liklihood that the hook will open up either upon the initial hookset or during the fight. Most companies will identify if a particular hook is forged but as you pointed out a forged hook is easily distinguished by the flattened sides of the wire along the length of the hook. As previously mentioned a forged hook is less likely to open up, however this increased strength in one plane identifies the associated inherent weakness resulting from thinner material in the opposite direction. Please excuse the long winded answer, and more to the point certain Gamakatsu hooks are forged, particularly the saltwater versions but some of the lighter wire jig hooks are not. Regards, Paul Shibata
-
Flats was right on, I've done precisely what you are proposing with great success. However I've found that the figure 8 shaped ss used for hook hangers in plastic body baits a better alternative to the sinker eyes. The brass in my humble opinion was too soft and was easily bent. This method enables you to use conventional worm hooks in almost any mold. This technique also facilitates longer shanks without increasing the gap, ideal for tube jigs. regards, Paul
-
Thanks CJ, I assume you're referring to either Devcon (5min or 30min) or Flex Coat, do you have a personal preference? Should the spinnerbait placed on a rotating dryer while the epoxy cures? Thanking you in advance, Unagi
-
Greetings, I've just purchased the new Do-It ultra minnow head spinnerbait mold and it facilitaes the use of the 3D self adhesive eyes. I am pretty certain that I read that you can clear coat over them with powder paint and prior to baking, the results were pretty good. However after I cooked them, they became opaque and neither the iris colour nor the pupil colour were visible. I baked at 300F for about 20 minutes. Your recommendations would be greatly appreciated. Thanks, Unagi
-
Though relatively straight forward, (1) size the tip, (2) glue the tip (3) wrap to finish, The following is the method that I've used with success: Firstly if the blank (graphite?) was broken, ensure that the blank tip is sanded smooth eliminating any jagged edges. I use 1000 grit Silicon Carbide sand paper for this purpose. Inspect the graphite tip to ensure that there isn't any "hairline" longitudinal fractures and sometimes in an overabundance of caution I will apply a drop of low viscosity superglue to the tip to "seal" the graphite. Allow the glue to dry before proceeding. Size the tip ensuring a snug fit. The tip sizes vary in 1/128" so try to purchase the right sized tip. The tip should slide on without resistance, too tight and there will be insufficient room for the glue, too loose and the sentivity may be reduced or worse yet a second breakage may occur. Slide the tip top on and align its position with the other guides by "sighting" down the guides like a rifle. Before removing the tip guide, mark the aligned postion on the guide and blank with a piece of chalk. Personally I've always used hot glue sticks instead of the true tip top cement and have not realized any difference. Using an Xacto blade, cut slivers of the cold glue stick filling most of the tube cavity on the tip top guide. While holding the ring of the guide heat the tube with a lighter until the glue melts. Almost all guides are made from stainless which does not conduct heat very well so this process is not as potentially uncomfortable as it sounds. With the glue melted, immediatley slide the tip onto the blank and align the tip using the chalk marks. Lastly sight down the blank and fine tune the tip guides alignment. By heating the tube instead of using a glue gun, the residual heat from the tip guide will slow down the curing of the glue enabling you to make minor adjsutments before the glue freezes. If you're not satisfied with the alignment, reheat the tube with a lighter carefully and try again. Lastly trim off any glue that oozed out and finish the guide with the appropriate wrap. Good Luck!! Sorry for the long winded answer, it is both simpler and faster than I described. Unagi - FishSBC
-
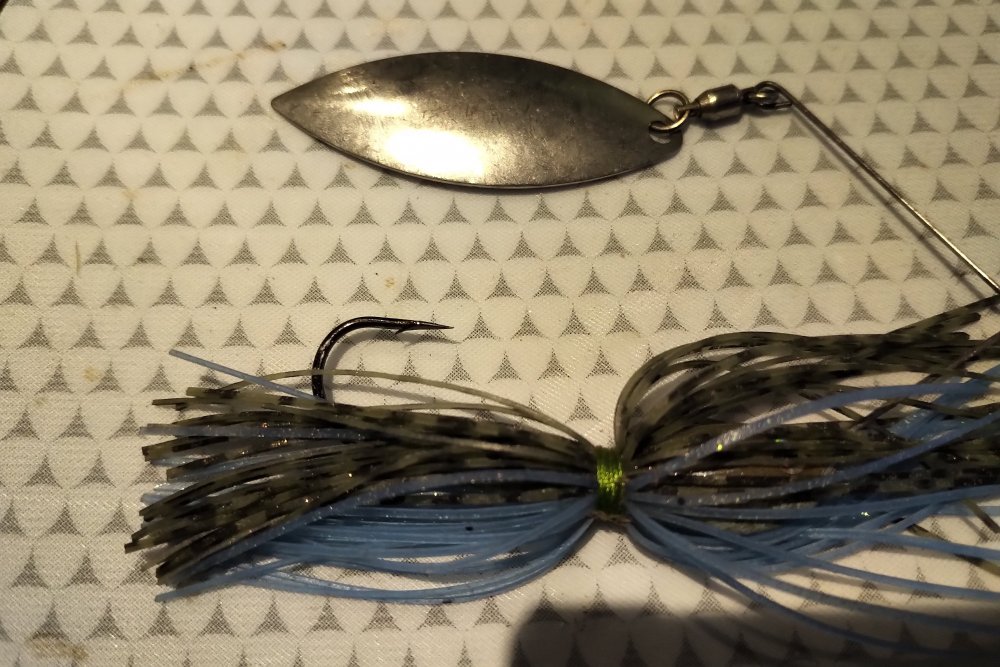
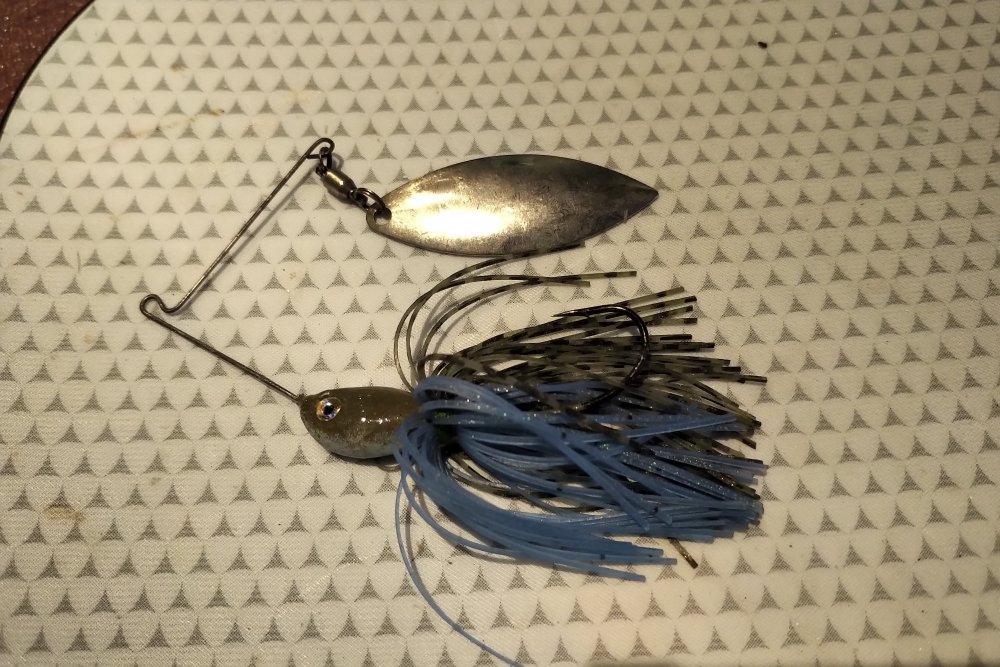
Newbie here and a virgin "poster". Firstly thanks to all, the site is extremely informative and has had a positive impact on my creations. As a function of courtesy I've read through as many post regaring wire forms and have searched the site several times, however my specific dilemma has yet to be discussed. Your input would be greatly appreciated. The wire form eventually lossens inside the spinnerbait head resulting in a small yet noticeable amount of "play". Understandably, a wire form bait has a limited life expectancy, and given the costs of producing your own, the life may be short yet clearly still a bargain and enjoyable aswell. I've experienced varying durability in my baits yet a good hard day (15+ fish) seems to be the average. The variables specific to my question are as follows; 1) Do-it Molds either style "H" (3/8 -1/2) or new "Ultra Minnow" (3/8 - 1/2) 2) R-bend stainlesss - .040" 3) Mustad 32608N 6/0 Firstly I've experimented with the lead alloy, commencing with almost pure lead, and adding tire weights to increase hardness. Not overly scientific though, merely threw in a few. I've added a few "kinks" to the form inside the head to eliminate the straight wire to hook attachment and also to adjust both the length of the first arm and the hook length. Though I am not complaing but much like many of you, we work so hard on finding the best components, creatively blending skirts strands and going Picasso on the paint process, I would like to maximize the durability factor. Any comments would be greatly appreciated. Thanking you in advance, FishSBC.


