


Chuck Young
-
Posts
906 -
Joined
-
Last visited
-
Days Won
45
Content Type
Profiles
Articles
TU Classifieds
Glossary
Website Links
Forums
Gallery
Store
Everything posted by Chuck Young
-
 Here is the automatic fisherman triggered
 -
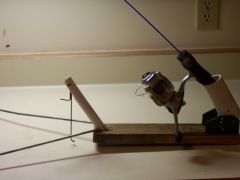
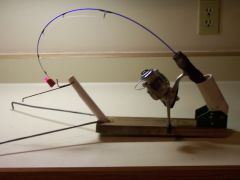 This is my version of an automatic fisherman. This one is set with the rod tip inserted onto a "load point" and the line draped ove a V on the end of the trigger. When the line is pulled the trigger is pulled down and the rod tip springs up. The hook is then set and the flag on the end of the rod pulses up and down with every movement of the fish.
 -
I don't know what you're fishing for, but I make an automatic fisherman for ice fishing. It uses an ice fishing jig rod with a lot of spring to it. There is a rod holder on the rear of the base that holds the rod at about 45 deg. Yhe front of the base has a hinged piece of plastic pipe with a trigger attached. The trigger is a piece 1/16" of copper coated steel welding wire that pivots on the end of the plastic pipe. About 1-1/2" up from the pivot is a 90 degree bend cut off at about 1".This is the loading point. The rest of the wire extends about 5-6" and has a V bend in the end of it. This is the trigger. The rod is placed in the holder. The tip of the rod is bent over and the tip is inserted onto the loading point. DO NOT LEAN OVER THE ROD WHEN IT IS LOADED. The line is let out to depth with bait or a jig. The line is then laid ove the V on the trigger and the reel is closed. When the fish takes the line the trigger is pulled and the rod springs up, setting the hook. I don't see any reason why you couldn't adapt it for use on a boat as a second rod... If it is legal in your area. I will post a pic in the gallery.
-
So far I have had no problem spraying directly onto a clean clear blank. If you did you could always spray the blank with Createx transparent base. Adding the base to your paint will make it more transparent if needed. Adding reducer allows you to spray thin controlled coats at a lower pressure. Pearls and fluorescents can also be used to a limited degree on ghost patterns.
-
Craw colors blended from createx paints T lite grey: t med grey (4), T black (7) , T base (6) reducer to taste T tan: T white (4), T dk brown (1), T base (5), reduce T t dark brown: T dk brown(1), T base (1), reduce T olive: T canary yellow (30), T deep blue (1), T dk brown (3) Green pumpkin: T dk brown (5), T leaf green (20), P(earl) lime green (2) cream: O(paque) white (7), O yellow (1) Cray oj: O yellow (10), T red (1) rusty brown: T dk brown (8 ), T red (5), T white (1) calico grey: O white (20), T deep blue (3), T gray: (5) :
-
Try experimenting on some pieces of plastic pipe. To get those colors you will probably have to layer. . out my craw pattern called "grassy knoll in the gallery ( a recent post) . Try this is the recipe: Opaque white base, wicked gold. The rest are very thin layers - Transparent olive (30 drops T canary yellow - 1 dr T deep blue - 3dr T dk brown) , Next spatter with wicked detail moss, then add T leaf green, Deepen with candy black (1 drop T black, 2 dr T base (no pigment), reducer) on top. This gives you a grassy green with a lot of depth to it. You may have to custom blend your own colors. When you do this keep track of the # of drops of each color added spray a spot on an address label, write the recipe on the label as well. this can then be stuck on a jar if you have some left over. I keep another copy as well in a notebook with all the pearls on one page, transparent on another. etc. Check out the cookbook thread for lure patterns and color recipes. I will post a few craw colors there.
-
I second that emotion. Thanks for checking.
-
I am in the process of making my first swimbait, a 4" crappie, out of birch. My process was to cut center line slots in the top and bottom, leaving about 7/16" in the center. Then i rough carved. Next I ran ss wire hinges through top and bottom and epoxied them in. At this point, the final carving and sanding were done. I sealed the bait with superglue. This left a slot in the whole length of the bottom of the bait a little less than 1/8" thick (Marathon saw blades are thin). I squashed some solder with a pair of vise grips and friction fit it into the slots. This allowed me to move the weights around, tweak the amount and water test for proper action, sink rate, and attitude. Finaly, they were glued in and the gap was filled with epoxy and micro-balloons. I don't know how others do it. But this seemed like a great way to tweak a bait. I am very happy with the results.
-
These things look like a lot of fun. Makes me wish we had some muskies here in NH. We have a few pike - they might work on them. Have you considered using roller bearing swivels on the plopper?
-
I bought a kit once to repair this kind of problem. The kit is called clean lens and costs $4.99. Inside the kit you will find special cleaning solution, cleaning cloths, and a clear viscous liquid with a brush applicator. If this sounds like the solution to your problem... think again. The finish dries very wavy and it does not get rid of all the scratches either. My polarized clip ons ended up worse than they started. My advice - buy a new pair of glasses. Unless they are your LUCKY glasses. In that case just look through the scratches.
-
I just want to say thanks to all sponsors, creators, moderators, participants, etc on this site. Here you can find several answers to just about any question. Discussions are (usually) carried out in a fun and positive manner. Many of the questions often asked are already covered - so you don't even have to ask! All in all, this is one incredible resource.
-
Rats! A 3d printer --- Some people have all the cool toys..
-
Thanks or as Jimmy would say: "ratatatatatat!"
-
What model # does he sell it as? I must be thinking of a different bait.
-
Do you mean the 1.2 or 1.5 megabass s crank? I checked Get Bit, Predator, lure color studios, M&R, Dakota lakes tackle, Bustin Bass. No joy. If you find them, let me know where. I would love to paint some of those.
-
That's some gooood salsa! Is that how they make it in the bay area?
-
The red party cups are made of polystyrene (#6) plastic. The little mixing cups (like the ones on nyquil bottles) are made of polypropylene (#5 in the triangle). It makes a difference. Try switching to a different plastic container.
-
I am looking for advise on Art Resin. It has some really nice features that seem ideal for lures. I have read many posts on this subject and visited the Art Resin site as well. This is what I know ont the plus side: uv protection, ultra clear, really brings out the color, long work time. This is what I know on the minus side: thin, needs 2 coats, needs lure turner, 3 day cure time. What am I missing? Any useful hints to minimize the negatives? How much protection is needed from dust?
-
There are some great video tutorials on you tube. Some of them are from members TU. I guess its ok to mention them by name. I am fairly new to this site myself. Check out videos by "Dakota lakes tackle" and"lure me in".
-
I use mostly pearls, irridescent, and transparent colors from createx and their wicked line. wicked detail sepia is indispensable. Fluorescent sunburst and yellow are also good for base coats or the bottom of many baits.
-
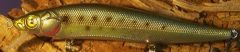
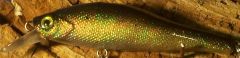 Special scape finish on this shiner.
 -
 Free hand spots, yellow, red, violet and blue highlights, and extra shine on this one.
 -
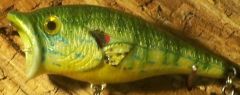 I do this one from ghost to dark.
 -
 This one looks great with a yellow bucktail siwash.
 -
 My first attempt at a spanish mackerel. the scale detail is purposefully finer.

