School Master
-
Posts
131 -
Joined
-
Last visited
-
Days Won
2
Content Type
Profiles
Articles
TU Classifieds
Glossary
Website Links
Forums
Gallery
Store
Everything posted by School Master
-
I've been eyeing it for a while. It's not cheap that's for sure. I will probably get some eventually. I've been wanting something like this and have failed with many other options.
-
That's easy... Just let me fish with them for about an hour. I have an extreme un-natural talent for removing paint jobs. On a serious note, I have a Harbor Freight airbrush style sand blaster. It was pretty cheap so it might be worth a shot with the soda. Solvents do wacky things to plastic baits.
-
I have a craft store problem as well. I go to a club ever Wednesday night to try and help, but sometimes I fall off the wagon hard. Paint, eyes, feathers, stencils, thread, silicone.... the list goes on. The craft store is one of my favorite tackle stores.
-
Anyone ever have issues with getting the decal to stick? Just went and bought some "decal set" solution. Hoping that helps. Once I soak the decal and apply, I'm having all sorts of issues with wrinkles and the edges not adhering to the bait.
-
That's insane Flipper!! Is that a "white" decal or clear? I like the look of clear decals over foil. Been thinking about trying some because of my lack of airbrush skills!
-
Very nice! I've been messing around a lot with resin lately. My biggest problem is tiny bubbles that no mater what I try I get them on the top side of my mold. Do you have the same issue?
-
Not for resale, I sell to dealers and customers though if you want some to fish with.
-
I've got a couple and it's an awesome creature bait. Get it, you will like it.
-
I'm very interested. Sounds like a fun project. My biggest question is how do you paint it? Using silicone dye doesn't seem like it would cut it for me. Would lureworks plastic paint work?
-
Yes it stiffens the plastic. I assume you are throwing it with a tube head shoved inside it if you are trying to duplicate a bitsy tube. Salt adds weight to the tube so you can cast it farther, it stiffens the plastic so your tails cut much much better and it also gives them a much better spiral action on the fall. That's why I said salt is a must. There is a reason why EVERY popular tube has salt in it.
-
For sure mix, mix, then mix it again. Throw some nuts or ball bearings in if you have a gallon. Use a cordless drill and a paint mixer if you have 5 gallons. Once you get it mixed, you need to add salt as well. Salt is crucial in tubes. Only lure I will say this for.
-
Regular RTV will work for a prototype mold. I make a master out of clay or wood etc. Then I will glue it down to a board and build a box around it. Pour silicone over the entire thing and use a xacto to cut it out. I say it works for a proto because it will not last long at all. It's good enough to get a couple proto lead heads out for testing. If it works then I will take the time and make a 2 cavity mold out of something that will take the heat. I'm actually working on one right now. I will throw up some pictures soon to describe the process a bit better.
-
 Dude.... That is unreal
 -
I could be pouring too fast. I will throw up a picture when I get home.
-
I've been messing around with making some hardbaits out of resin. I am using Featherlite, and my problem is bubbles. I made a master, then made a RTV mold of that master. I get little bubbles in the top of the bait every time. Any chance anyone has a tip to help me get better baits out of the mold?
-
Munkin, How does that titanium leader work? The titanium wire in the Gamakatsu heads are just flat out the best.
-
If you want it permanent, JB weld works very well. Mix some up and use a toothpick to fill in the weedguard slot. Then you can sand it flush in no time. I've done this to lots of molds I want to use a wire keeper instead of a standard collar.
-
I'm hoping it does because I just powdered 10 tungsten flipping weights. On the surface it appears to be the same durability as lead. But I really don't know until the ice melts.
-
Brand new to making hardbaits. I actually just got done with the process you are talking about last week. I made my mold so it molds my lip and my hook hangers before I pour. The hook ties work awesome, no drilling same spot every time. However the lip I kind of wish I would have left out. The major issue is tiny amounts of the foam will seep into the lip slot and get on the lip and it is VERY difficult to get off without scratching the lip. If you are planning on making baits for you box and don't care about a scratch or two I would say go ahead. If flaws on your bait will bother you like it does me, then leave it out. Cutting the slot is a different story, I'm still experimenting.
-
Very easy, I just rough cut with a Dremel cut off wheel and filed it down to my pattern.
-
I got mine last week. Very nice stuff. Great whitish beige clear (if that makes sense) like you see all the big boys have.

-
I'm also very new to airbrushing. I bought the Harbor Freight gun last year and I wish I would have bought a nicer one every time I use it. I'm sure 50% of my problems are operator error, but you get what you pay for. I've painted a fair amount of baits with it and don't get me wrong it does the job, but there has to be better options. The biggest complaint is the siphon feed cups. They fall off all the time don't work that well etc. If you were painting a large amount with one color, it would actually work pretty well. For small stuff like I do, I can't wait to get a gravity feed. Maybe with someone with a lot more knowledge can chime in about the quality of the gun, but I'm going to junk it and upgrade as soon as I can.
-
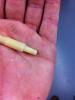
I wouldn't want to sell these either. For sure not high quality enough to sell on your website. I wouldn't want to make 1,000 either. It's just something I came up with so I figured I'd pass it along. I guess most people probably don't have access to a drill press. I've always been in and around shops so I take it for granted. Truth be told I actually made mine on a mill too, so they are much more accurate but I showed the drill press because I figured much more people could get to one.
-
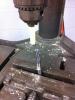
OK here is what I do to make reduced diameter pins. The nice thing about this process is once you get it dialed in and tightened down, you can repeat the process many times in just a few minutes. You do need a couple special tools, but for the most part people have access to them somehow. You need a drill press and an end mill (see picture 1). End mills are used in CNC machines mostly, but they can be purchased many places. Any size will work and you really don't need a high quality one either. 1) Clamp you end mill in a vice on the drill press table. I clamp mine at a slight angle so the mill can have clean access to the pin. 2) Put your pin or just a piece of 1/8" rod in the drill chuck and tighten. I use the pins so they fit perfect but sometimes it can be hard to grab the bigger head of the pin. 3) Lower your press down and adjust the vice to approximately where you want it. It's a good idea to mark the bottom of your rod with a 1/16" mark so you can get it pretty close. 4) Clamp your vice down, turn your drill press on and simply lower the pin onto the end mill. To start maybe you want to do a couple test pieces to get it dialed in correctly. Once you get it where you want it, you can simply mark the depth on the pin and repeat the process. You can easily do 50 in a couple minutes. I did this years ago and I'm still using the ones I have. I quickly did one on a much larger plastic rod just to show an example everyone could see. It works very well, it's fairly simple and it makes a much better product than the ole plumbers tape and drill bit. Please feel free to ask more questions, I hope this helps.
-
I feel like 2 bucks a piece is pretty expensive for a simple operation like that. I don't want to undercut you Cadman, do you mind if I share my process?