JimP
-
Posts
183 -
Joined
-
Last visited
-
Days Won
2
Content Type
Profiles
Articles
TU Classifieds
Glossary
Website Links
Forums
Gallery
Store
Everything posted by JimP
-
Eastman03: I'm no pro by a long shot but I'll give you my two cents worth to get the ball rolling. Others will chime in and you will get several opinions that are all valid. You then will pick and choose to fit your style and available tools. Do all of you drilling and slotting while the wooden lure blank is still in the rectangular shape then saw the shape and contour the body. Gorilla Glue is great stuff, but its going to foam out into the hook hangers and lip slot. Its not too bad to remove if you catch it just right in the cure process, show up late and its a mess. Also consider epoxy and maybe Bondo as final filler. Thin wooden splines sized to fit the wire slots and inserted at the time you apply whatever glue you decide to use are easy to trim and sand flush. Table saw with as thin a blade as you can find. You can also get very thin slotting saws for use with drill presses. Be careful and come up with a safe jig to hold everything while you body parts are a safe distance away. Have fun!
-
rufthumbs: Balsa is one of the woods that vary a lot in weight, even within the same board. Most of the lure manufactures select the denser woods. You might like to compare different boards from the available selection next time you buy Balsa lumber. Heavier is denser. Linked below is a chart that list the properties of many domestic and imported lumbers. Might be handy to compare different woods. An example the listed density of Balsa is 6.8 to 12.5 lb/cu ft and that is quite a spread. Meaning that the amount of ballast that is correct for one lure might need a different amount of weight to perform the same with an identically shaped lure body. Western Red cedar is 21.5 lb/cu ft and will be much more consistent board to board. Something to look over and think about. Here is the link Wood Physical Properties
-
rufthumbs: Being a curious cat, if I had the lure you mention I would have to take a knife and cut it open to see whats going on inside. You will probably answer your question. Let us know as well.
-
Musky: I use CS Seal-Coat as a top coat. Thinned at least 10% with water and sprayed with an airbrush. Takes about three coats but they dry fast. Recoat in 30 minutes or so depending on humidity and temperature. It will be dry to the touch in less than an hour. Then if you can let it cure for a day before you drag it over rocks and limbs. It is very clear and I have seen no yellowing on lures that are three years old.
-
If you don't like signing up for an email you could follow "Custom Baits Magazine" on Face Book and you will get the same notification when a new edition comes out. Thanks again Chuy for another great edition of "Custom Baits Magazine". Chuy is giving a lot and asking for nothing in return, he deserves the support of this group.
-
 Great looking finish, can you share details. I'd like that with a dark back and white belly.
 -
I know its not for the production guys, and I have not tried anything co2. Just asking the question has anyone tried co2 tanks to power an air brush? Been reading about the use of small portable tanks filled with co2 that are being used to power nail guns by woodworkers and by the off road guys to refill tires and run tools. They are often using paintball gun tanks and adding a regulator made for co2 and getting hundreds of nail gun shots from a single refill that cost about $4.00. Ok where does this fit into this fourm? If it can power a nail gun then an airbrush should be a low usage tool and should last a long time, I think. The parts don't seem too expensive, regulator $35-$100, paintball tanks $20- $50 and $4 to fill the tanks. I think you need two tanks an keep a full one on hand. The portability enjoyed by the woodworkers and the off road guys is not a feature for most lure makers since we are mostly a shop bound bunch but other advantages could be - No noise of compression. No chance of moisture or oil contamination. No compressor to buy or replace, or maybe used less often. And just a cool tool that has other uses.
-
I was able to produce a crude model. Without the correct tooling I could not get the gap correct to allow an lure eyelet to pass between the wires. I was using .024 stainless steel wire which is very close to your design. Keep us posted, an interesting project.
-
You might have something there. Am I correct that it takes a bit of force to open the loose end eyelet enough to insert the lure along with about three changes in direction to allow the lure to freely hang in the eyelet? That looks good, great use of wire, one inch at a time. I might try to hand make one and get back with you.
-
Dave: I think shorter should be a goal for the design Along with a streamline design to reduce snagging debris. Also a variety of sizes are in order. The smallest that will match the line your fishing with should be used. The tensile strength of the wire will dictate wire diameter I guess.
-
Opps: Guys don't use the word "p o p" in your post. The software will convert it to "Plaster of Paris" as in line five of the original post. To "Plaster of Paris" on a split ring is not a good idea.
-
Mark: Consider this, Take a finished lure minus the eyelet split ring. Attach a small Duo-Lock snap to your line and connect to the lure and test. I think the Duo-Lock snap on your line connected directly to the eyelet should give about the same weight/action as a split ring attached to your line. That should give you quick change for testing several lures and if everything checks out just pop on a split rings and it ready to fish. If it works we might never attach a split ring to the lure, just a Duo-Lock snap or something like one tied directly to our line. From the chart I found on line even the smallest snap is rated for 20#. That surprised me! Maybe Vodkaman can invent a smaller version of the Duo-Lock or something like one.
-
rwfleming: I might have a lip very close to that on hand. If you want the bait to preform the same as it did before your bridge accident your replacement lip will need to be very close to the broken original. If someone has not fixed your problem, get back with me with the information below and I'm sure we can get you back to fishing with your old friend. If I have one I'll send it to you free-bee, you can cover shipping. Click on this link to see a lure that is close to the one you want to fix. https://dl.dropboxusercontent.com/u/1924904/IMG_1550.jpg You will need to know: width at the top width at the widest part at the bottom overall length thickness material, in this case lexan Good luck, we all hate to loose a bait with years of history like that.
-
A couple of years ago I purchased a Peak vise based on a head to head review. The Peak vise has been a solid performer with no problems and has been used a lot with no problems. This link is a couple of years old and since that time the Peak Vise retail price has inflated slightly past the $150 mark. Shop around, you can still find them at times sub $150. Here is a link to that vise review: http://www.flyfishohio.com/Vise%20Review%201/Fly_Tying_Vise_Shoot-Out.htm
-
A very light coating of oil will ease the pin removal a lot. Just a couple of drop in a paper towel, drag the pin through.
-
You might be in good shape right now, do a test shoot on a sealed lure you dont care about and look for "fish eye" or other hints that something is different. The acrylic paints are pretty forgiving, some top coats however are very demanding on air quality.
-
If you start seeing "fish eyes" (little dots where the paint does not level normally) then you have oil contamination. If you don't see a problem then follow BobP's suggestion about getting an oil trap, might also consider a water trap. You can buy them built in one unit at any auto parts store, Harbor Freight ect. A minute at 30 psi, I bet you are good to go. You might also bleed off the air pressure then drain any condensation from the tank if there is any. there should be a drain valve somewhere on the bottom of the tank. Keep on spraying!
-
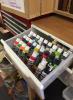
Whackett: This is not the template you were looking for but a concept that can be used on any drawer. I too had a problem locating a bottle of paint that I knew was there. My storage was a long narrow shelf that held the bottles about three deep. My solution was an insert made of wood to fit drawers on a big box store storage cabinet. What would make a good storage cabinet for paint? I wanted to see most of the label to identify the opaque from the transparents and the other types as well as the various colors within the groups. Just putting the bottles into a drawer was a disaster. Thay all look the same, and to lay them on their sides would go bad when a lid didn't snap fully closed. I saw a kitchen spice rack that held the bottles at about a 45 degree angle. Problem solved except for modifiction to fit the paint bottles that we are so used to in our craft. Most of the bottles we work with are about the same size.(35mm dia X 100mm tall) or (1 3/8" dia X 3 7/8" tall) Get your self one piece of wood, 2X4 pine is what I used, that is as wide as your drawer and 1 1/2" X 1 1/2" square. Then saw at a 45 degree angle with a band saw if you can so you end up with two triangles. One triangle is used to start the run as is, it just supports the base of the first row of bottles. All additional triangles will have grove where the bottles will lay. The ideal if you have one would be a 1 3/8' Forstner drill bit. they cut with the rim of the bit and are capable of drilling the edge of a board. You could also sand, carve, rout or what ever your tools dictate. Long story short, every 1 3/8 of an inch cut a dip into the top edge of the triangle, repeat on other boards for as many rows as needed. You also need a piece of very thin ply wood or even foam core sheet or cardboard would work. Cut the sheet to fit snug into the bottome of the drawer. The plain triangle gets glued or double stick taped to the front of the drawer, angle facing towards the back. Next, one of the grooved triangles is attached and spaced back 3/4" from the base of the first one. Keep adding grooved triangles until the drawer is full. I got four rows in a drawer that was 12 1/4" X 11 1/2" with some left over space in the back. Total storge for 36 bottles located in a square foot and every label is partly visiable. The larger bulk type bottles will still need other storage but this cleared up some clutter in my shop, hope it helps you.
-
Jonister: Just a bit more feed back about coloring lures. I have read about poor color fast qualities of some of the "Copic" pens. Some colors are worse than others. The Copic pens are an alcohol base tint, neither bad or good just saying. I have had good luck with "Sharpies." At a local craft store I found a set of "Sharpie" Neons. The color of the "Neons" is very intense. A set of five colors for less than one Copic pen. The "Sharpies" are inexpensive, several tip (nibs) sizes and shapes for different amounts of detail and you can get them almost anywhere. Try some of each and you will know in short order what works for you. Here is a link to the Sharpie Neon pens. http://www.amazon.com/Sharpie-Point-Permanent-Markers-Colored/dp/B00BEYXGNY/ref=sr_1_1?ie=UTF8&qid=1442017090&sr=8-1&keywords=sharpie+neon
-
I have used many types of "markers" and pens to add highlights and tints to hair, feathers and bodies on flies and fly rod poppers with out problem. I will not say they are a bright as the day I made them but still look good to me after a couple of seasons. You can always retouch anything that fades any time you want to. Just make sure the markers have the word "Permanent" somewhere in the label.
-
Here you go: The link below is to a multi page PDF file that has the info you seek. It should download a copy to you download directory. https://dl.dropboxusercontent.com/u/1924904/blankextend.pdf
-
Chad: You are adding microballoon additives to you resin to either extend the resin or to lighten the resin. If the purpose is to lighten the density of the resin then don't add plaster of paris. It will make your final lures heavier than the pure resin. As a pure resin extender POP should work fine. However, if you are looking for a microballoon replacement that will reduce density you can try a paint additive that is used to give the sand texture to paint. In the old days it really was sand now days it seems to be some sort of very light weight ground up plastic. The label does not mention the actual material but it is very light weight and I have used it for your stated purpose. The box I have is called "Homax Paint Texture Sand" The link below is for "Stone" and many work or not, look for "Sand." Here is an Amazon link for more details. The link is selling "Heavy Finish," my experience was with "Medium Finish." If you can find the "Fine Finish" I think I'd try that first. http://www.amazon.com/Homax-8452-10-Ounce-Stone-Texture/dp/B009WQ35WS/ref=sr_1_5?ie=UTF8&qid=1441425088&sr=8-5&keywords=paint+texture+additive As you can see several companies manufacture the same stuff, check a local hardware store paint department and you should find what you need. Good luck!
-
Franko: McMaster-Carr has the G-10 circuit board material and US Plastic has Lexan (polycarb) as well as several sources on Amazon.
-
There was a lot of chatter about how color fastness of the Copic pens. Some colors were more durable than others which is always the case. Some reports claim some colors faded in just a couple of days. Cost seems high, almost $6 each when bought in multi packs and even more individually. For a fraction of an ounce of ink. Only printer ink is more expensive. I'm sure they have their place, just too expensive for general lure painting.