eastman03
-
Posts
462 -
Joined
-
Last visited
-
Days Won
28
Content Type
Profiles
Articles
TU Classifieds
Glossary
Website Links
Forums
Gallery
Store
Everything posted by eastman03
-
 Beautiful! Very nice work.
 -
 Hard maple nose heavy jigging lure. Sadly not the lure I wanted to enter into the competition as I was called out to work way up north. But here is one that I made for myself anyway!
 -
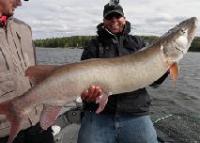
That looked like tough conditions. He caught some good ones! Gussy won last week! Huge win for the Canadian. I mark a waypoint every time I see him on lake of the woods. Haha.
- 1 reply
-
- 1
-

-
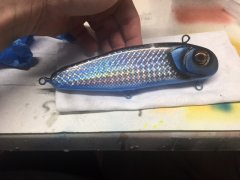
Normally I would paint some opaque white over the black, then paint the color that I want because you are right, the black really dulls the color down. That can be hard if you are free hand painting, but it works well with stencils or mesh for scales. Just make sure the stencil/mesh is pressed down on the lure, and doesn't move. Sometimes I will put a layer of epoxy (or something like polycrylic) over the black, then paint my next layers. That way if you mess up, you can wipe the paint off without affecting the previous layer.
-
Welcome here, I agree 100% with what Bob said. Those are the three main choices overall, and they can all work really well, but they each have their own issues too. I think it would sell out all over the bait making community if you could come up with a insanely tough, dippable, easy to store, very clear, non yellowing clear coat. UV cure might suit your needs, especially if you are making relatively small lures. Lots of positive reviews overall. Search the form for previous threads, there have been a few good discussions on clear coats. But like we have said, it too has some downfalls. Learn how to use it and get good at it before making any judgements.
-
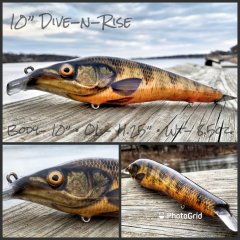
 Very sick! That thing would get deep!
 -

E46601A7-2D17-4090-AD5E-DAEA31391628.jpeg
eastman03 commented on fishordie79's gallery image in Hard Baits
 Very nice!
 -
@Hillbilly voodoo I had similar problems with the tail I made (as far as the action). I was hoping for a wide thumping action at slow speeds, which was ok when I softened the plastic, but then the tail "straightened out" and loses action sometimes. So when I made a stiffer plastic version, it stayed straight, but had to be reeled in pretty fast to get the desired action. I'm sure this is an issue for almost every paddle tail, and it was originally why i got into making my own (also because they are super expensive). A popular Muskie lure I liked had soft really good action paddle tails, then they changed their formula or maybe manufacturer and the plastic was stiffer and more durable, but the action at slow speeds disappeared. Anyway, I'm sure there is a way to balance the durability with the desired action. I might try pouring the bottom of the tail/shaft with harder plastic, then softer plastic on the top half. See if i can keep the paddle down, but still have a wide waggle. Did you use any softener or hardener in the plastic you used for your tail?
-
It has been a pretty mild winter other than the two weeks of -30. So, if this nicer weather holds, most of the ice will be out mid-april ish. but we are a gigantic north to south province, so up north it is still -25, and the ice roads are still have semi-trucks rolling on them. The north often has ice right up into mid-may. I'm on my way to Thompson tomorrow for work, so maybe I'll get a day of lake trout fishing in some time!
-
That sounds amazing Big Epp. I might be able to take the 18" extension off my ice auger soon! lol
-
Let us know if you try that method and how it goes fern. I’m hopefully going to give it a try sometime too. thanks for the idea @Cami!
-
I believe the rounded head would be the step one that he mentioned. Tap and screw a cap onto the one end of the pipe. And make sure that the cap is "domed" or concave, to round off the head end. I imagine getting the correct thickness would require some trial and error. It looks pretty good in the pictures though!
-
Wow, interesting idea! I wish i could see the video. In the original tackle underground post, the materials you mention a rod thin enough not to ruin the tube. What is that for? I'm sure it would make more sense if I would see the video. You just lube up the PVC pipe, pour in some hot plastic and keep it rotating. Then cool it carefully, and remove it. Or does the other rod go inside the PVC to make like a mould? Either way, thanks for the links!
-
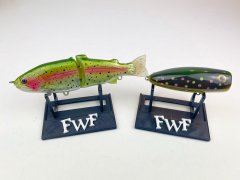
Looks pretty good! I wish I could say if it will work, very hard to tell until it is finally in it's plastic form. I think this would have some good thump to it.
-
That is a great question! I hope you can get answers from some of the people here! I'm curious as well. I attempted to make myself a 10" tube by making my own "rod" out of wood, and sealed it. I dipped it into a pyrex container, but like you said, that is like 4-5" max. I tried to pour the plastic over it to see if that would flow enough to give it a coat, but it was a hilarious embarrassing mess haha. It was mostly just a little side project that I was working on because I have some extra plastic. I'm curious to know if there is a easy alternative to do this!
-
I totally agree Hillbilly! Watching people fish for years of guiding at the lodge it doesn't take long to figure out who will catch the most fish out of a group. Even out of some of the really experienced anglers (mostly for bass) that were in my boat, some of them spent more time getting snagged, casting into weeds instead of around, or changing colors or flakes or getting a tube jig with a slightly different hue. Meanwhile, the other guy was hauling them in with the same color the whole time. Standing while fishing. Casting accuracy. Good polarized glasses. Not drinking booze. Paying attention to cadence/rhythm of a successful cast. I was the one who picked the spots, but there was only so much I could help some of the fishermen with, especially the ones that refused to take my advice lol. I don't know why some guests feel the need to do that, I'm not always right by any stretch, but I was on the water for over 100 days in a row lol. After fishing/guiding for that many years, color of lure is very low on my priority list (the Winnipeg river where I'm at isn't super clear, so it may have more of a factor in other places). Action/placement/cadence/contrasting patterns/depth are all probably things I think about before color. Nowwww that being said, as a lure maker, the lures I make for myself are like 2 colors haha. The ones I sell have much more painstaking detail, because lets be honest, it helps catch a fisherman's eye.
-
Tell ya what @Vodkaman I will get Bass Pro Shops to give me that job, getting footage or lures and catches for every single one in their collection. It would be a tough job, but I'm willing to do it just to help out the fellow angler. lol
-
I do the same as AZ. I use a west systems epoxy (mostly cured in about 15 min), so I have some working time to do a few lures at once. Polycarbonate does not like to stick to anything (not exactly sure what your lips are made of), so it is wise to at least scuff up the surface that's going to be glued. I usually go one step further and drill two holes and screw the lip in with the epoxy. Probably not necessary, but on a large lipped musky lure that often smashes into rocks, I'll give the lip all the support I can. I will have them all lined up and test fitted with the screws before applying epoxy, so it makes that stage pretty easy. Just apply the epoxy and screw them in, wipe off any epoxy that leaked out. Because it's happened where I think I've aligned the lip with epoxy perfectly without any pins, and by the time it cured, the lip had moved to the side a bit. lol Dang it. I'm no pro either by any stretch. Just letting ya know what I often do on my musky lures.
-
Then I might stand a chance. For every entry, you have to have 100 comments in the forum. Lol. entries are look cool already! I’ll have to come up with something.
-
@Vodkaman wellll only about three days in and half the entries didn't read the rules lol why is that so hard? haha
-
Very painfully lol. Welcome here by the way. I've made a few large poppers and have struggled to do this easily. Easiest way I found is to "hog" out the bulk of the material carefully with a drill bit (don't go too deep, also I've only made giant poppers, so this may not be necessary at all), then i have a few ball burrs for my Dremel tool that I shape the cup with. It is slow, but I've only made a few poppers, so it worked. To get the final sanding and shape, I ended up gluing some sand paper to a golf ball, which I glued a drill bit into, so I could turn the ball with my hand held drill haha. Actually worked pretty good to smooth it out (it was a giant giant popper, so a golf ball was about the right circumference). Solarbaits makes a similar tool at the 6 minute mark in the video here. Same idea to get the cup sanded. Wouldn't be too hard to make yourself a tool Lure making | The popper - YouTube
-
Makes sense. My tail is quite thick through the shaft. I think I can add a bit to my mould and thin that section out to let it kick. looks good!
-
I like where your head is at! It seems that the line tie looks a bit high on the bait? Unless this was very nose heavy, it seems like you would be getting alot of lift when reeling it in. But i could be wrong. I made a hybrid (no spinner) paddle tail last year, and I was disappointed with the action in the tail. in hindsight, i should have somehow done more testing on shape to get the action i wanted before making a mold. That being said, I'm not really sure how to test before making a mold and just going for it. The tail i made was large, but there was so much water resistance that it kinda gets bent straight back and doesn't thump at slow speeds. Your tail looks like it should work, it seems to be a fine line. When i made the plastic soft, it would thump, but also bend back and straight at higher speeds. When i made the plastic harder, i had to reel super fast to get it to thump. Honestly that was my first endeavor into soft plastics, so i'm not much help. Just thought I'd share what I went through. Keep us updated how this works for you!
-
Welcome here first of all! I would suggest stick with one clear coat for a while. Give it a chance. Typically, you will have die hard fans in each camp - epoxy, UV, and KBS (moisture cured urethane i believe). That isn't a bad thing, it's a great thing. That means that a lot of lure makers have had great success with their product. But I've heard bad things about each one too, they ALL have a learning curve. Don't give up on one before getting over that learning curve and then making a decision. You may see someone dipping KBS and think it's brain dead simple, only to have a 100$ jar of KBS get hard on you after the first use (storage issues from what i gather). Anyway, this isn't a rant on any particular clear coat, I don't have experience with Alumilite UV (epoxy guy myself), but i know guys that do. And they love it. So there must be a way to get the desired result through some practice. You will get tons and tons of comments from different platforms saying ditch KBS use epoxy, or ditch epoxy use UV etc... Like i said, learn how to use what you have, and then decide for your self. Check out Engineered angler on youtube, he has videos outlining how to use UV clear coat products. ( Also, from what I've heard Solarez is similar, but much more smelly and generally less liked. lol there I gave an opinion as well )
-
I’ve made a few mega poppers for edict fishing. I’ve had some nice fish explode on it. Stupid Muskies like to explode on the popper, but often end up hitting it away. Lol. Crazy for me to think a catfish would go for one! Those are cool fish. anyway. They were a pretty standard popper shape, 10” long. About 1.25” diameter popper mouth. I’ll have to see what info I have on them. I added enough ballast roughly in the middle to make it sit slightly nose up in the water. With t he hook hanger just under the water when sitting. it made a pretty good pop when I give it a hard quick jerk. I’ll have to get more info once I go to the shop.